Every composite I’ve ever built starts with the same problem: getting the light to behave. Not the light I’ll paint in later, but the light already baked into the source photographs. If a background is too evenly lit, the subject floats. If the ground has no weight, the whole scene reads as fake within seconds. I’ve spent entire afternoons hunting down that imbalance with manual selections, luminosity masks, and adjustment layers stacked six deep. So when I sat down with this tutorial by Aaron Nace over at PHLEARN, I wasn’t expecting a revolution. I was expecting a shortcut. What I got was something more useful: a workflow that handles the grunt work so I can spend more time thinking about the image.
Watch the full tutorial on YouTube
The tutorial focuses on the AI masking tools inside Adobe Camera Raw, and it’s part of Nace’s ten-day AI editing series. The approach is deceptively simple: open Camera Raw as a filter on a Smart Object, let the AI do the heavy detection work, then use those masks to push exposure and shadow values in specific zones. What makes it genuinely useful for compositing isn’t the automation itself. It’s that the masks are editable, combinable, and non-destructive. That combination is what changes the math.
Step 1: Convert Your Layer to a Smart Object
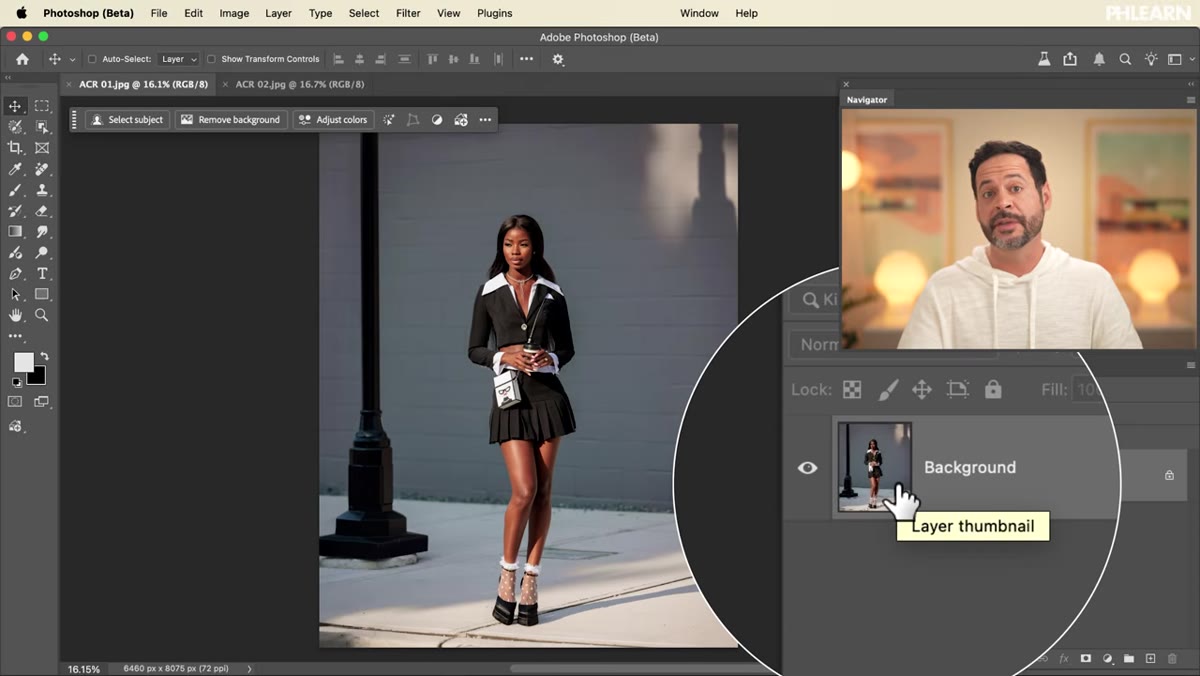 Converting background layer to Smart Object via Filter menu
Before anything else, right-click your background layer and convert it to a Smart Object, or go to Filter and choose “Convert for Smart Filters.” This step is non-negotiable if you want to keep the Camera Raw filter editable after the fact. As a Smart Object, your layer retains all the raw processing data, meaning you can double-click back into Camera Raw at any point and adjust the masks without rebuilding them from scratch. In composite work, that revisability is everything. Lighting decisions you make in pass one almost always need revision once the full scene is assembled.
Converting background layer to Smart Object via Filter menu
Before anything else, right-click your background layer and convert it to a Smart Object, or go to Filter and choose “Convert for Smart Filters.” This step is non-negotiable if you want to keep the Camera Raw filter editable after the fact. As a Smart Object, your layer retains all the raw processing data, meaning you can double-click back into Camera Raw at any point and adjust the masks without rebuilding them from scratch. In composite work, that revisability is everything. Lighting decisions you make in pass one almost always need revision once the full scene is assembled.
Step 2: Open the Camera Raw Filter
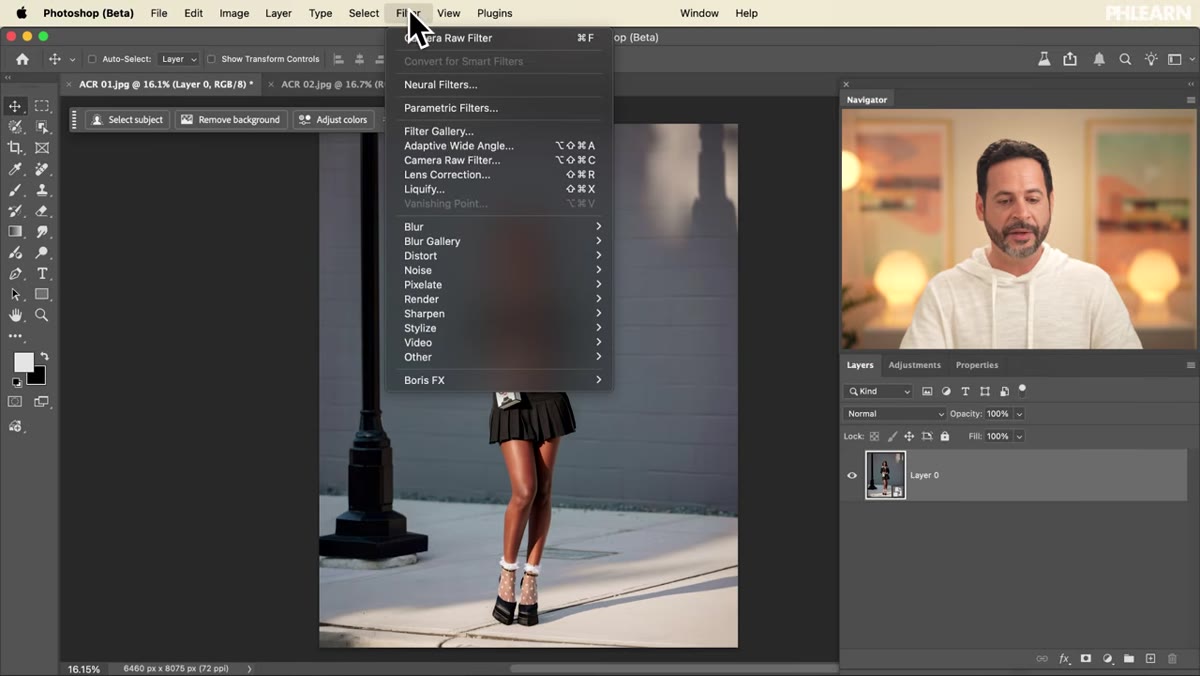 Camera Raw filter interface open in Photoshop
With your Smart Object selected, go to Filter and choose “Camera Raw Filter.” The full ACR interface opens. Even if you’re working with a JPEG rather than a raw file, every tool in this panel is available to you. Head to the right-hand side of the interface and locate the masking panel. This is where the AI-powered tools live, and it’s the engine for everything that follows in this workflow.
Camera Raw filter interface open in Photoshop
With your Smart Object selected, go to Filter and choose “Camera Raw Filter.” The full ACR interface opens. Even if you’re working with a JPEG rather than a raw file, every tool in this panel is available to you. Head to the right-hand side of the interface and locate the masking panel. This is where the AI-powered tools live, and it’s the engine for everything that follows in this workflow.
Step 3: Use “Select Background” for Your First Mask
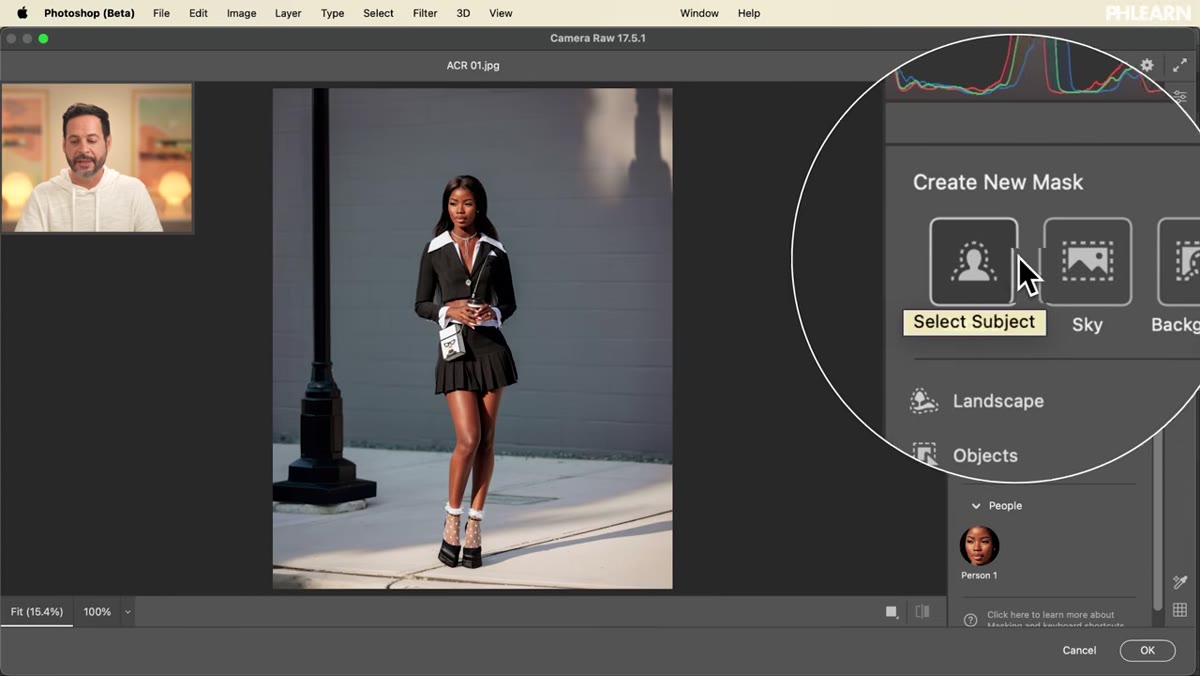 AI masking panel open, background mask options visible
Inside the masking panel, you’ll see options including Select Subject, Select Sky, Select Background, Landscape, and Objects. For this first pass, choose Select Background. The AI analyzes the image and generates a mask that covers everything except the primary subject. Once the mask is created, scroll down to the Light adjustments and pull the Exposure slider down slightly. The subject immediately reads with more presence against a darker surround. This is the same principle I use when painting in light manually, reducing background luminance to direct the viewer’s eye, but here it takes about four seconds instead of twenty minutes.
AI masking panel open, background mask options visible
Inside the masking panel, you’ll see options including Select Subject, Select Sky, Select Background, Landscape, and Objects. For this first pass, choose Select Background. The AI analyzes the image and generates a mask that covers everything except the primary subject. Once the mask is created, scroll down to the Light adjustments and pull the Exposure slider down slightly. The subject immediately reads with more presence against a darker surround. This is the same principle I use when painting in light manually, reducing background luminance to direct the viewer’s eye, but here it takes about four seconds instead of twenty minutes.
Step 4: Subtract a Radial Gradient to Create a Background Glow
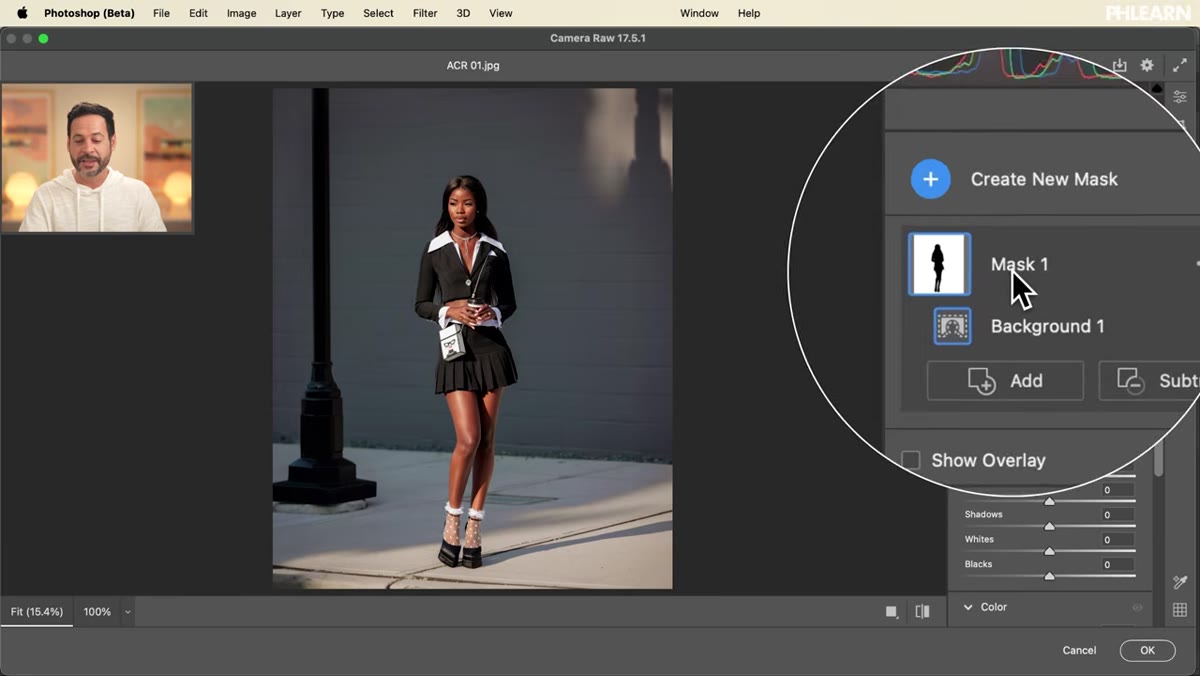 Radial gradient being subtracted from background mask
Here is where the tutorial gets genuinely clever. With the background mask active, click “Subtract” and choose Radial Gradient. Draw the gradient centered just behind the subject. This removes a soft circular area from the background mask, meaning that central zone will no longer be darkened by the exposure reduction you applied. The practical result is a natural-looking pool of lighter tone behind the subject, as if a secondary light source is wrapping around them. You can reposition the gradient using the V key to hide the pin overlay and drag it into place, and use Y to toggle the mask overlay so you can see exactly what’s protected.
Radial gradient being subtracted from background mask
Here is where the tutorial gets genuinely clever. With the background mask active, click “Subtract” and choose Radial Gradient. Draw the gradient centered just behind the subject. This removes a soft circular area from the background mask, meaning that central zone will no longer be darkened by the exposure reduction you applied. The practical result is a natural-looking pool of lighter tone behind the subject, as if a secondary light source is wrapping around them. You can reposition the gradient using the V key to hide the pin overlay and drag it into place, and use Y to toggle the mask overlay so you can see exactly what’s protected.
Step 5: Create a New Mask for the Ground Using Landscape Detection
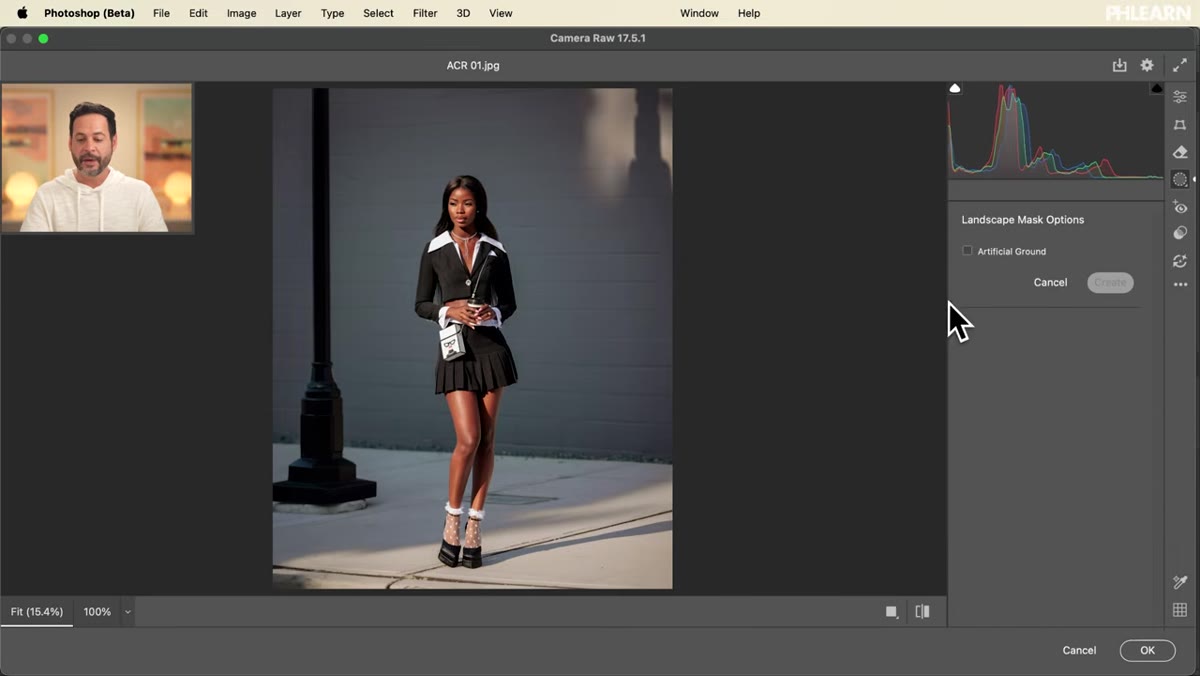 Landscape masking panel showing “Artificial Ground” selection
Go back to the masking panel and create a new mask. This time, choose Select Landscape, then look for the sub-option labeled “Artificial Ground.” The AI reads the geometry and surface characteristics of the scene and isolates the floor plane. Once created, pull the Exposure down again on this mask separately. Darkening the ground independently from the background gives the scene a sense of anchored depth. In my experience, a slightly underexposed foreground ground plane is one of the fastest ways to make a composite feel like the subject is actually standing in the scene rather than dropped onto it.
Landscape masking panel showing “Artificial Ground” selection
Go back to the masking panel and create a new mask. This time, choose Select Landscape, then look for the sub-option labeled “Artificial Ground.” The AI reads the geometry and surface characteristics of the scene and isolates the floor plane. Once created, pull the Exposure down again on this mask separately. Darkening the ground independently from the background gives the scene a sense of anchored depth. In my experience, a slightly underexposed foreground ground plane is one of the fastest ways to make a composite feel like the subject is actually standing in the scene rather than dropped onto it.
Step 6: Select the Subject and Lift the Shadows
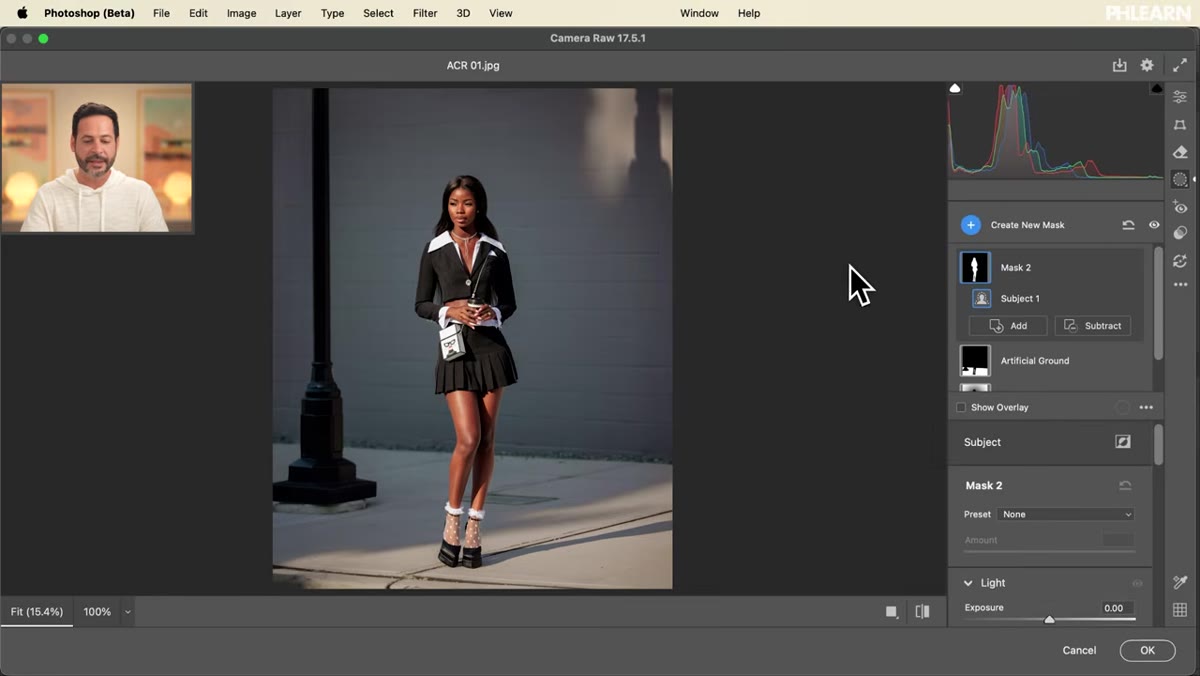 Subject selected with AI, shadow slider being adjusted
For the final mask in this sequence, create a new mask and choose Select Subject. The AI isolates the person cleanly. Rather than applying a broad exposure change, Nace specifically reaches for the Shadows slider and nudges it upward. This preserves the subject’s midtones and highlights while opening up the darker areas of their form. It’s a subtle move, but it separates the subject’s tonal range from the now-darker background, adding micro-contrast between the two planes. The before-and-after difference is quiet but convincing.
Subject selected with AI, shadow slider being adjusted
For the final mask in this sequence, create a new mask and choose Select Subject. The AI isolates the person cleanly. Rather than applying a broad exposure change, Nace specifically reaches for the Shadows slider and nudges it upward. This preserves the subject’s midtones and highlights while opening up the darker areas of their form. It’s a subtle move, but it separates the subject’s tonal range from the now-darker background, adding micro-contrast between the two planes. The before-and-after difference is quiet but convincing.
What I’d Add From My Own Practice
The stacking logic in this workflow maps almost perfectly onto how I build compositing light passes. Where Nace uses three masks here, background plus gradient subtract, ground, and subject, I’d often add a fourth: a Select Sky mask if any sky is visible, adjusted to pull saturation slightly and reduce highlights. Overlit skies compete with subjects for visual dominance, and a subtle desaturation pass through ACR before the image ever enters a compositing stack keeps the background from fighting back.
One thing I’d also flag: Camera Raw’s AI masks are excellent at clean edges on well-lit subjects, but they can struggle with translucent fabrics, windblown hair, or subjects against complex foliage. In those cases, I’ll use the AI mask as a base and then refine in Photoshop’s Select and Mask workspace. The ACR mask doesn’t have to be perfect on its own. It just has to get you 80 percent there, which it usually does.
The deeper point this tutorial makes, even if it doesn’t say it directly, is that AI tools in Camera Raw are most powerful when you stop thinking of them as one-click solutions and start treating them as selection scaffolding. You’re not handing the image to the machine. You’re using the machine to build the structure, then you finish the work.
Watch the full tutorial on YouTube and follow along with Aaron’s free sample assets. The masking panel in Camera Raw has more range than most people give it credit for, and this walkthrough is the clearest demonstration of that I’ve seen.
Comments
Leave a Comment