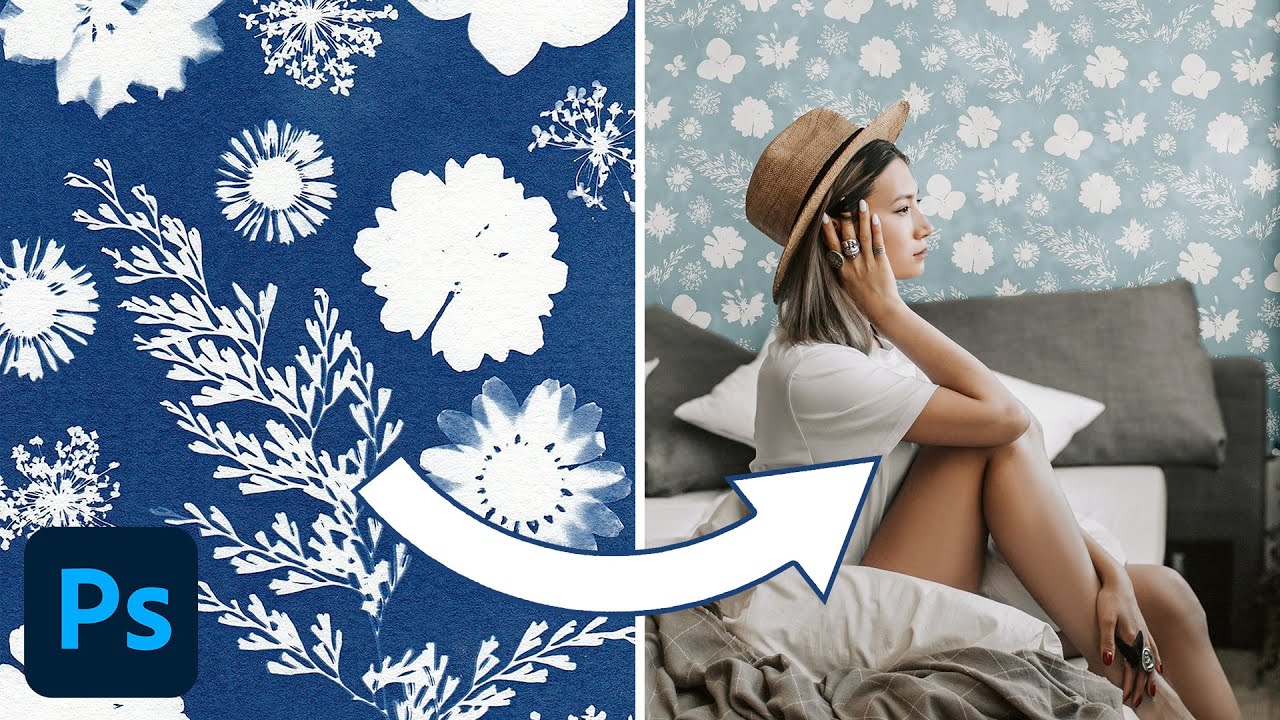
There’s a specific kind of project that shows up constantly in commercial compositing work: you need a surface to be something it isn’t. A wall needs a different wallpaper. A product needs a custom textile behind it. A portrait needs an environment that doesn’t exist yet. For years, my solution was to hunt down stock textures or hand-paint something from scratch, which could eat half a day before I’d even opened the actual comp. What I didn’t realize was that Photoshop had a workflow sitting right in the View menu that changes everything about how you build tileable patterns from real photographs.
In this Aaron Nace tutorial from PHLEARN, Watch the full tutorial on YouTube, the technique involves taking a photograph of a floral print, isolating the elements, rearranging them in real time with a live pattern preview, and then saving it as a defined pattern that can be applied to any surface in a composite. The whole thing is faster than it has any right to be. What follows is my step-by-step breakdown, with the notes I wish I’d had the first time I tried this.
Step 1: Isolate Your Subject with Color Range
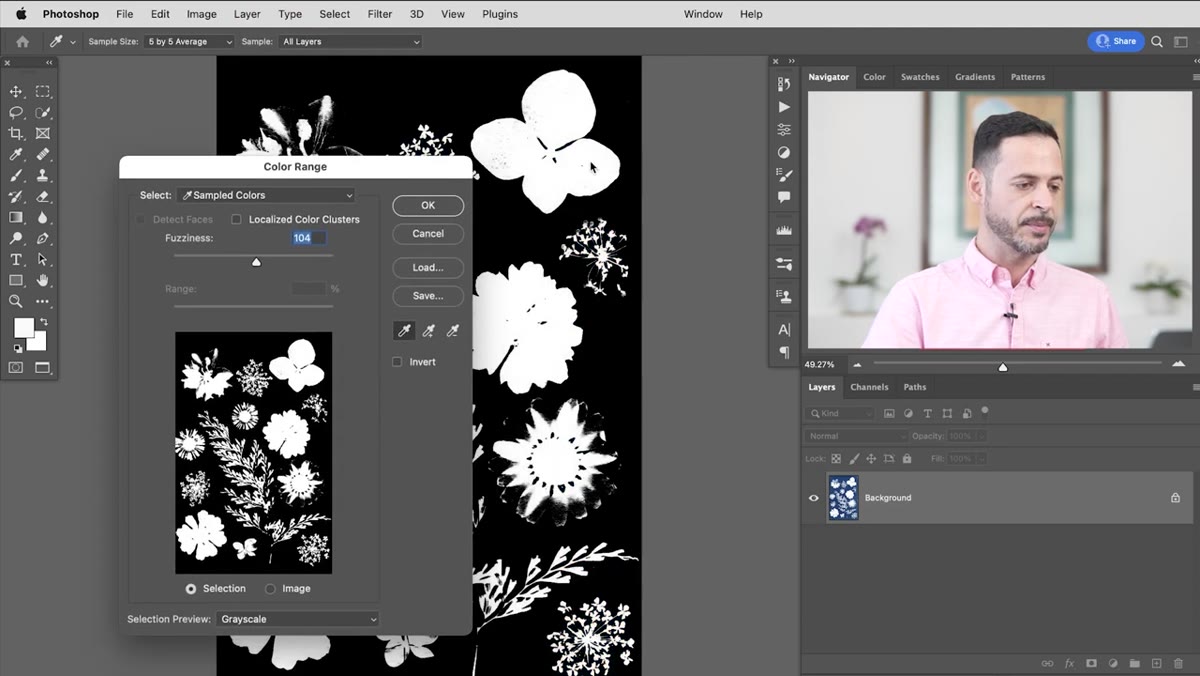 Color Range dialog open, flower selected with fuzziness slider
Start by clicking your background layer and navigating to Select, then Color Range. Click directly on the element you want to extract, in this case the flowers in the print, and adjust the Fuzziness slider until your selection captures the detail you need without pulling in too much of the background. You’re not going for perfection here; you’re creating a working layer, so aim for a selection that captures the shapes cleanly.
Color Range dialog open, flower selected with fuzziness slider
Start by clicking your background layer and navigating to Select, then Color Range. Click directly on the element you want to extract, in this case the flowers in the print, and adjust the Fuzziness slider until your selection captures the detail you need without pulling in too much of the background. You’re not going for perfection here; you’re creating a working layer, so aim for a selection that captures the shapes cleanly.
Once you’re satisfied, confirm the selection and create a new blank layer above the background. Go to Edit, Fill, and choose White. This paints your selected shapes in solid white, giving you clean, high-contrast elements that will work as the building blocks of your pattern. Deselect with Ctrl/Cmd+D, then toggle the background layer off. If you want to preview your elements against a color, add a Solid Color fill layer underneath.
Step 2: Enable Pattern Preview
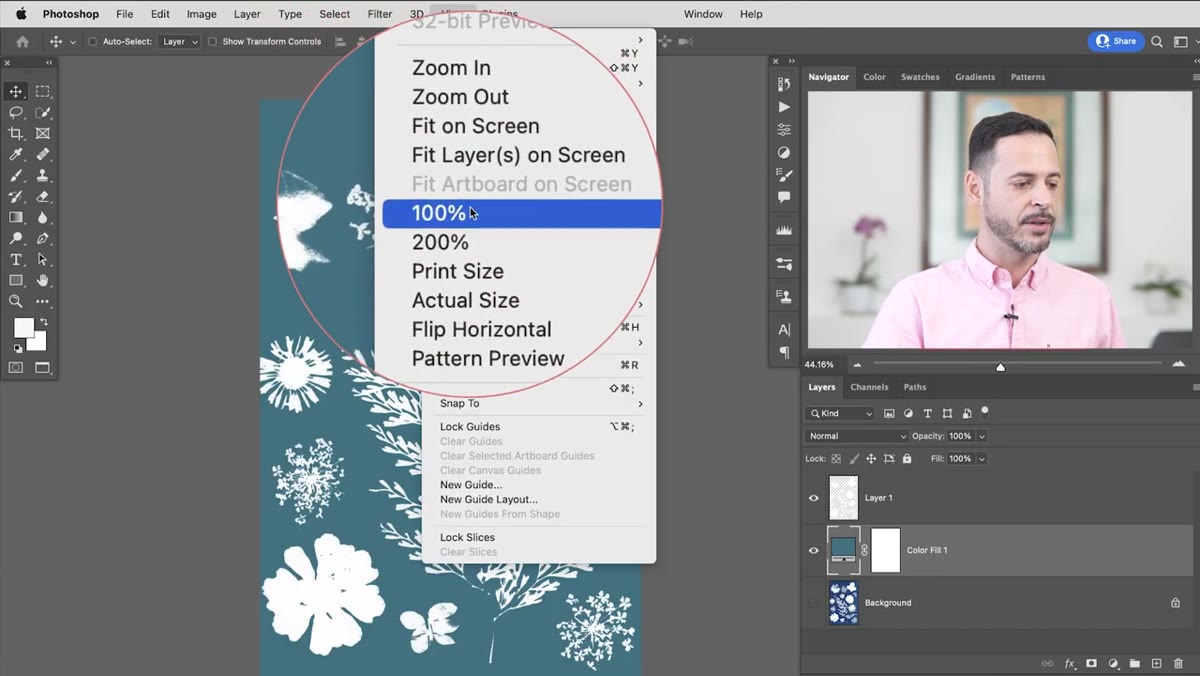 View menu open, Pattern Preview option highlighted
This is the feature that makes the whole workflow possible, and most people have walked past it without knowing it exists. Go to View, and select Pattern Preview. Photoshop will prompt you with a dialog, just click OK. Then press F to enter full-screen mode. This matters because the pattern preview populates the space around your canvas, and you need that visible real estate to see how your tile is actually reading.
View menu open, Pattern Preview option highlighted
This is the feature that makes the whole workflow possible, and most people have walked past it without knowing it exists. Go to View, and select Pattern Preview. Photoshop will prompt you with a dialog, just click OK. Then press F to enter full-screen mode. This matters because the pattern preview populates the space around your canvas, and you need that visible real estate to see how your tile is actually reading.
What you’ll see immediately is your current canvas tiling out infinitely in every direction. If your elements are clustered in one area, you’ll see obvious gaps across the pattern. That’s not a problem. It’s the starting point.
Step 3: Rearrange Elements in Real Time with the Lasso and Move Tools
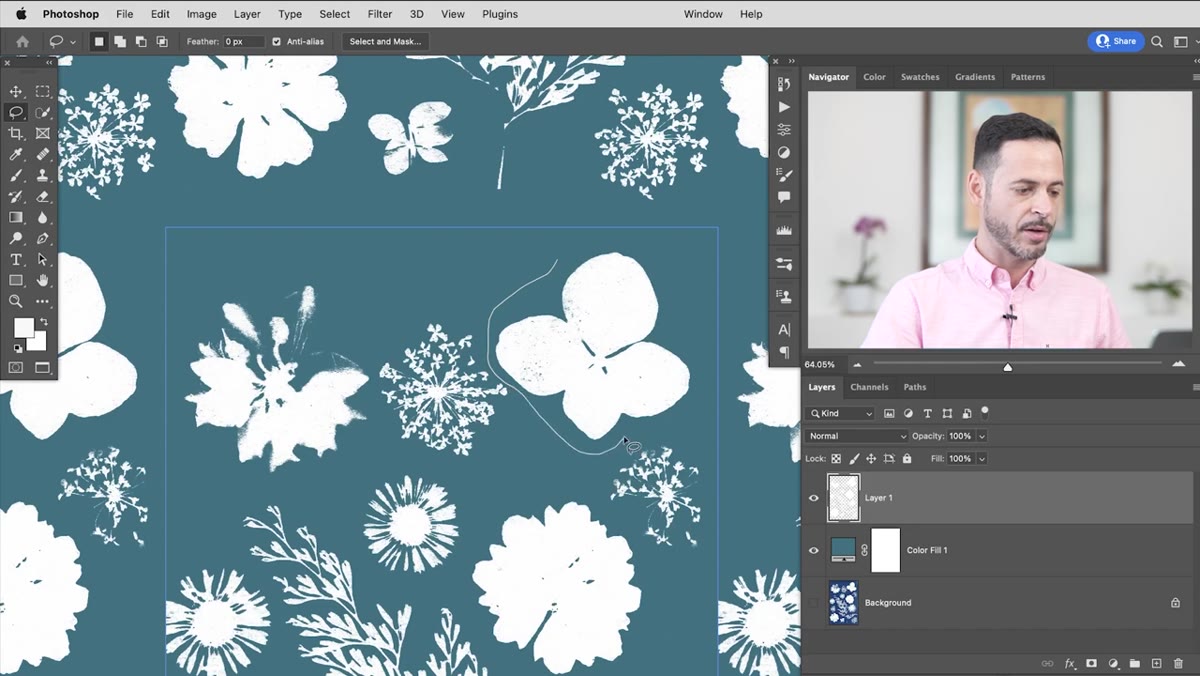 Lasso tool selecting single flower element on canvas
Here’s where the real intelligence of the workflow kicks in. Select the Lasso Tool (L) and draw a loose selection around one of your elements. Switch to the Move Tool (V) and drag that element. As you move it, watch what happens in the surrounding preview tiles: Photoshop automatically wraps the element, so if you push a flower toward the right edge of the canvas, the other half appears on the left edge of every adjacent tile. This is live, seamless offsetting, and it means you can fill gaps in your pattern by distributing elements visually rather than doing the math yourself.
Lasso tool selecting single flower element on canvas
Here’s where the real intelligence of the workflow kicks in. Select the Lasso Tool (L) and draw a loose selection around one of your elements. Switch to the Move Tool (V) and drag that element. As you move it, watch what happens in the surrounding preview tiles: Photoshop automatically wraps the element, so if you push a flower toward the right edge of the canvas, the other half appears on the left edge of every adjacent tile. This is live, seamless offsetting, and it means you can fill gaps in your pattern by distributing elements visually rather than doing the math yourself.
Work through each element one at a time. The goal is to distribute them so there are no large empty regions in the tile. Pay attention to the preview, not just the canvas itself. An arrangement that looks fine on the canvas can reveal awkward clusters or voids when you see it tiled. Keep adjusting until the pattern reads as balanced and continuous at the zoom level you’d actually use it.
Step 4: Define the Pattern
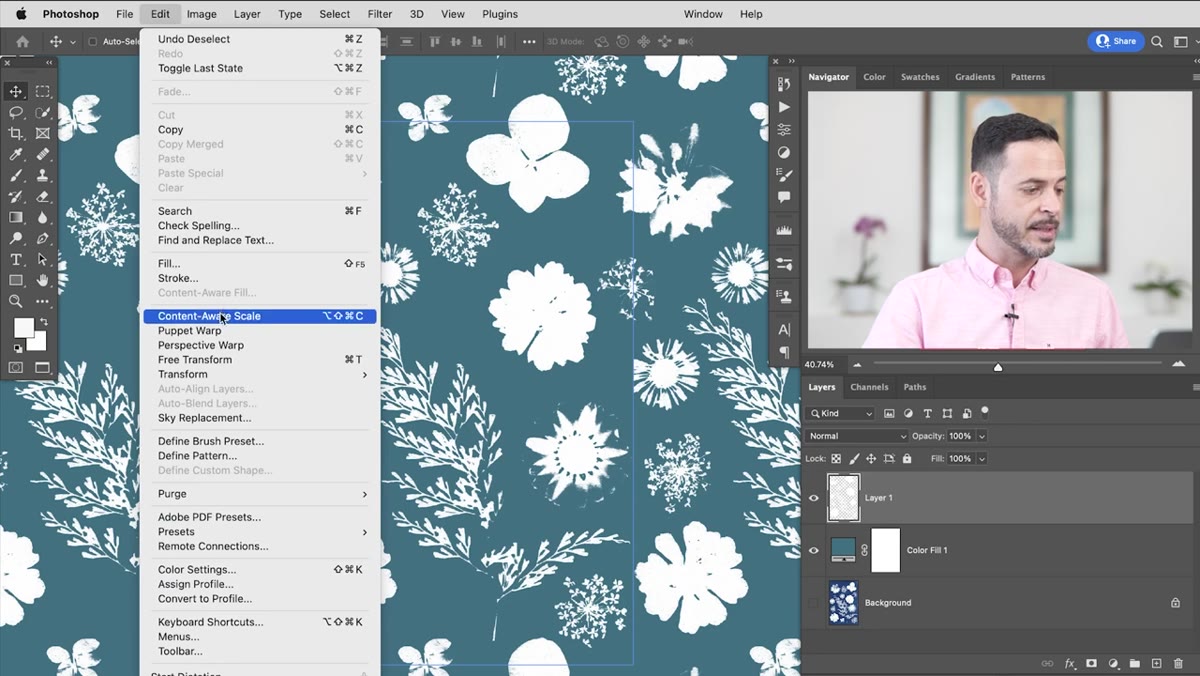 Edit menu open with Define Pattern option visible
Once your arrangement looks solid, go to Edit and then Define Pattern. Photoshop will ask you to name it. Use something specific, “Wallpaper Floral 01” is better than “Pattern 1” because you’ll forget what “Pattern 1” is in three weeks. Click OK and your pattern is saved.
Edit menu open with Define Pattern option visible
Once your arrangement looks solid, go to Edit and then Define Pattern. Photoshop will ask you to name it. Use something specific, “Wallpaper Floral 01” is better than “Pattern 1” because you’ll forget what “Pattern 1” is in three weeks. Click OK and your pattern is saved.
One thing worth doing at this stage: toggle your background layer off entirely and define the pattern again under a second name. Now you have two versions, one with a background color baked in and one with transparency. The transparent version is more flexible for compositing work because you can drop it over any surface and control the background color independently.
Step 5: Apply the Pattern to a New Composite
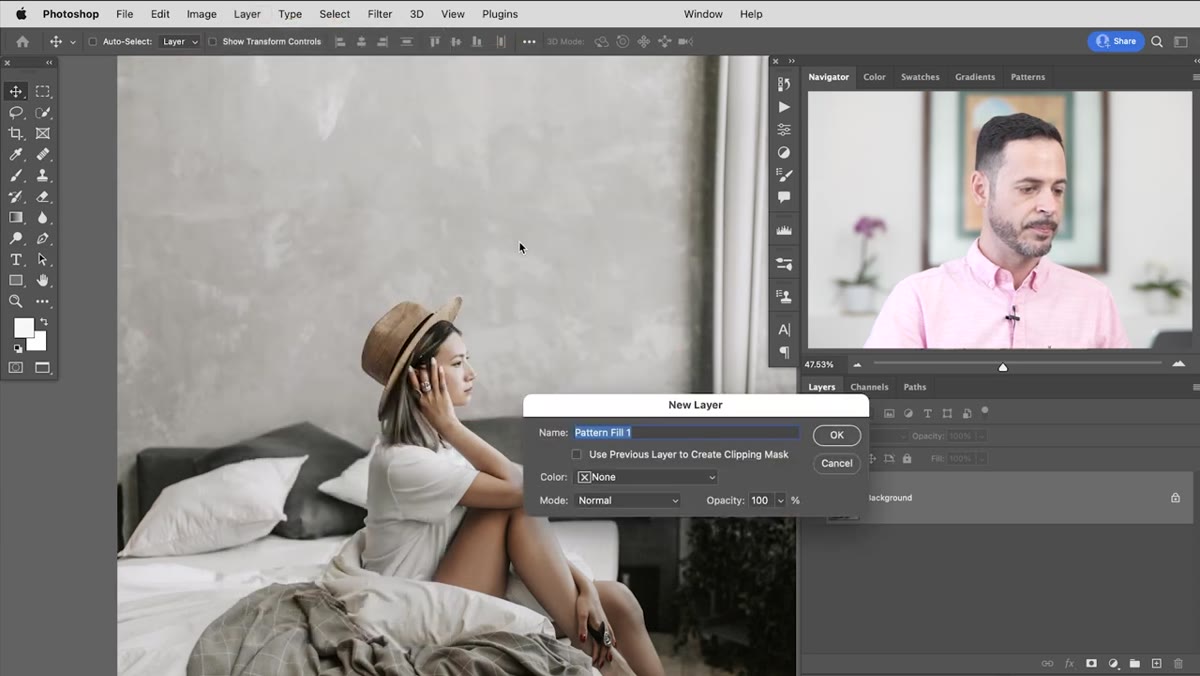 Pattern Overlay applied to wall layer in composite scene
With your pattern defined, open your target composite, the scene where you want the wallpaper to appear. Select the layer representing the surface you’re covering, whether it’s a wall, a piece of fabric, or a flat plane, and add a Pattern Overlay via Layer Styles, or use a Pattern Fill layer through Layer, New Fill Layer, Pattern. Select your saved pattern from the dropdown. From here, you control scale and position directly in the dialog.
Pattern Overlay applied to wall layer in composite scene
With your pattern defined, open your target composite, the scene where you want the wallpaper to appear. Select the layer representing the surface you’re covering, whether it’s a wall, a piece of fabric, or a flat plane, and add a Pattern Overlay via Layer Styles, or use a Pattern Fill layer through Layer, New Fill Layer, Pattern. Select your saved pattern from the dropdown. From here, you control scale and position directly in the dialog.
To make it feel like it actually lives on the surface, the pattern layer needs to follow the lighting and texture of whatever it’s being applied to. Set the Pattern Fill or Overlay layer to Multiply or Overlay blend mode, reduce opacity to taste, and let the underlying texture of the surface show through. A pattern that has zero texture bleed from the surface beneath it always reads as pasted on, not composited.
What I’d Add from Experience
The pattern preview workflow is built around flat, repeated arrangements, which is exactly what you want for wallpaper. But when I’m compositing a pattern onto a curved or distorted surface, such as a fabric draped over a figure or a wall with perspective, I take one extra step. I convert the pattern fill to a Smart Object, then run Liquify or apply a displacement map based on the surface’s texture. This keeps the pattern editable but lets it conform to the geometry of the scene.
I also keep a small library of patterns I’ve defined from unexpected sources: close-up shots of worn concrete, aged book pages, damaged wallpaper from architectural reference photos. The Color Range isolation method from this tutorial is exactly how I build those. Once you understand the pipeline, every textured photograph you own becomes raw material.
The most important thing this tutorial demonstrates isn’t the Pattern Preview feature itself. It’s the principle that a non-tileable photograph can become a tileable asset through selective repositioning, and you can see the result in real time while you work. No guesswork, no export-and-check cycles. That feedback loop is worth understanding deeply because it changes how you approach any surface in a composite.
Watch the full tutorial on YouTube to see Aaron walk through the full workflow, including the final composite application.
Comments (7)
Quality content like this is rare. Keep it up.
Solid advice. Especially the part about taking your time with it.
Couldn't agree more. I've seen this make a huge difference in lighting work specifically.
Solid advice. Especially the part about taking your time with it.
Would love to see a follow-up going deeper into this topic.
Printing this out and pinning it next to my monitor. That good.
This is fantastic. I've been recommending this approach to my readers too.
Leave a Comment