Every composite starts with a problem. Sometimes it’s a sky that needs replacing, a background that kills the mood, or a subject shot in flat afternoon light that needs to feel like dusk. The solar eclipse composite is a different kind of problem entirely. You have a series of images shot across time, each one a fragment of the same event, and your job is to assemble them into something that reads as a single, coherent visual. It sounds straightforward. It is not.
I’ve been building composites for over a decade, and the part of this process that trips people up most often is deceptively simple: getting black to behave. In eclipse photography, the background needs to be pure, absolute black. If it isn’t, every blend falls apart. That’s the foundation this whole technique rests on, and it’s why I found Matt Kloskowski’s tutorial so immediately useful. In this Matt Kloskowski tutorial on editing a solar eclipse composite, he walks through two approaches to assembling eclipse phase images in Photoshop, using the Screen blend mode as the central tool. What he’s teaching here is something I’d use on a commercial project without modification. Let me walk you through it.
Step 1: Edit Your Individual Eclipse Images First
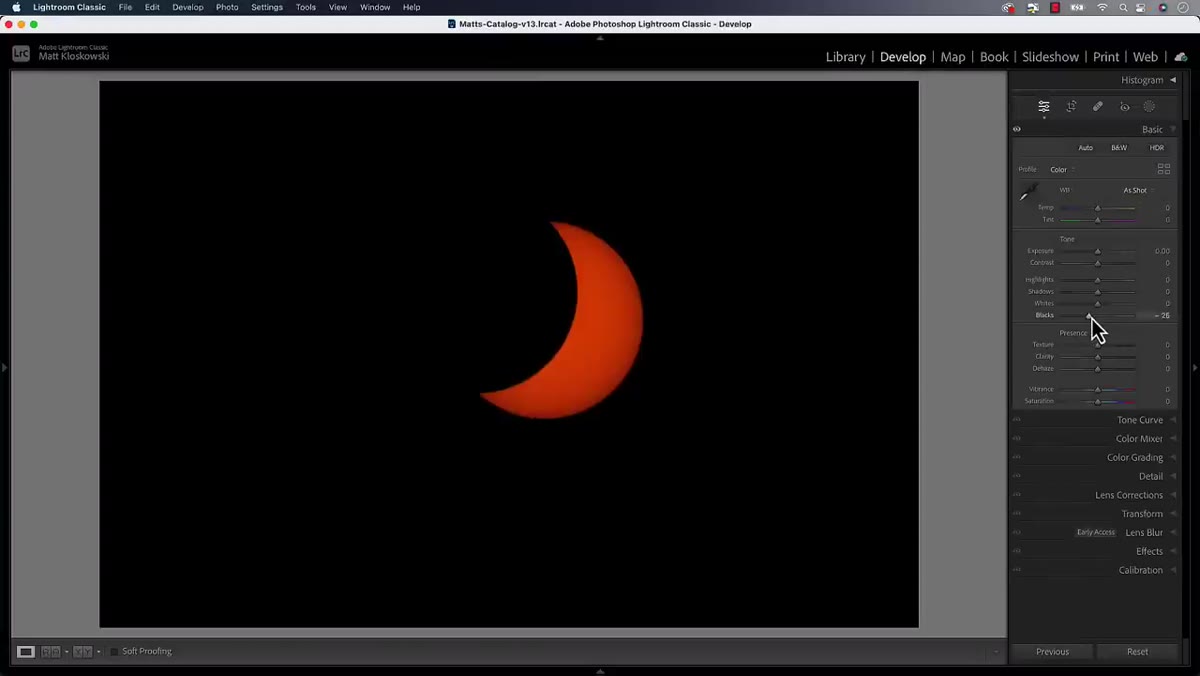 caption: Adjusting the black slider in a raw editing panel
Before a single image lands in Photoshop, you need to do your tonal editing. The most important adjustment is the black slider. Push it left to deepen the shadows until the area around the eclipse is as close to pure black as possible. Any residual gray or near-black tone in the background will create halos and bleed when you start blending layers. This isn’t a stylistic choice, it’s a technical requirement.
caption: Adjusting the black slider in a raw editing panel
Before a single image lands in Photoshop, you need to do your tonal editing. The most important adjustment is the black slider. Push it left to deepen the shadows until the area around the eclipse is as close to pure black as possible. Any residual gray or near-black tone in the background will create halos and bleed when you start blending layers. This isn’t a stylistic choice, it’s a technical requirement.
Once you’ve dialed in one image, synchronize those settings across all of your phase images so they match. Consistency here saves you significant cleanup work later.
Step 2: Load All Phase Images as Layers in Photoshop
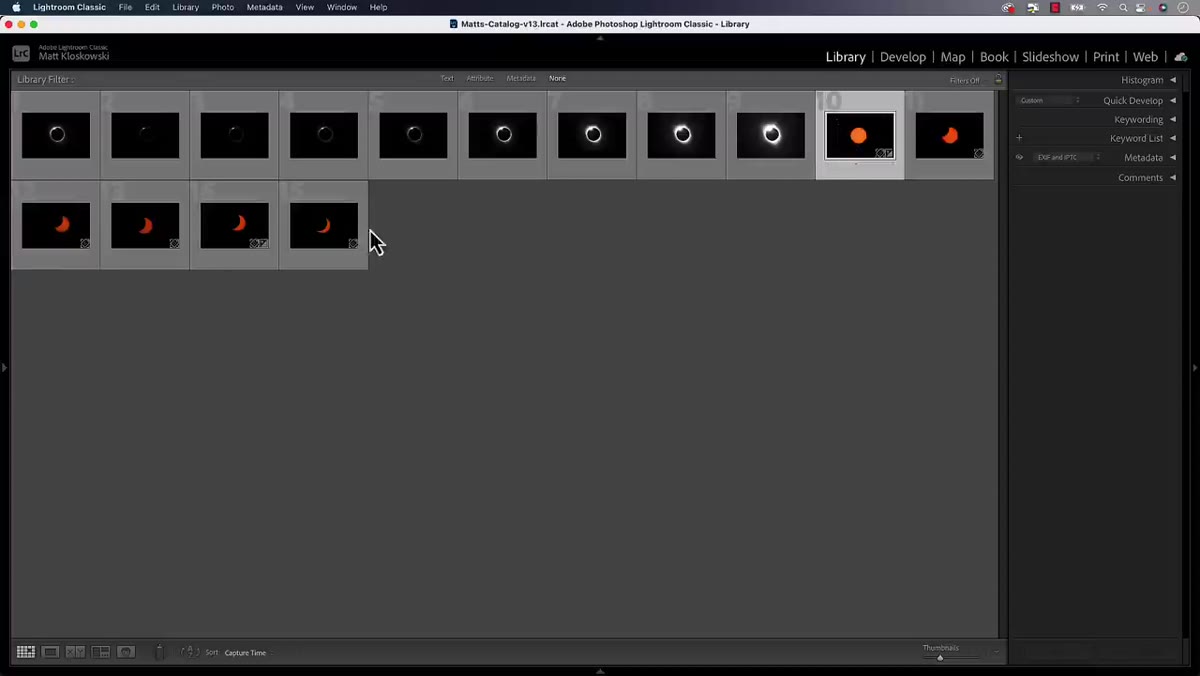 caption: Selecting multiple images to open as layers in Photoshop
There are a few paths into Photoshop depending on your workflow. If you’re in Lightroom, select all your eclipse images, then go to Photo, Edit In, and choose Open as Layers in Photoshop. Photoshop will stack every selected image into a single document automatically. If you’re in Adobe Bridge, the same option lives under Tools, then Photoshop, then Load Files into Photoshop Layers.
caption: Selecting multiple images to open as layers in Photoshop
There are a few paths into Photoshop depending on your workflow. If you’re in Lightroom, select all your eclipse images, then go to Photo, Edit In, and choose Open as Layers in Photoshop. Photoshop will stack every selected image into a single document automatically. If you’re in Adobe Bridge, the same option lives under Tools, then Photoshop, then Load Files into Photoshop Layers.
For anyone on the cloud version of Lightroom, the automatic stack option isn’t available. The workaround is to send each image to Photoshop individually, then use File, Scripts, Load Files into Stack, and add your open files. It takes an extra minute but gets you to the same place.
Step 3: Set Your Canvas Size and Aspect Ratio
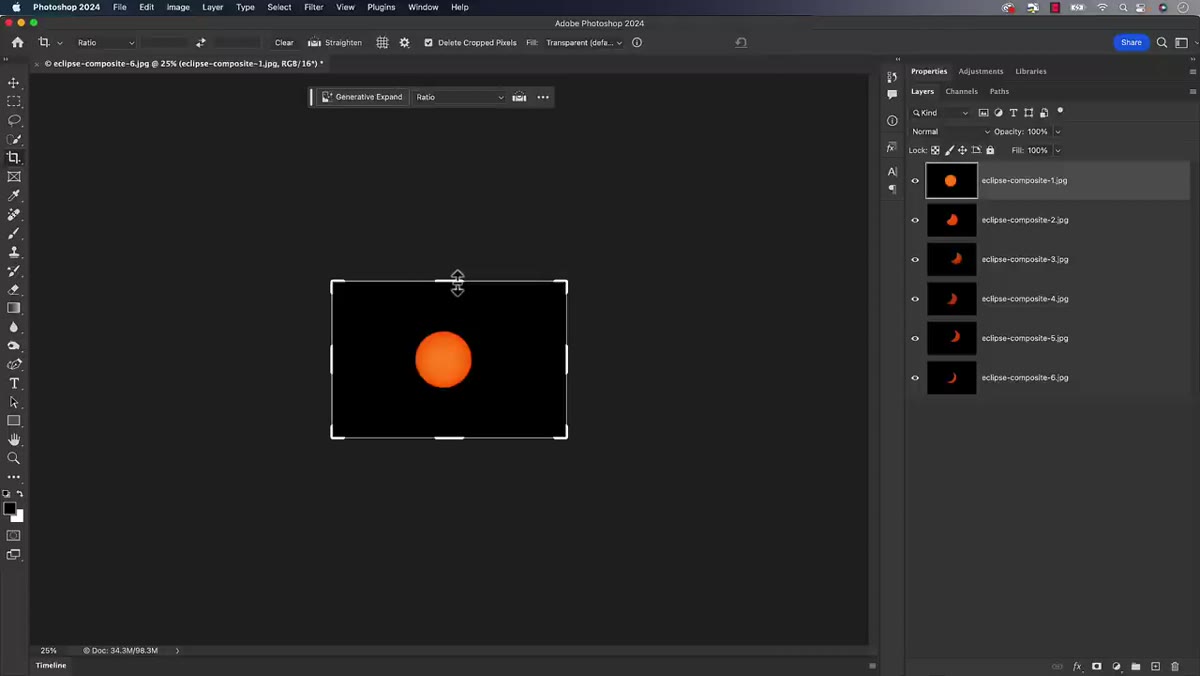 caption: Crop tool active with transparency fill selected in options bar
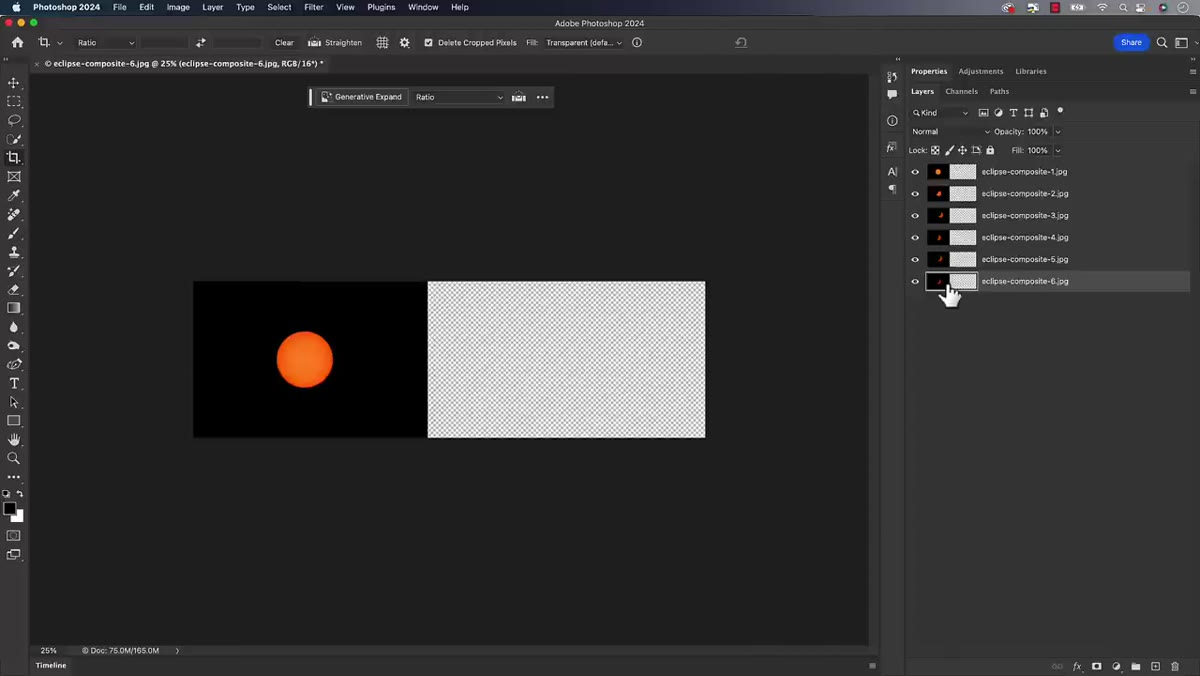
Once all your layers are stacked, you need to decide on the final shape of the composite. Some eclipse composites work beautifully as wide panoramics, with phases spread across a horizontal field. Others feel more grounded in a standard photo aspect ratio. There’s no correct answer here. This is where you’re making an artistic decision, not a technical one.
caption: Crop tool active with transparency fill selected in options bar
Once all your layers are stacked, you need to decide on the final shape of the composite. Some eclipse composites work beautifully as wide panoramics, with phases spread across a horizontal field. Others feel more grounded in a standard photo aspect ratio. There’s no correct answer here. This is where you’re making an artistic decision, not a technical one.
Press C to grab the Crop tool. In the options bar at the top, make sure the Fill setting is set to Transparent, not the default Content-Aware or Background Color. Drag the crop to your desired dimensions and confirm. The transparent area outside your original frames will show as a checkerboard, which is exactly what you want before you add your background layer.
Step 4: Add a Black Background Layer
 caption: New layer added below the bottom layer, filled with black
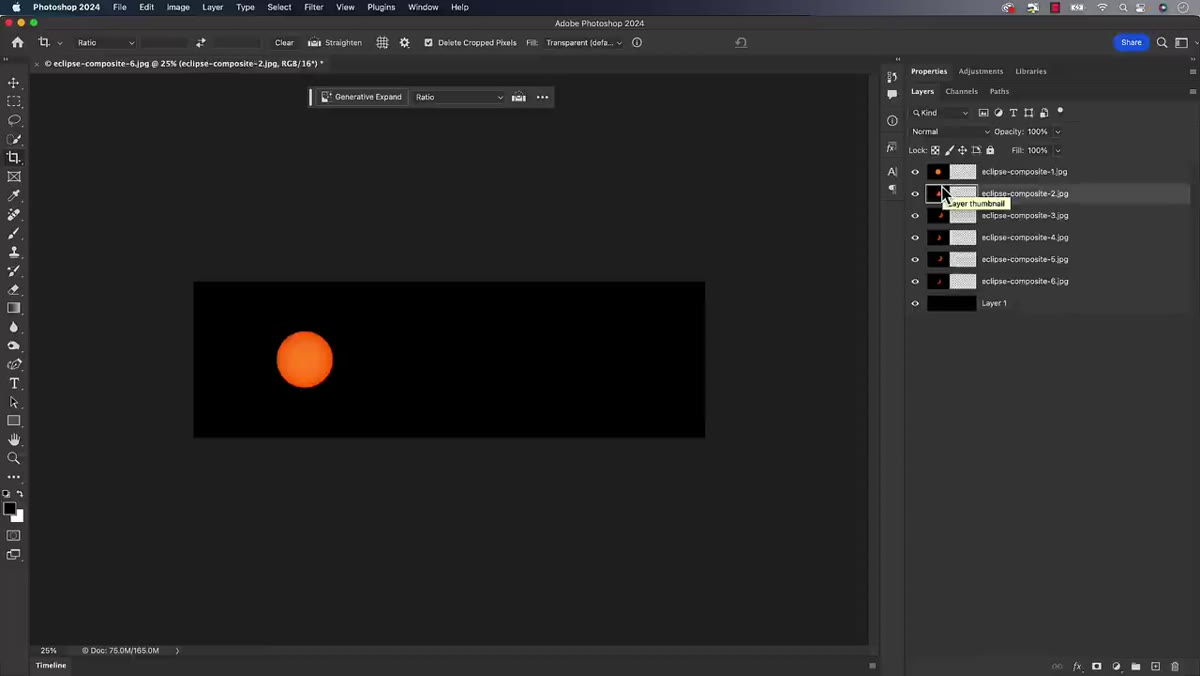
Click on the lowest layer in your stack. Hold Command on Mac, or Control on PC, and click the New Layer icon at the bottom of the Layers panel. This keyboard shortcut drops the new layer directly beneath the selected layer, which saves you from dragging it into position manually. It’s a small thing, but in a composite with many layers, small things add up.
caption: New layer added below the bottom layer, filled with black
Click on the lowest layer in your stack. Hold Command on Mac, or Control on PC, and click the New Layer icon at the bottom of the Layers panel. This keyboard shortcut drops the new layer directly beneath the selected layer, which saves you from dragging it into position manually. It’s a small thing, but in a composite with many layers, small things add up.
Fill this new layer with black using Edit, Fill, and selecting Black from the Contents menu. This layer is your foundation. Every eclipse phase will sit above it, and the Screen blend mode you apply in the next step depends on this layer being true black.
Step 5: Arrange Your Phase Images Across the Canvas
 caption: Multiple eclipse phase layers repositioned across the canvas
With your black background locked in, start moving each phase layer into position using the Move tool. Think about the arc you want the phases to follow. A natural eclipse progression moves in a curve or a line depending on how long your shooting window was and how you want to represent time. Spread them out with enough breathing room so no two phases feel crowded, but close enough that they read as part of the same sequence.
caption: Multiple eclipse phase layers repositioned across the canvas
With your black background locked in, start moving each phase layer into position using the Move tool. Think about the arc you want the phases to follow. A natural eclipse progression moves in a curve or a line depending on how long your shooting window was and how you want to represent time. Spread them out with enough breathing room so no two phases feel crowded, but close enough that they read as part of the same sequence.
At this stage, don’t worry about the black backgrounds on each individual layer overlapping other phases. That gets resolved in the next step.
Step 6: Apply Screen Blend Mode to Each Phase Layer
 caption: Blend mode dropdown set to Screen on an eclipse phase layer
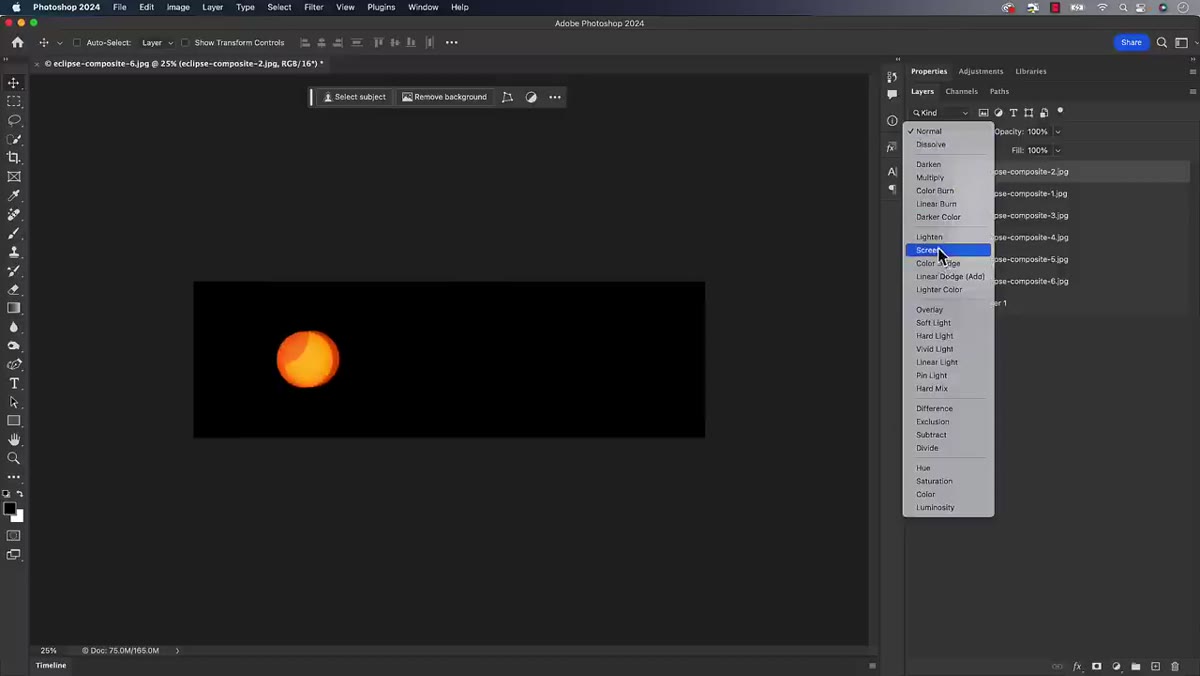
This is the technical centerpiece of the whole technique. Select a phase layer and change its blend mode from Normal to Screen. Screen blend mode works by mathematically ignoring any pixel that is pure black, treating it as transparent. The eclipse and its corona remain fully visible, while the black background on that layer disappears completely, revealing whatever is beneath it.
caption: Blend mode dropdown set to Screen on an eclipse phase layer
This is the technical centerpiece of the whole technique. Select a phase layer and change its blend mode from Normal to Screen. Screen blend mode works by mathematically ignoring any pixel that is pure black, treating it as transparent. The eclipse and its corona remain fully visible, while the black background on that layer disappears completely, revealing whatever is beneath it.
Apply Screen to every phase layer in your stack. What you’ll see is each eclipse sitting cleanly on the shared black background with no harsh edges, no masking required, and no bleed between the phases. The technique works because of the prep work in Step 1. Pure black is invisible in Screen mode. Anything less than pure black is not.
A Note From My Own Practice
The Screen blend mode trick that Kloskowski demonstrates here is not exclusive to eclipse composites. I’ve used the same approach when building composites with sparks, lens flares, fire, and smoke elements shot against black in a studio. Any element that lives naturally against a black background can be dropped into a composite using Screen and it integrates immediately, with no masking.
The caveat I’d add for working professionals: if your eclipse images were shot with any atmospheric haze or light pollution affecting the black areas, Screen mode will reveal that contamination instead of hiding it. The fix is returning to your raw editor and crushing those blacks further before you bring anything into Photoshop. The cleaner the blacks at capture, the faster and cleaner the composite. I sketch every composite on paper before opening Photoshop, and when I’m planning something like this, I’m already thinking about which blend modes I’ll need. Knowing Screen is in your toolkit changes how you think about what’s worth shooting clean against black.
The single most important thing to take away from this technique is that the Screen blend mode replaces masking when your subject is photographed against true black. Master that principle and a whole category of compositing work gets faster and cleaner.
Watch the full tutorial on YouTube to see Matt Kloskowski demonstrate both composite layout options and get his full breakdown of the workflow from import to final image.
Comments
Leave a Comment