Before I open Photoshop on any new composite, I sketch the whole thing on paper. Every shadow, every edge, every point where one element bleeds into another. I do this because I once published a movie poster composite where the shadow on the main subject ran in the opposite direction from every other light source in the image. Nobody caught it but me. I still see it when I close my eyes. The lesson I took from that disaster was not about shadows specifically. It was about control. Layer masks are how you get control, and getting them wrong, or using them lazily, is how you end up haunted by your own work.
Layer masks are the single most important non-destructive tool in Photoshop for anyone doing serious compositing. I have used them daily for years, and I still picked up a handful of things from this Aaron Nace tutorial from PHLEARN that tightened up my workflow in ways I did not expect. If you want to watch the full thing first, here it is: Watch the full tutorial on YouTube. But if you want a working breakdown you can follow step by step, keep reading.
Step 1: Create a White or Black Mask Intentionally
 Layer mask icon clicked in Photoshop Layers panel
Most people click the layer mask icon at the bottom of the Layers panel without thinking about which state they want to start in. A single click gives you a white mask, meaning everything on that layer is fully visible. That is the right starting point when you plan to paint away areas gradually. But when you are compositing a subject onto a new background and you know you want everything hidden by default, hold Alt (Windows) or Option (Mac) while clicking that same icon. You get a black mask instead, and the entire layer disappears immediately. From there, you paint white only where you want the subject to appear. This approach is faster and cleaner than creating a white mask and then trying to fill it to black afterward.
Layer mask icon clicked in Photoshop Layers panel
Most people click the layer mask icon at the bottom of the Layers panel without thinking about which state they want to start in. A single click gives you a white mask, meaning everything on that layer is fully visible. That is the right starting point when you plan to paint away areas gradually. But when you are compositing a subject onto a new background and you know you want everything hidden by default, hold Alt (Windows) or Option (Mac) while clicking that same icon. You get a black mask instead, and the entire layer disappears immediately. From there, you paint white only where you want the subject to appear. This approach is faster and cleaner than creating a white mask and then trying to fill it to black afterward.
Step 2: Move Your Layer and Mask Independently
 Chain link icon between layer thumbnail and mask thumbnail
By default, Photoshop links your layer and its mask together, which means moving one moves the other. That is usually what you want. But there are situations in compositing where you need to reposition the image underneath while keeping the mask exactly where it is, or vice versa. Click the small chain link icon that sits between the layer thumbnail and the mask thumbnail in the Layers panel to unlink them. Now you can click on just the layer thumbnail and drag with the Move tool, and the mask stays put. Or click the mask thumbnail and reposition the mask while the image stays fixed. When everything is aligned the way you need it, click the space between the thumbnails again to re-link them.
Chain link icon between layer thumbnail and mask thumbnail
By default, Photoshop links your layer and its mask together, which means moving one moves the other. That is usually what you want. But there are situations in compositing where you need to reposition the image underneath while keeping the mask exactly where it is, or vice versa. Click the small chain link icon that sits between the layer thumbnail and the mask thumbnail in the Layers panel to unlink them. Now you can click on just the layer thumbnail and drag with the Move tool, and the mask stays put. Or click the mask thumbnail and reposition the mask while the image stays fixed. When everything is aligned the way you need it, click the space between the thumbnails again to re-link them.
Step 3: Convert an Active Selection Directly into a Mask
 Elliptical selection active around subject’s face
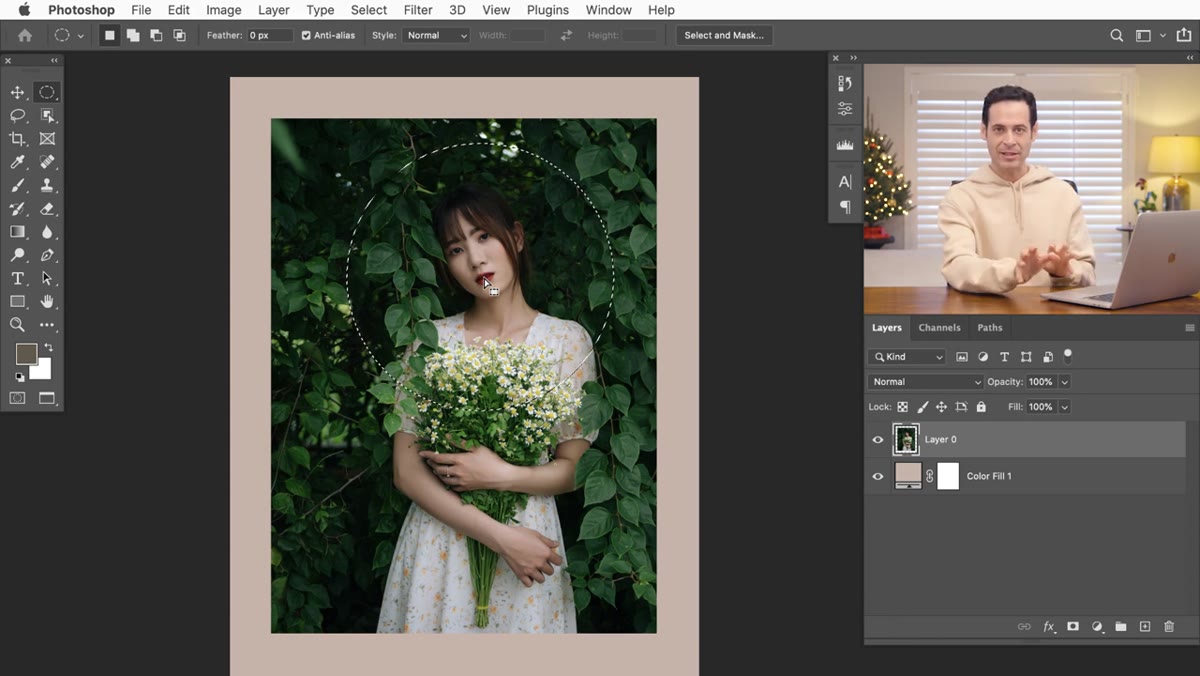
This is the step that separates people who plan their composites from people who are just experimenting. If you know the shape you want to mask before you create the mask itself, make the selection first. Use whatever selection tool fits the shape: the Elliptical Marquee for circles and ovals, the Lasso for freehand shapes, or more advanced methods like Select > Color Range for complex subjects. Once you have a selection active (the “marching ants” are visible), click the layer mask icon. Photoshop converts the selection directly into a mask, white inside the selection and black outside. This works with any selection method, which means it scales from a simple oval crop all the way up to a full subject extraction.
Elliptical selection active around subject’s face
This is the step that separates people who plan their composites from people who are just experimenting. If you know the shape you want to mask before you create the mask itself, make the selection first. Use whatever selection tool fits the shape: the Elliptical Marquee for circles and ovals, the Lasso for freehand shapes, or more advanced methods like Select > Color Range for complex subjects. Once you have a selection active (the “marching ants” are visible), click the layer mask icon. Photoshop converts the selection directly into a mask, white inside the selection and black outside. This works with any selection method, which means it scales from a simple oval crop all the way up to a full subject extraction.
Step 4: Invert the Mask When You Have It Backwards
 Layer mask inverted with Ctrl/Cmd+I shortcut
This one saves minutes on every complex composite I build. If you look at your mask and realize the visible and hidden areas are exactly reversed from what you want, do not start over. Click on the mask thumbnail to make sure it is active, then press Ctrl+I (Windows) or Cmd+I (Mac). Photoshop inverts the entire mask: white becomes black, black becomes white, and everything that was hidden is now visible and vice versa. This is especially useful when you make a selection around the area you want to remove rather than the area you want to keep. Instead of remaking the selection, just invert the mask once it is created.
Layer mask inverted with Ctrl/Cmd+I shortcut
This one saves minutes on every complex composite I build. If you look at your mask and realize the visible and hidden areas are exactly reversed from what you want, do not start over. Click on the mask thumbnail to make sure it is active, then press Ctrl+I (Windows) or Cmd+I (Mac). Photoshop inverts the entire mask: white becomes black, black becomes white, and everything that was hidden is now visible and vice versa. This is especially useful when you make a selection around the area you want to remove rather than the area you want to keep. Instead of remaking the selection, just invert the mask once it is created.
Step 5: Fill the Mask Quickly with Black or White
 Layer mask filled using keyboard shortcut workflow
Once you have a mask selected, you can fill it completely with black or white using a keyboard shortcut sequence that is faster than going to Edit > Fill every time. With the mask thumbnail active, press D to reset your foreground and background colors to black and white. Then press Alt+Backspace (Windows) or Option+Delete (Mac) to fill with the foreground color, or Ctrl+Backspace (Windows) or Cmd+Delete (Mac) to fill with the background color. This is how you quickly reset a mask to full visibility or full invisibility without touching a menu, which matters when you are iterating fast on a composite and toggling between states to check your edges.
Layer mask filled using keyboard shortcut workflow
Once you have a mask selected, you can fill it completely with black or white using a keyboard shortcut sequence that is faster than going to Edit > Fill every time. With the mask thumbnail active, press D to reset your foreground and background colors to black and white. Then press Alt+Backspace (Windows) or Option+Delete (Mac) to fill with the foreground color, or Ctrl+Backspace (Windows) or Cmd+Delete (Mac) to fill with the background color. This is how you quickly reset a mask to full visibility or full invisibility without touching a menu, which matters when you are iterating fast on a composite and toggling between states to check your edges.
What I Add to This Workflow on Actual Projects
The techniques Aaron covers here are solid fundamentals, and I use all of them. Where I extend the workflow on commercial composites is in how I review masks before I consider a layer finished. I have a habit of Alt-clicking (Option-clicking on Mac) directly on the mask thumbnail in the Layers panel, which displays the mask itself as a grayscale image in the canvas. Edges that look clean at normal view often reveal themselves as blurry, uneven, or missing subtle detail when you look at the raw mask this way. On the album cover project where I spent six months studying how light behaves on water, I caught at least a dozen edge problems this way that would have destroyed the illusion. It takes ten seconds and it is worth doing on every single mask before you flatten anything.
Another thing I do that is not covered in the tutorial: I name my masks. Photoshop does not give you a text label for masks the way it does for layers, but you can use layer groups and naming conventions to keep track of which mask is doing what in a complex document. On a poster with thirty or forty layers, unclear masking structure is how mistakes get buried until it is too late to fix them cleanly.
Layer masks are not a feature you learn once and check off a list. They are a discipline. Every compositing decision I make runs through them, from the roughest first pass to the final edge refinement before delivery. The tips Aaron walks through in this tutorial are the kind of foundational controls that become reflexes with practice, and the faster they become reflexes, the more mental space you have for the actual creative problem you are trying to solve.
Watch the full tutorial on YouTube and bookmark it. Then come back here and follow the steps above on a real project, not a practice file. That is when they stick.
Comments
Leave a Comment