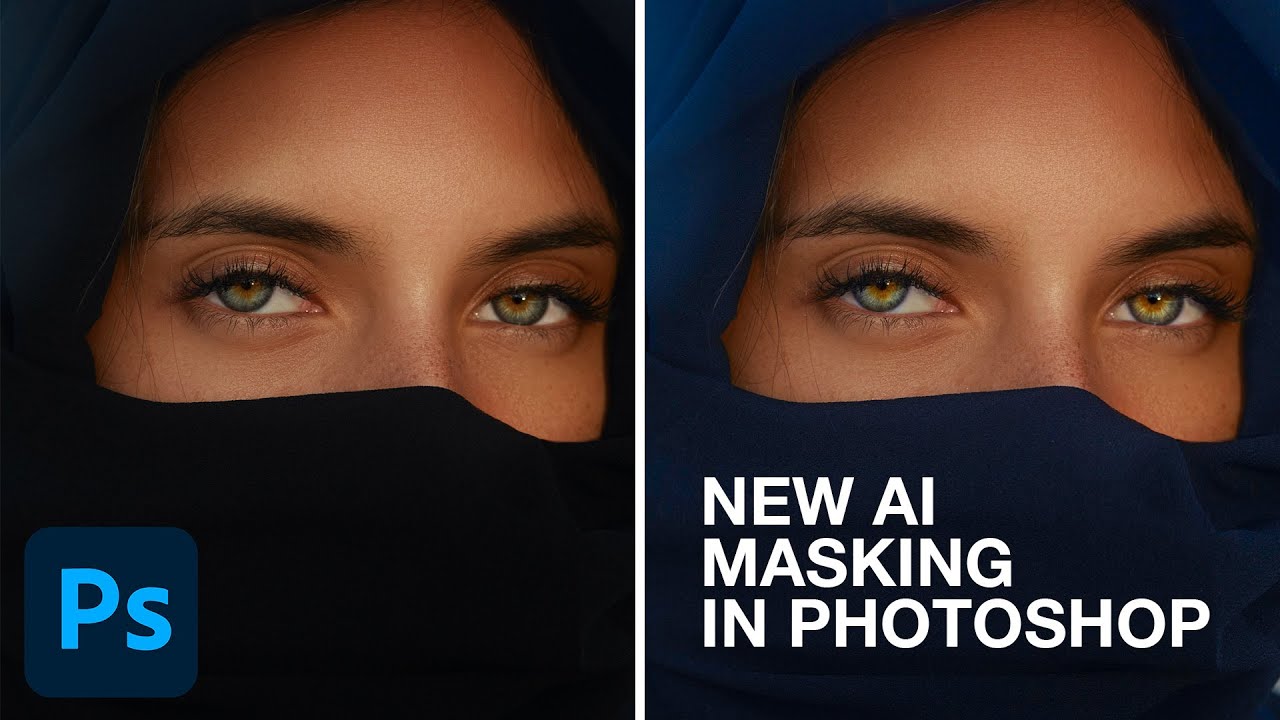
Every composite artist has a list of jobs that should take twenty minutes and somehow eat an entire afternoon. For me, that job used to be selective color work on eyes. Getting a clean mask around an iris, without bleeding into the whites or the skin around the socket, meant painting by hand, running Calculations, sometimes both. The result was fine. The time cost was not.
That changed when I watched Aaron Nace’s tutorial on the new AI-powered masking tools inside Adobe Camera Raw for Photoshop 2023. Watch the full tutorial on YouTube before or after reading this breakdown, because the way Aaron moves through the interface makes the logic of the feature click faster than text alone. What I’m offering here is the working walkthrough with enough detail to follow along without the video open, plus one observation from my own practice that the tutorial doesn’t cover.
The short version: Adobe has built an AI that can identify and isolate individual facial features, body regions, and clothing areas from a single click. No painting. No channel tricks. No Pen Tool. If you’re doing portraiture, product work, or compositing that involves people, this changes your day.
Step 1: Convert Your Layer to a Smart Object
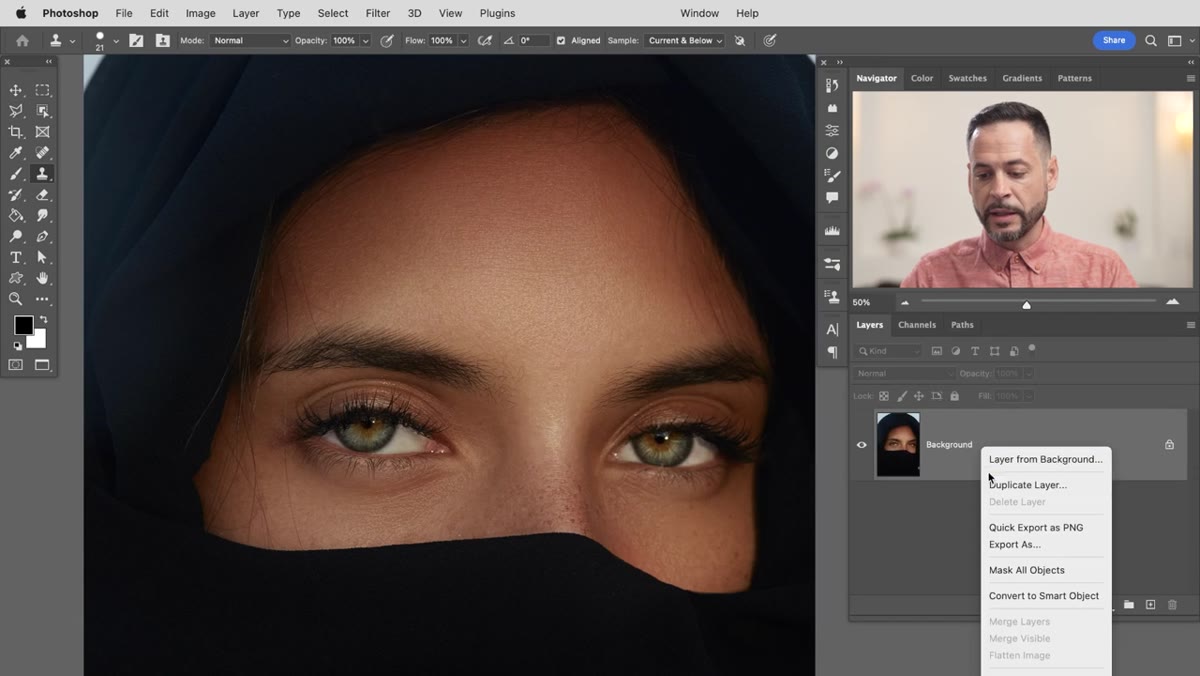 Right-clicking a layer to convert to Smart Object
Before you open Camera Raw, right-click your background layer in the Layers panel and choose “Convert to Smart Object.” The Camera Raw Filter then applies as a non-destructive smart filter, meaning you can double-click back into it at any point and revise your masks and adjustments without touching the original pixels. Aaron makes this a firm first step, and he’s right. In Lightroom, this doesn’t apply since the non-destructive workflow is already baked in, but in Photoshop it’s non-negotiable if you want to stay flexible.
Right-clicking a layer to convert to Smart Object
Before you open Camera Raw, right-click your background layer in the Layers panel and choose “Convert to Smart Object.” The Camera Raw Filter then applies as a non-destructive smart filter, meaning you can double-click back into it at any point and revise your masks and adjustments without touching the original pixels. Aaron makes this a firm first step, and he’s right. In Lightroom, this doesn’t apply since the non-destructive workflow is already baked in, but in Photoshop it’s non-negotiable if you want to stay flexible.
Step 2: Open the Camera Raw Filter
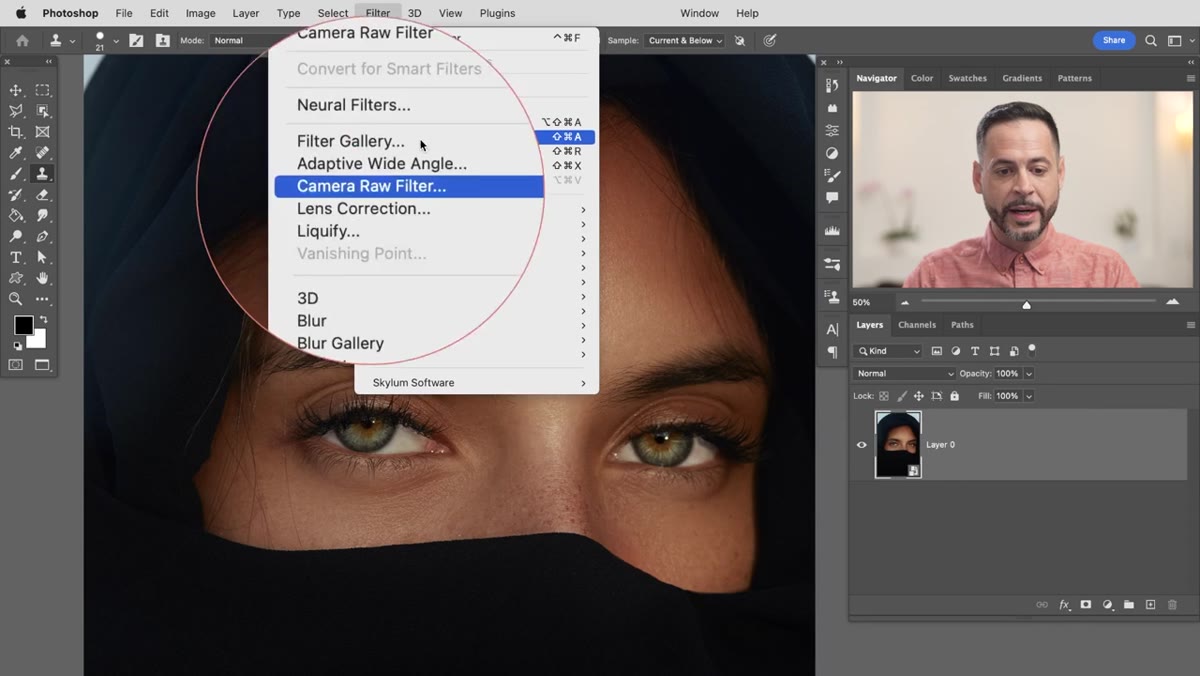 Navigating to Filter > Camera Raw Filter in the menu
With your smart object selected, go to Filter in the top menu and scroll down to “Camera Raw Filter.” This opens the full Camera Raw interface inside Photoshop. If the option is grayed out or missing, you likely need to update both Photoshop and the Camera Raw plugin through Creative Cloud. Adobe released these AI masking tools as part of a 2022-2023 update cycle, so older installations won’t have them. Take the two minutes to update. It’s worth it.
Navigating to Filter > Camera Raw Filter in the menu
With your smart object selected, go to Filter in the top menu and scroll down to “Camera Raw Filter.” This opens the full Camera Raw interface inside Photoshop. If the option is grayed out or missing, you likely need to update both Photoshop and the Camera Raw plugin through Creative Cloud. Adobe released these AI masking tools as part of a 2022-2023 update cycle, so older installations won’t have them. Take the two minutes to update. It’s worth it.
Step 3: Navigate to the Masking Panel
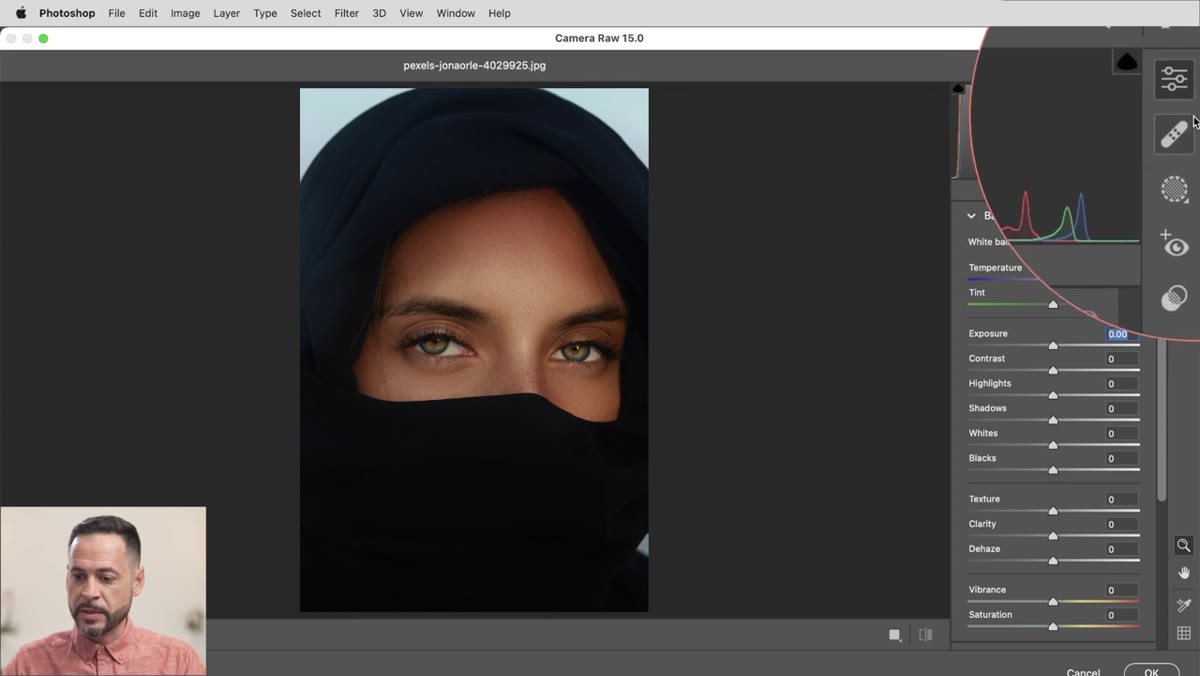 The masking icon selected in the Camera Raw right-side panel
Inside Camera Raw, look at the icon strip running down the right side of the interface. The masking tool looks like a small circle with a dotted edge. Click it. You’ll see a set of options for automatic mask creation: Subject, Sky, Background, and the new one that matters most here, People. The global sliders you see by default, exposure, contrast, highlights, and so on, affect the entire image. The masking panel is how you constrain those adjustments to exactly what you want to touch.
The masking icon selected in the Camera Raw right-side panel
Inside Camera Raw, look at the icon strip running down the right side of the interface. The masking tool looks like a small circle with a dotted edge. Click it. You’ll see a set of options for automatic mask creation: Subject, Sky, Background, and the new one that matters most here, People. The global sliders you see by default, exposure, contrast, highlights, and so on, affect the entire image. The masking panel is how you constrain those adjustments to exactly what you want to touch.
Step 4: Select the “People” Mask Option
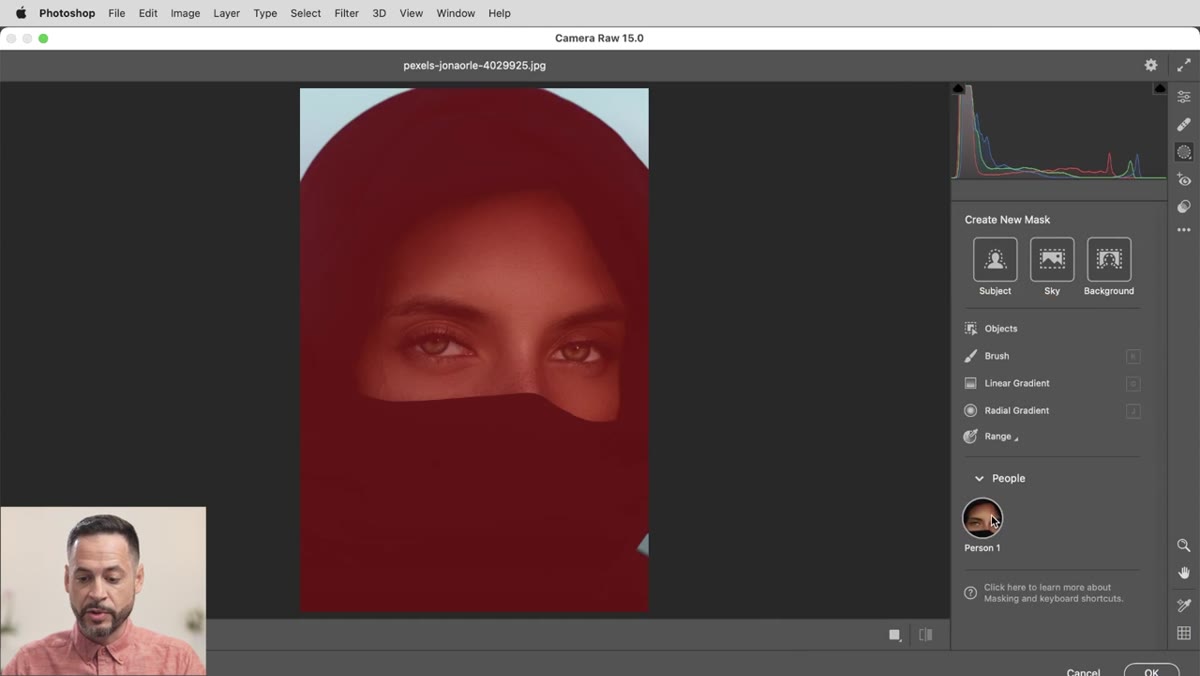 The People masking option highlighted in the mask panel
Click “People.” Photoshop’s AI scans the image and identifies every person in the frame, labeling them Person 1, Person 2, and so on. Under each person, you get a breakdown of selectable regions: skin, eyebrows, eye sclera (the whites), iris and pupil, lips, teeth, and hair. This is the part that genuinely surprised me the first time I used it. The granularity is not what I expected from a one-click tool. You’re not getting a rough body cutout. You’re getting anatomically specific selections that would take serious manual work to reproduce.
The People masking option highlighted in the mask panel
Click “People.” Photoshop’s AI scans the image and identifies every person in the frame, labeling them Person 1, Person 2, and so on. Under each person, you get a breakdown of selectable regions: skin, eyebrows, eye sclera (the whites), iris and pupil, lips, teeth, and hair. This is the part that genuinely surprised me the first time I used it. The granularity is not what I expected from a one-click tool. You’re not getting a rough body cutout. You’re getting anatomically specific selections that would take serious manual work to reproduce.
Step 5: Choose Your Target Region and Create the Mask
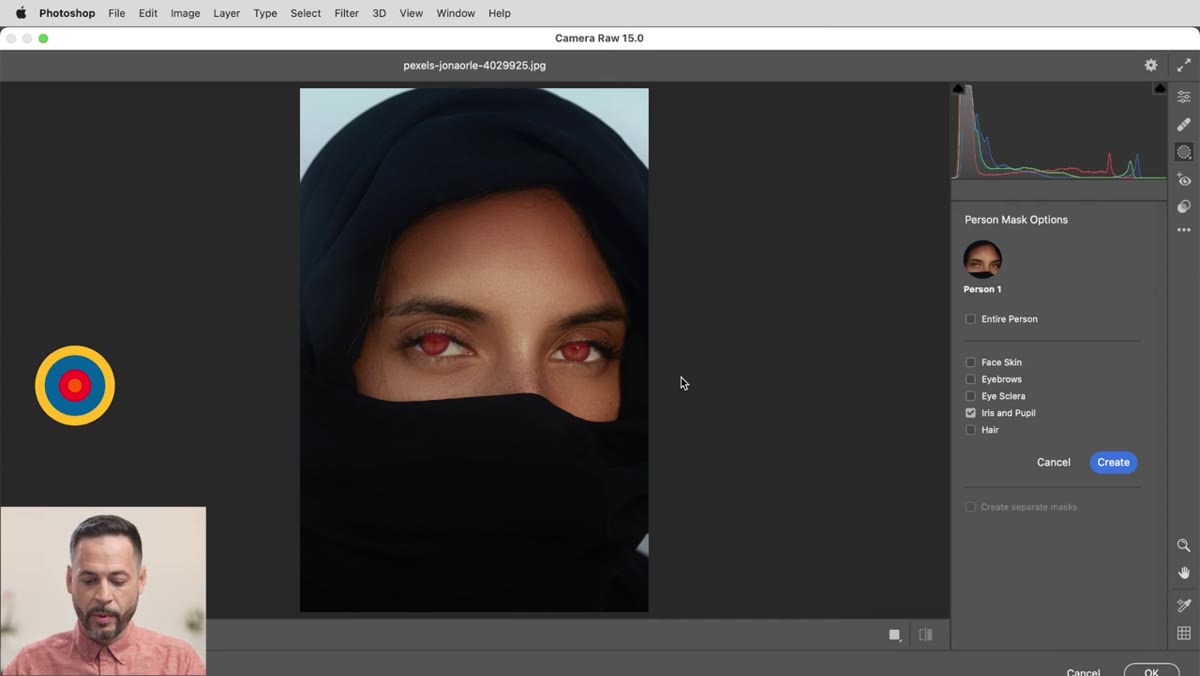 Checking the iris and pupil checkbox in the People submenu
Check the box next to the region you want to work with. In the tutorial, Aaron selects the iris and pupil to enhance the subject’s eye color. As you hover over each option, Camera Raw previews the selection on the image in real time so you can confirm accuracy before committing. Once you’ve selected your region, click “Create.” Camera Raw generates the mask and takes you directly to the adjustment sliders, scoped entirely to that masked area. Nothing outside the selection will be touched.
Checking the iris and pupil checkbox in the People submenu
Check the box next to the region you want to work with. In the tutorial, Aaron selects the iris and pupil to enhance the subject’s eye color. As you hover over each option, Camera Raw previews the selection on the image in real time so you can confirm accuracy before committing. Once you’ve selected your region, click “Create.” Camera Raw generates the mask and takes you directly to the adjustment sliders, scoped entirely to that masked area. Nothing outside the selection will be touched.
Step 6: Dial In Your Adjustments
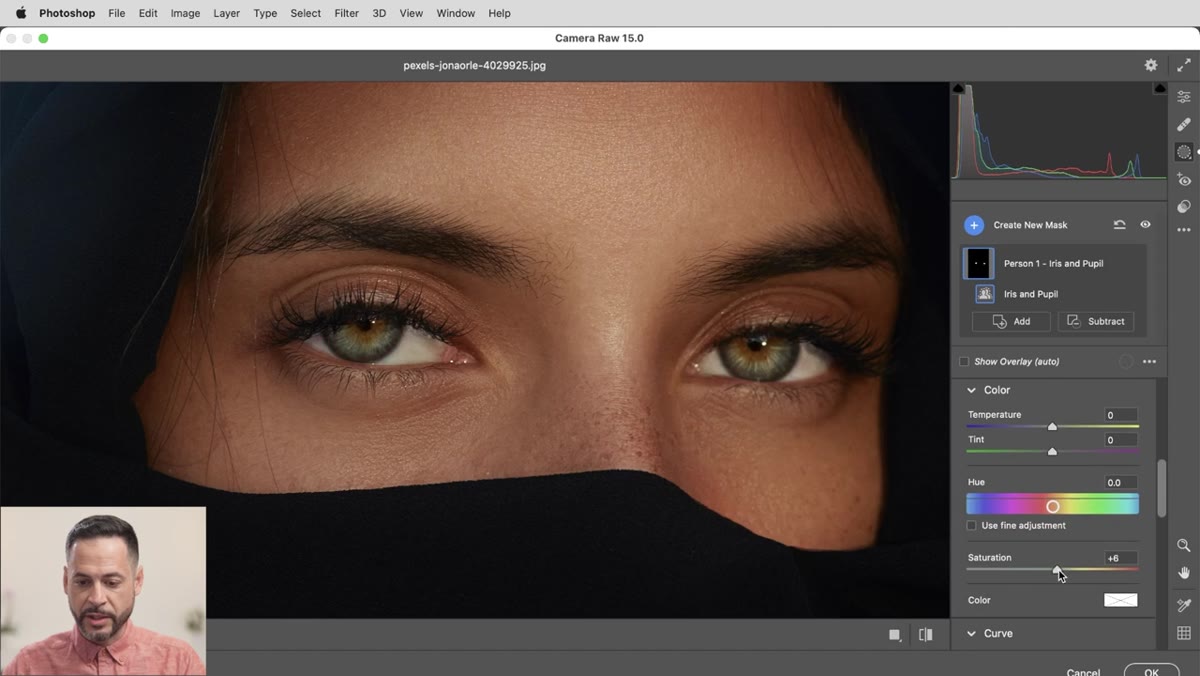 Saturation and exposure sliders being adjusted with the iris mask active
With the mask created and active, use the sliders the same way you would for a global edit, but now every change is pinned to your selection. Aaron boosts saturation to intensify the iris color, adds a touch of blue in the color mixer, lifts contrast, and brings up highlights to add a subtle brightness to the eyes. Each of these moves is small. Stacked together they read as a natural enhancement rather than a retouch. The toggle icon next to the mask lets you switch visibility on and off to check your before and after without leaving the panel. Use it constantly. The eye adjusts to changes quickly, and toggling keeps you honest.
Saturation and exposure sliders being adjusted with the iris mask active
With the mask created and active, use the sliders the same way you would for a global edit, but now every change is pinned to your selection. Aaron boosts saturation to intensify the iris color, adds a touch of blue in the color mixer, lifts contrast, and brings up highlights to add a subtle brightness to the eyes. Each of these moves is small. Stacked together they read as a natural enhancement rather than a retouch. The toggle icon next to the mask lets you switch visibility on and off to check your before and after without leaving the panel. Use it constantly. The eye adjusts to changes quickly, and toggling keeps you honest.
What I’d Add From My Own Work
The tutorial demonstrates this technique on eyes, which is a great starting point because the result is immediately visible. But the feature that I keep reaching for on compositing jobs is the skin mask, not the iris. When I’m blending a subject into a scene with a different color temperature, skin is always the hardest region to match. A separate mask over just the skin lets me push warmth, shift hue, or pull highlights without touching the hair or clothing that might already be reading correctly in the new environment. The AI skin selection in Camera Raw is accurate enough that I now start almost every portrait composite with it as a base. I still paint adjustments by hand for final refinement, but having a clean, automatic starting point cuts the rough-in time down dramatically.
One honest caveat: the AI does occasionally stumble on images where the subject’s skin tone is close in value to the background, or where the lighting is very flat. I keep a folder of past failures that I review every month to track where my process breaks down, and AI-assisted selections show up there more often when the source image has low contrast. When that happens, I fall back to the Brush tool within Camera Raw’s masking panel to add or subtract from what the AI generated. It’s a few extra minutes, but you’re still working from a solid foundation rather than starting from scratch.
The single most important thing this tutorial taught me is that AI masking in Camera Raw is not a replacement for understanding selections. It’s a way to get to a correct selection faster so you can spend your time on the decisions that actually require a human eye. The tools are genuinely impressive. The judgment still has to be yours.
Watch the full tutorial on YouTube to see Aaron walk through the full interface in real time, including the Sky and Background mask options that this breakdown didn’t cover.
Comments (2)
Applied this to my portfolio shots and the improvement is noticeable.
Shared this with my photography group. Everyone loved it.
Leave a Comment