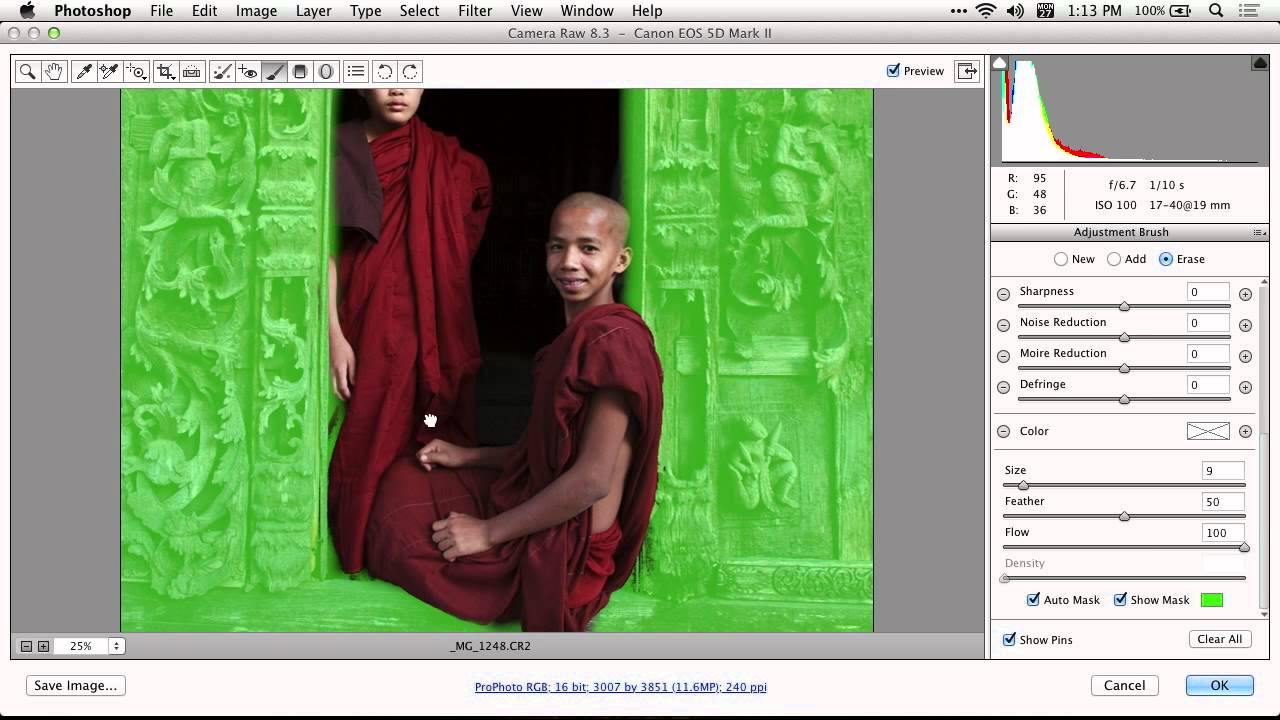
There is a specific kind of frustration that lives in the details of a composite. Not the big structural problems, the ones you catch in your paper sketch before you ever open Photoshop. I mean the small, creeping ones. You’ve made a localized adjustment, darkened a background, pulled some color out of a sky, and then you zoom in and realize the effect has bled onto a subject it was never supposed to touch. Overspray, some people call it. I call it the thing that kept me staring at a book cover at 1 a.m. trying to figure out why the hero’s jacket looked wrong. The adjustment mask was doing too much, and cleaning it up by hand felt like surgery with oven mitts.
Watch the full tutorial on YouTube
In this CreativeLive tutorial, Ben Willmore walks through a scenario that will feel immediately familiar: a localized adjustment that’s spilled onto subjects in the frame, and a mask that needs precise cleanup without destroying what’s already working. What he demonstrates is a combination of Photoshop’s Erase mode and its Auto Mask feature inside the adjustment mask workflow, and the way these two tools work together is genuinely clever. It’s one of those techniques you absorb in ten minutes and then use on nearly every project afterward.
Step 1: Enable “Show Mask” to See What You’re Actually Working With
 Green overlay showing the adjustment mask’s affected areas
Before you touch anything, you need to see the full extent of the problem. Inside your active adjustment layer’s masking controls, check the box labeled “Show Mask.” This toggles a colored overlay, typically green, directly on your canvas that maps exactly where your current adjustment is being applied. Don’t skip this. It’s easy to assume you know where the mask is sitting, but the overlay will reveal overspray you didn’t know was there. In Willmore’s example, the green spills clearly onto figures in the scene who were never meant to be part of the adjustment.
Green overlay showing the adjustment mask’s affected areas
Before you touch anything, you need to see the full extent of the problem. Inside your active adjustment layer’s masking controls, check the box labeled “Show Mask.” This toggles a colored overlay, typically green, directly on your canvas that maps exactly where your current adjustment is being applied. Don’t skip this. It’s easy to assume you know where the mask is sitting, but the overlay will reveal overspray you didn’t know was there. In Willmore’s example, the green spills clearly onto figures in the scene who were never meant to be part of the adjustment.
Step 2: Understand the Three Modes Before You Pick One
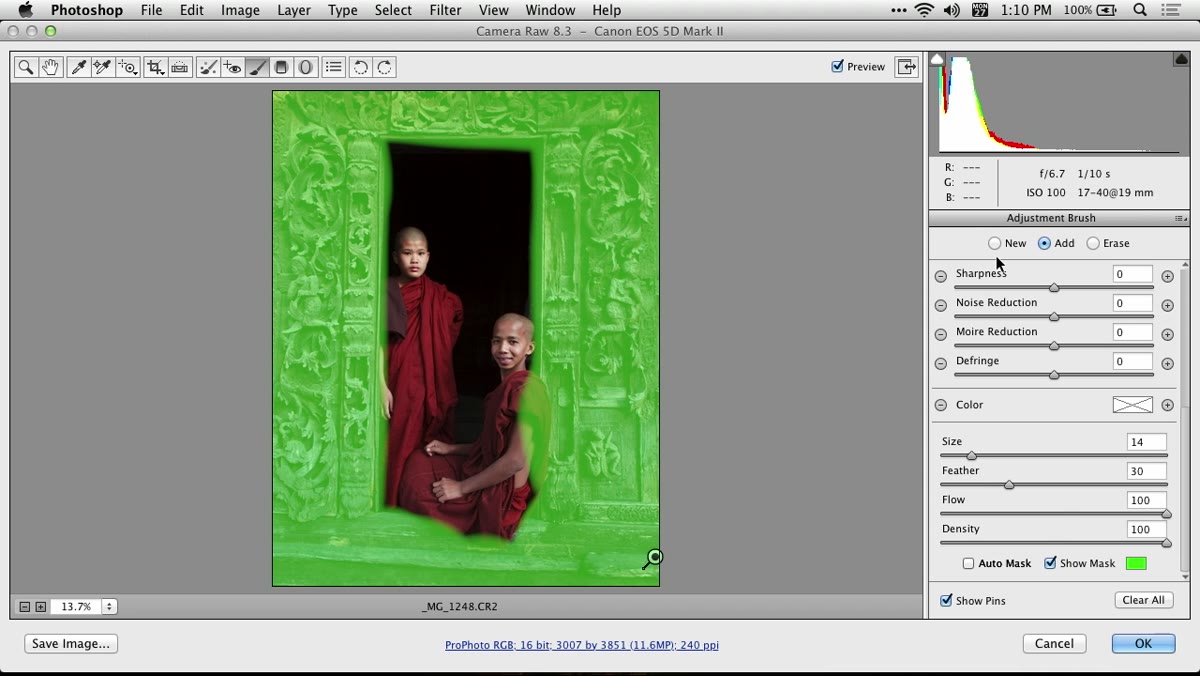 The New, Add, and Erase options visible at top right of panel
At the top right of the adjustment’s masking panel, you’ll see three mode options: New, Add, and Erase. New creates an independent adjustment zone, completely separate from what you’ve already painted. Add is the default and lets you build on an existing mask stroke by stroke, click by click, without interrupting the adjustment. Erase is the one this tutorial centers on, and it does exactly what the name says: it removes the adjustment from wherever you paint. The key detail Willmore points out is that Erase carries its own independent brush settings. It remembers the size, hardness, and flow you last used while erasing, separately from your Add brush. That separation matters because cleanup work almost always calls for a smaller, more controlled brush than your initial painting pass.
The New, Add, and Erase options visible at top right of panel
At the top right of the adjustment’s masking panel, you’ll see three mode options: New, Add, and Erase. New creates an independent adjustment zone, completely separate from what you’ve already painted. Add is the default and lets you build on an existing mask stroke by stroke, click by click, without interrupting the adjustment. Erase is the one this tutorial centers on, and it does exactly what the name says: it removes the adjustment from wherever you paint. The key detail Willmore points out is that Erase carries its own independent brush settings. It remembers the size, hardness, and flow you last used while erasing, separately from your Add brush. That separation matters because cleanup work almost always calls for a smaller, more controlled brush than your initial painting pass.
Step 3: Switch to Erase Mode and Begin Removing Overspray
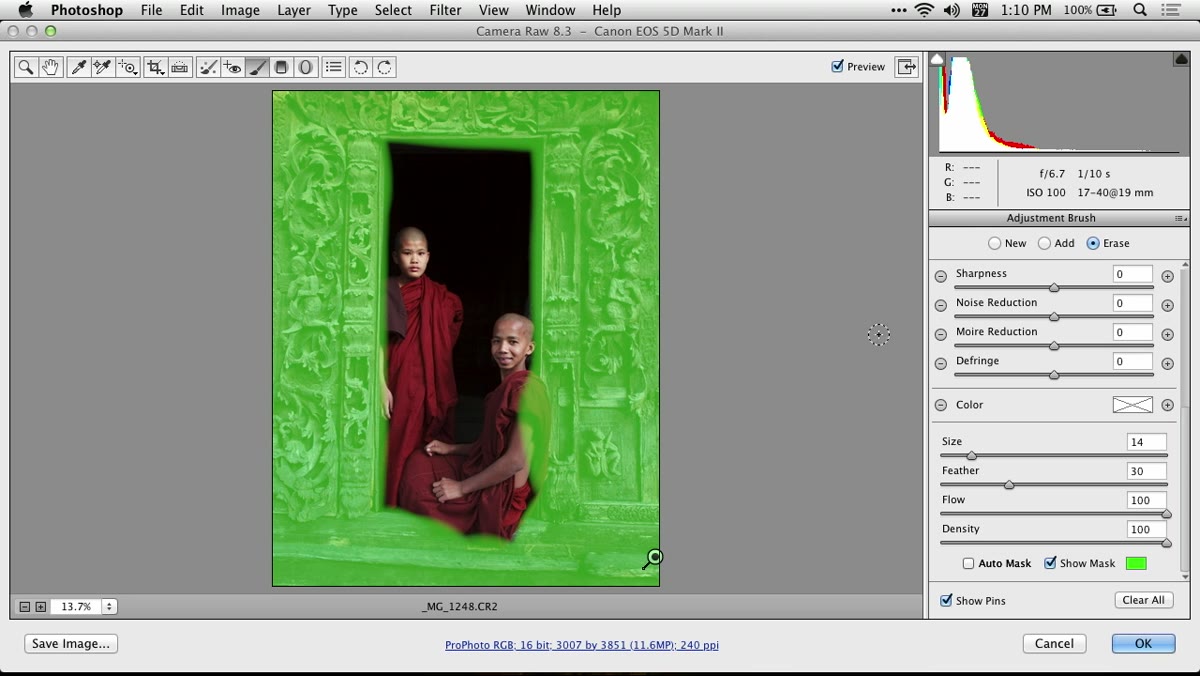 Erase mode selected, brush removing green overlay from subject
With Erase selected, paint directly over the areas of overspray. As you stroke across the image, the colored overlay retreats wherever your brush makes contact, showing you in real time that the adjustment is being pulled back from those pixels. The instinct at this point is to use a large brush and get through it quickly. Resist that. The perimeter between your adjustment zone and your subject is where composites either look professional or fall apart, and a brush that’s too wide will cause new problems on the other edge.
Erase mode selected, brush removing green overlay from subject
With Erase selected, paint directly over the areas of overspray. As you stroke across the image, the colored overlay retreats wherever your brush makes contact, showing you in real time that the adjustment is being pulled back from those pixels. The instinct at this point is to use a large brush and get through it quickly. Resist that. The perimeter between your adjustment zone and your subject is where composites either look professional or fall apart, and a brush that’s too wide will cause new problems on the other edge.
Step 4: Turn On Auto Mask to Let Photoshop Do the Edge Work
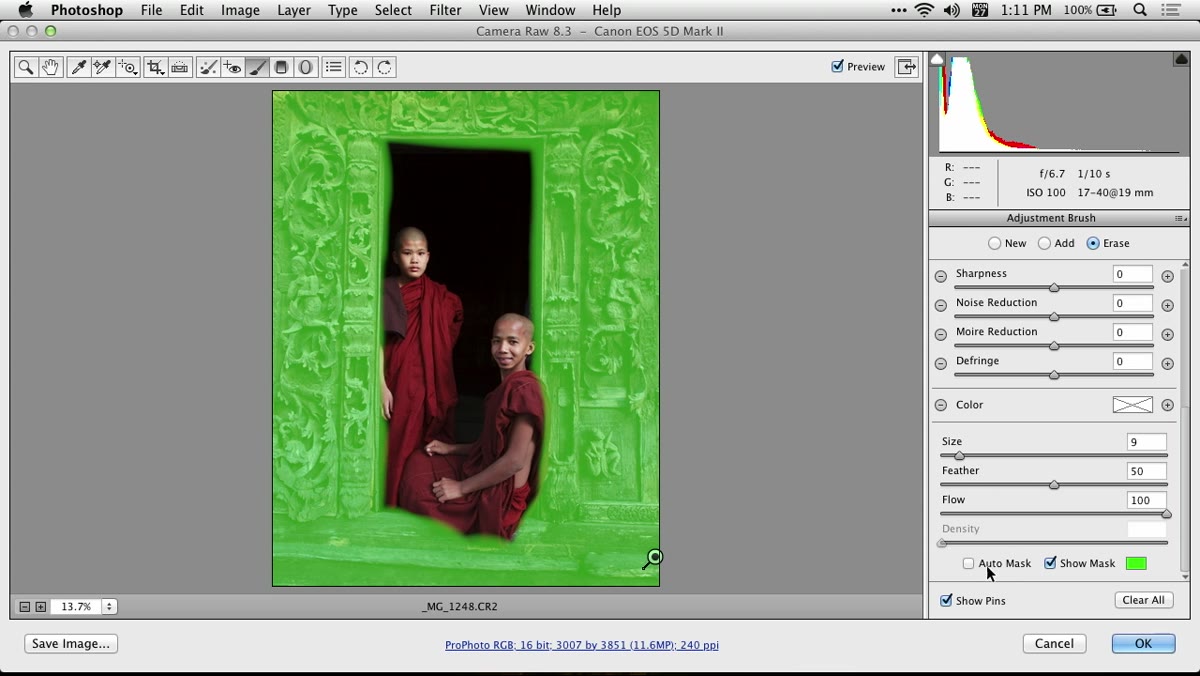 Auto Mask checkbox enabled, brush crosshair visible on subject
Here’s where the technique gets genuinely useful. Enable the “Auto Mask” checkbox in the brush options. When Auto Mask is on, Photoshop shifts its logic: instead of applying your erase stroke to every pixel under the brush, it reads the color sitting directly under the small crosshair at the center of your cursor. It then restricts the effect to pixels that share a similar color to whatever is under that crosshair. The brush can physically overlap the background, but as long as the crosshair stays over your subject, the background pixels remain untouched. You’re essentially telling Photoshop, “Stay on this color family, and don’t cross over.”
Auto Mask checkbox enabled, brush crosshair visible on subject
Here’s where the technique gets genuinely useful. Enable the “Auto Mask” checkbox in the brush options. When Auto Mask is on, Photoshop shifts its logic: instead of applying your erase stroke to every pixel under the brush, it reads the color sitting directly under the small crosshair at the center of your cursor. It then restricts the effect to pixels that share a similar color to whatever is under that crosshair. The brush can physically overlap the background, but as long as the crosshair stays over your subject, the background pixels remain untouched. You’re essentially telling Photoshop, “Stay on this color family, and don’t cross over.”
Step 5: Keep the Crosshair Off the Background
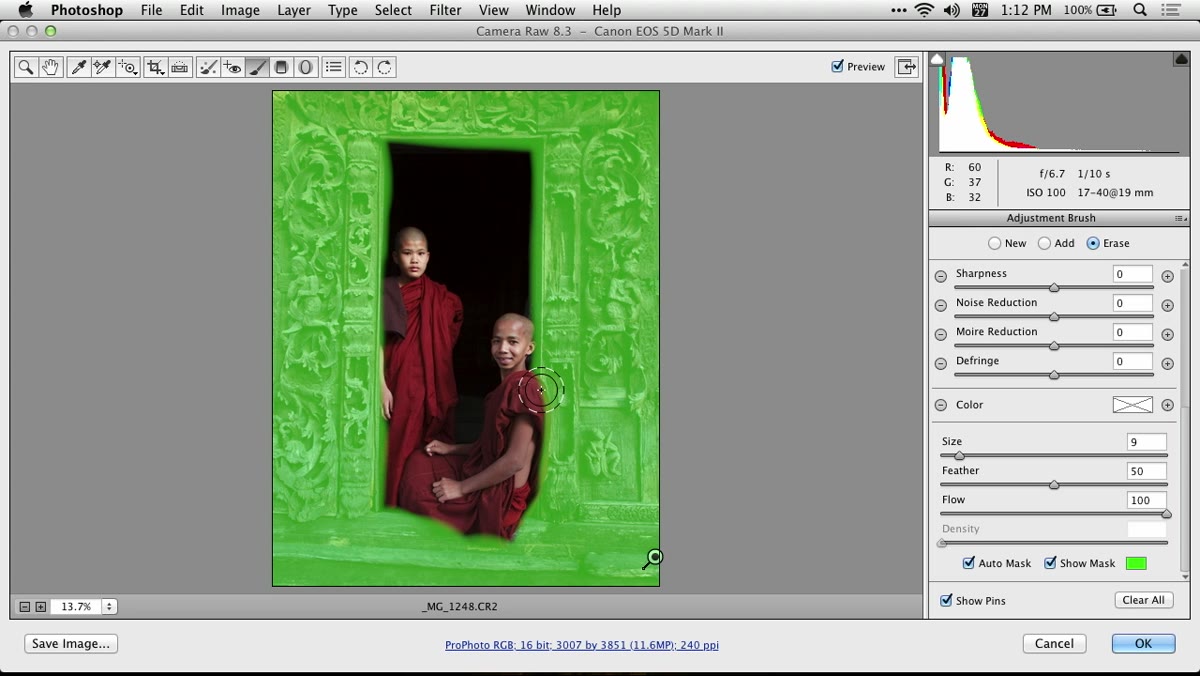 Crosshair positioned on subject, brush edge overlapping background
Auto Mask is powerful but it is not magic, and it has one vulnerability. The moment your crosshair drifts onto the background, Photoshop resamples to that color and starts erasing the adjustment from background pixels instead. Willmore demonstrates this explicitly: when the crosshair lands on a deep shadow in the subject’s clothing that happens to be nearly the same tone as the surrounding area, the feature begins to break down and bleeds into the background. The fix is simple but requires focus. Work in shorter strokes. Let go of the mouse, reposition deliberately so the crosshair is squarely on your subject, then paint again. Zoom in far enough that you can actually see the crosshair placement.
Crosshair positioned on subject, brush edge overlapping background
Auto Mask is powerful but it is not magic, and it has one vulnerability. The moment your crosshair drifts onto the background, Photoshop resamples to that color and starts erasing the adjustment from background pixels instead. Willmore demonstrates this explicitly: when the crosshair lands on a deep shadow in the subject’s clothing that happens to be nearly the same tone as the surrounding area, the feature begins to break down and bleeds into the background. The fix is simple but requires focus. Work in shorter strokes. Let go of the mouse, reposition deliberately so the crosshair is squarely on your subject, then paint again. Zoom in far enough that you can actually see the crosshair placement.
Step 6: Switch Back to Add Mode to Recover Any Over-Erased Areas
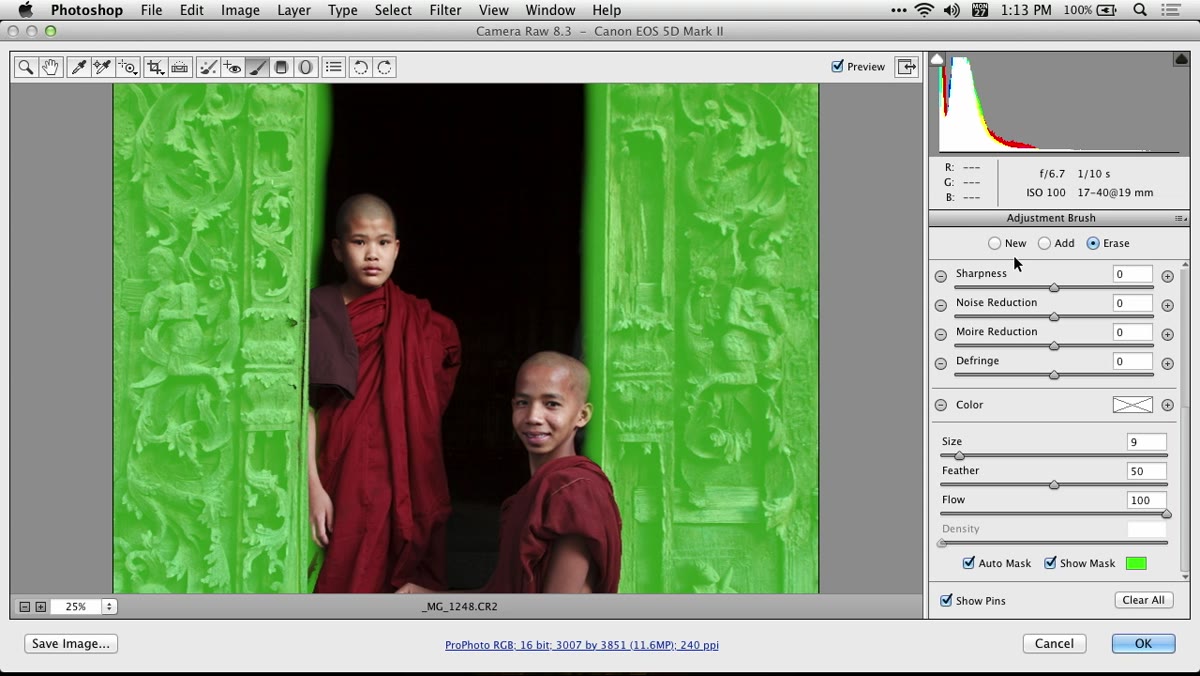 Add mode selected, small brush painting adjustment back in
Erase mode will occasionally take a little too much. You’ll see a sliver of background come back through, or the edge of a subject will lose adjustment coverage it was supposed to keep. When that happens, flip back to Add mode, turn Auto Mask off, choose a small brush, and paint that coverage back in manually. You’re not redoing the work. You’re just patching specific spots. Willmore is clear that in areas of very deep shadow, minor imperfections are largely invisible because there’s so little tonal variation for the adjustment to affect. But in lighter, more visible edge zones, this small correction pass is worth the extra thirty seconds.
Add mode selected, small brush painting adjustment back in
Erase mode will occasionally take a little too much. You’ll see a sliver of background come back through, or the edge of a subject will lose adjustment coverage it was supposed to keep. When that happens, flip back to Add mode, turn Auto Mask off, choose a small brush, and paint that coverage back in manually. You’re not redoing the work. You’re just patching specific spots. Willmore is clear that in areas of very deep shadow, minor imperfections are largely invisible because there’s so little tonal variation for the adjustment to affect. But in lighter, more visible edge zones, this small correction pass is worth the extra thirty seconds.
A Note from Working With This on Actual Projects
The first time I applied this combination to a real piece, a movie-poster-style composite with a figure against a heavily graded background, I still caught myself being too precious about it. I kept zooming out to check the whole image instead of staying zoomed in long enough to actually finish the edge. The Auto Mask feature gives you permission to move more confidently, but it rewards patience. I’ve also found that for composites with subjects against backgrounds that share tonal values, dark coats against dark environments for example, Auto Mask reaches its limit fast. In those situations, I fall back to a luminosity mask built before the adjustment layer, which gives me that color and tone separation upfront rather than trying to recover it afterward. Think of Auto Mask as your best option for clear contrast situations, and a harder-edged luminosity approach for when things get ambiguous.
The single most transferable idea from this tutorial is the separation between Erase and Add brush settings. Most people working in Photoshop treat masking as a one-brush job and then wonder why their cleanup feels clumsy. Having a dedicated erase brush dialed in at a smaller size, separate from the large brush you use to build the adjustment, removes one layer of friction from a workflow that already has enough of it. That distinction alone is worth the ten minutes.
Watch the full tutorial on YouTube to see Ben Willmore walk through the entire sequence on a live image. Watching the crosshair behavior in motion makes the Auto Mask logic click in a way that a written description can only approximate.
Comments (4)
Quality content like this is rare. Keep it up.
My workflow just got 10x faster. Not even kidding.
Printing this out and pinning it next to my monitor. That good.
This is exactly what I needed today. Been struggling with this for weeks.
Leave a Comment