
There is a specific kind of failure that only bothers other compositors. Everyone else looks at the image and sees a person standing in front of a background. You look at it and see a thin halo of wrong color bleeding around every strand of hair like a ghost that refuses to leave the frame. I have shipped work with fringe I wasn’t happy with. Not often, but enough to know it’s one of those details that separates a composite that reads as real from one that reads as assembled.
The problem is physics, mostly. When a photo is taken against a colored background, that background reflects onto the subject’s edges. Hair is the worst offender because it has thousands of semi-transparent edges catching light. When you cut the subject out and drop them onto a new scene, those edges carry the old background color with them. Mask harder and you lose hair. Leave it soft and you keep the fringe. For years I painted around it manually, sampling edge colors and rebuilding them stroke by stroke. It worked, but it was slow and it required constant second-guessing.
In this Aaron Nace (PHLEARN) tutorial, Watch the full tutorial on YouTube, the solution is elegant enough that I’m a little annoyed I wasn’t already doing it this way. It uses clipping masks combined with a color blend mode to paint over fringe without disturbing the luminosity of the hair underneath. Here is the full walkthrough.
Step 1: Set Up Your Composite With a Layer Mask Already Applied
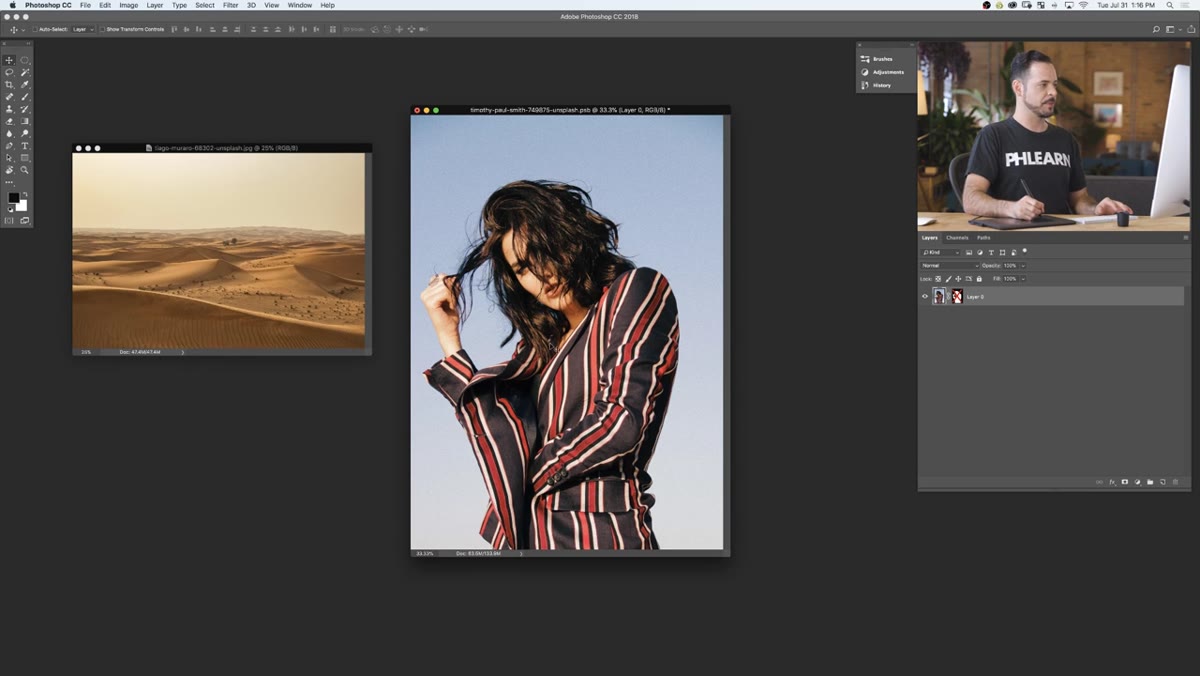 Subject layer with mask and new background below it
Before any fringe removal happens, your subject needs to be cut out with a layer mask and your new background needs to be placed beneath it in the layer stack. Nace moves his background in using the Move tool, converts it to a Smart Object before scaling, and applies a blur to it so the resolution loss from enlarging doesn’t read. The blur also sells the depth-of-field separation between subject and background, which does a lot of heavy lifting for realism before you touch a single fringe pixel.
Subject layer with mask and new background below it
Before any fringe removal happens, your subject needs to be cut out with a layer mask and your new background needs to be placed beneath it in the layer stack. Nace moves his background in using the Move tool, converts it to a Smart Object before scaling, and applies a blur to it so the resolution loss from enlarging doesn’t read. The blur also sells the depth-of-field separation between subject and background, which does a lot of heavy lifting for realism before you touch a single fringe pixel.
If your background is sharp and your subject was shot with any kind of shallow focus, that mismatch will undermine the whole composite. Get the background looking roughly right at this stage. Fringe removal works best when you can actually see the fringe against its new context.
Step 2: Zoom In and Identify the Fringe
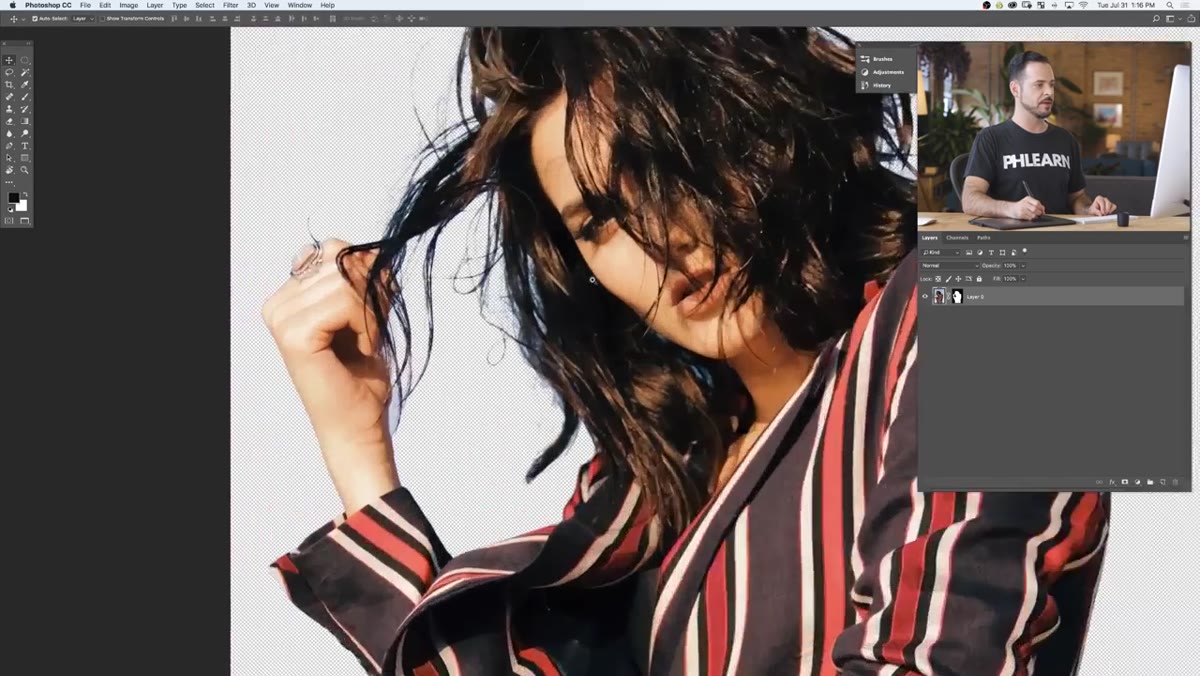 Zoomed view showing blue fringe around hair edges
Zoom to at least 100 percent and look at the hair edges against the new background. What you’re looking for is a thin band of color that belongs to the old background, not the new one. In Nace’s example the original background was blue, so the fringe reads as a blue outline around dark hair. Against a green or neutral background, that blue becomes immediately visible as wrong.
Zoomed view showing blue fringe around hair edges
Zoom to at least 100 percent and look at the hair edges against the new background. What you’re looking for is a thin band of color that belongs to the old background, not the new one. In Nace’s example the original background was blue, so the fringe reads as a blue outline around dark hair. Against a green or neutral background, that blue becomes immediately visible as wrong.
Note where the fringe is heaviest. It’s almost always concentrated in the fine hair at the edges of the silhouette, not along the solid parts of the head or shoulders. This matters because that’s exactly where you’ll be painting in the next steps.
Step 3: Create a New Empty Layer Above the Subject Layer
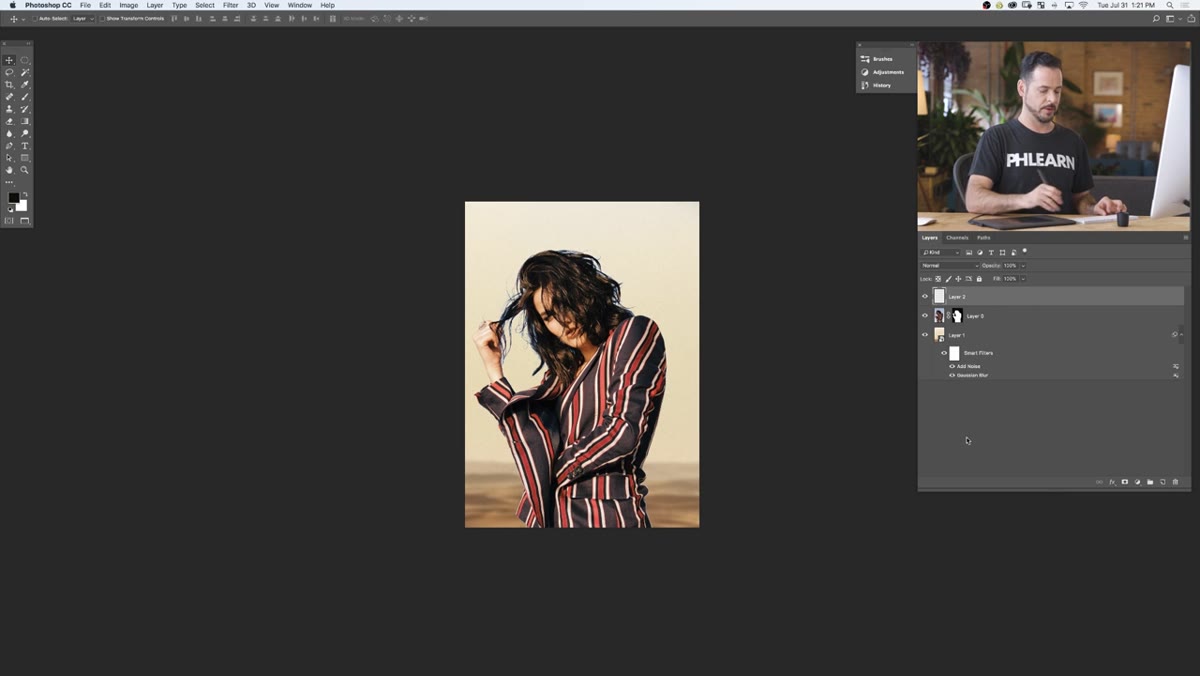 New layer added above subject in Layers panel
Add a new blank layer directly above your masked subject layer in the Layers panel. This layer will hold your corrective paint. Don’t merge it, don’t group it yet. It needs to sit loose above the subject layer for the clipping mask to work correctly in the next step.
New layer added above subject in Layers panel
Add a new blank layer directly above your masked subject layer in the Layers panel. This layer will hold your corrective paint. Don’t merge it, don’t group it yet. It needs to sit loose above the subject layer for the clipping mask to work correctly in the next step.
Keeping this on its own layer means you can reduce opacity, erase mistakes, or throw the whole thing away and start over without touching your mask. Destructive editing on fringe removal is a trap. You almost always want to refine it after you’ve moved further into the color grading of the composite.
Step 4: Apply a Clipping Mask to the New Layer
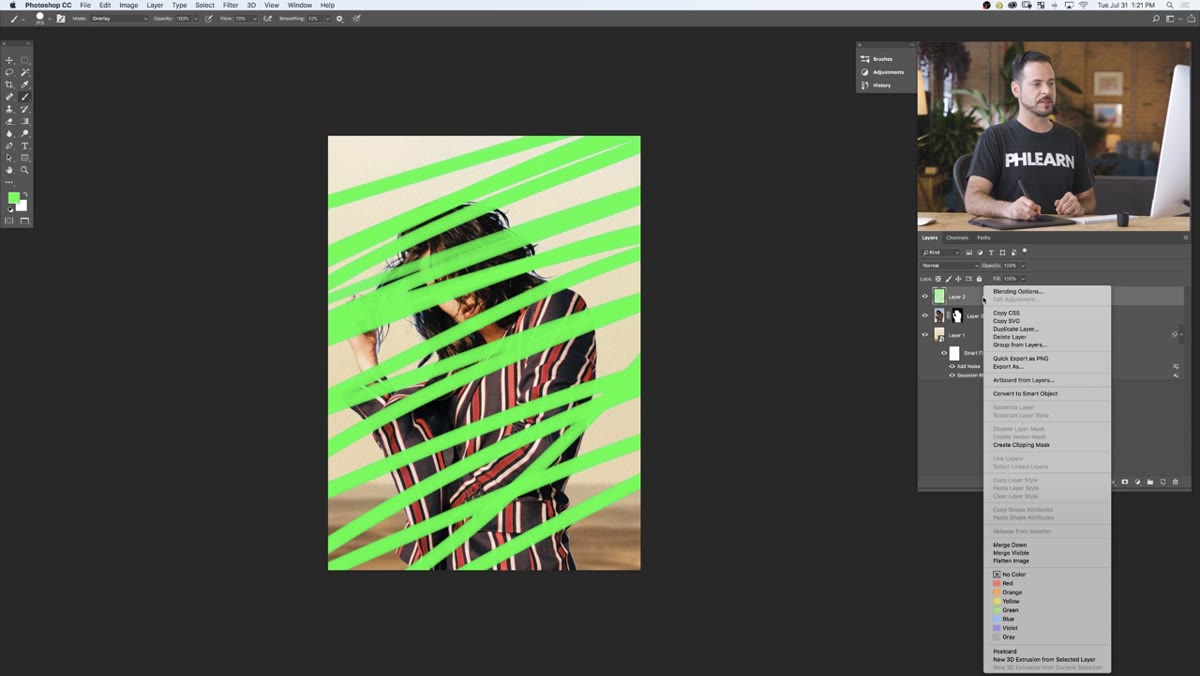 Clipping mask applied, layer indented beneath subject layer
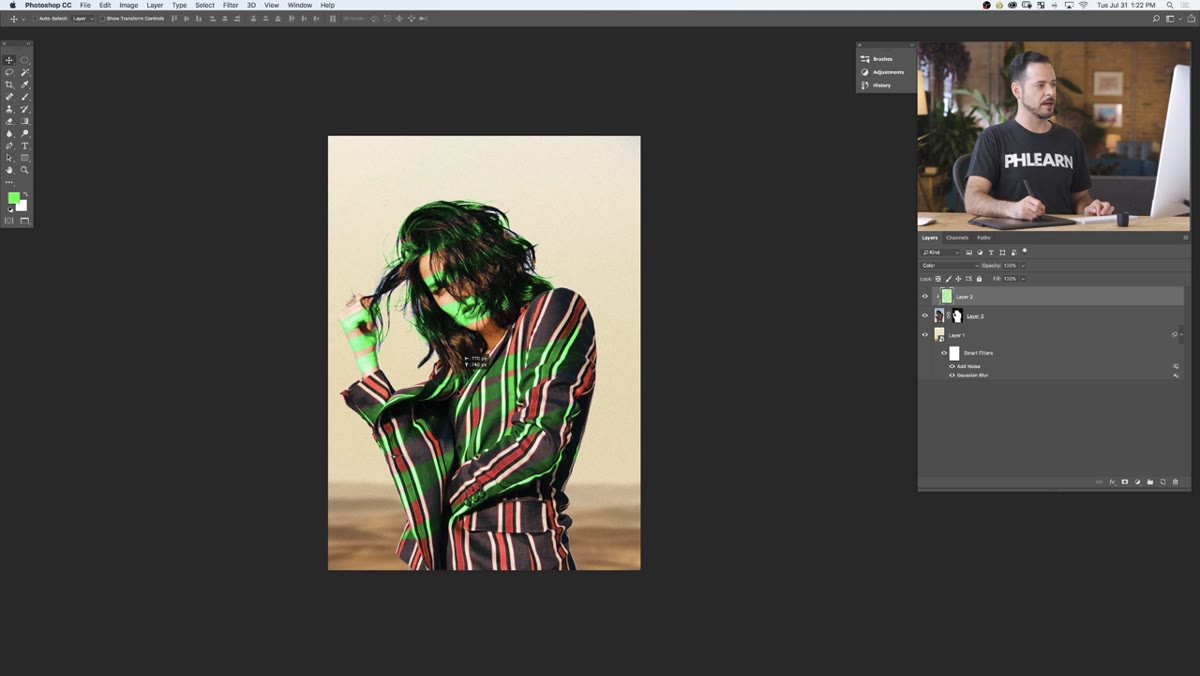
Right-click on the new empty layer and choose Create Clipping Mask. You’ll see it indent in the Layers panel with a small arrow pointing down toward the subject layer below it. What this does is constrain the visibility of your new layer to exactly the area where the subject layer is visible, meaning anything you paint will only appear where the subject exists. It cannot bleed onto the background, no matter how sloppy your brushwork.
Clipping mask applied, layer indented beneath subject layer
Right-click on the new empty layer and choose Create Clipping Mask. You’ll see it indent in the Layers panel with a small arrow pointing down toward the subject layer below it. What this does is constrain the visibility of your new layer to exactly the area where the subject layer is visible, meaning anything you paint will only appear where the subject exists. It cannot bleed onto the background, no matter how sloppy your brushwork.
Nace demonstrates this with a block of green paint to make the mechanic visible. You can see the paint filling the subject’s silhouette completely but stopping at the mask edge. That’s the containment you need. It means your corrective strokes are inherently bounded.
Step 5: Set the New Layer’s Blend Mode to Color
 Blend mode dropdown set to Color in Layers panel
Change the blend mode of the clipping mask layer from Normal to Color. This is the critical setting. The Color blend mode takes the hue and saturation from your paint layer and applies it to the luminosity of the layer below. In practical terms, it means you can paint over fringe areas and push them toward a different hue without making the hair look flat or posterized. The tonal variation in the hair, the light and dark strands, all of that survives. Only the color shifts.
Blend mode dropdown set to Color in Layers panel
Change the blend mode of the clipping mask layer from Normal to Color. This is the critical setting. The Color blend mode takes the hue and saturation from your paint layer and applies it to the luminosity of the layer below. In practical terms, it means you can paint over fringe areas and push them toward a different hue without making the hair look flat or posterized. The tonal variation in the hair, the light and dark strands, all of that survives. Only the color shifts.
Without this blend mode change, painting over fringe with an opaque brush would turn your hair edges into solid patches of color. The Color blend mode lets you correct without obscuring.
Step 6: Sample Hair Color and Paint Over the Fringe Areas
 Brush tool sampling hair color, painting over blue fringe edges
Use the Eyedropper tool to sample a color from the hair itself, somewhere mid-tone that represents the dominant hair color near the fringe area. Switch to the Brush tool with a soft edge, lower the opacity to somewhere between 30 and 60 percent depending on how heavy the fringe is, and paint along the hair edges where the fringe lives.
Brush tool sampling hair color, painting over blue fringe edges
Use the Eyedropper tool to sample a color from the hair itself, somewhere mid-tone that represents the dominant hair color near the fringe area. Switch to the Brush tool with a soft edge, lower the opacity to somewhere between 30 and 60 percent depending on how heavy the fringe is, and paint along the hair edges where the fringe lives.
You’re not trying to paint the hair. You’re pushing the hue of the fringe pixels toward hair color so they stop reading as the old background. Work in short strokes and zoom in close. On stubborn fringe, build up several light passes rather than one heavy one. Because you’re on a clipping mask layer in Color mode, every stroke is non-destructive and bounded. You can sample different tones from the hair as you move around the edge to keep it looking natural.
What I’d Add From My Own Workflow
Nace’s technique handles hue fringe cleanly, but I’ve run into composites where the fringe problem isn’t just color, it’s that the edge pixels are too light or too dark relative to the hair. In those cases I’ll add a second clipping mask layer above the color correction layer, set to Multiply or Screen depending on whether I need to darken or brighten, and paint the same way with a very low opacity brush. The combination of a Color layer for hue correction and a Multiply or Screen layer for luminosity correction covers nearly every edge problem I encounter.
I also always keep both layers grouped and labeled. Six months from now when a client wants a revision, you need to know exactly which layer holds the fringe work.
The single most important thing this tutorial taught me is that the clipping mask plus Color blend mode combination turns a tedious manual problem into a targeted, reversible fix. The containment of the clipping mask means you can work quickly without worrying about painting outside the lines. The Color blend mode means the hair stays looking like hair. Together they solve the blue ghost problem in a fraction of the time.
Watch the full tutorial on YouTube to see Aaron Nace walk through each stage with the actual footage and get a feel for the brush pressure and sampling decisions in real time.
Comments
Leave a Comment