There is a particular kind of frustration that comes from finishing an edit, stepping back, and seeing a glowing outline around your sky mask like the photo is wearing a neon sign. I have felt it on commercial work, on personal projects, and more times than I care to count on final deliverables that were supposedly done. The halo effect, that thin rim of light or dark that appears right at the boundary between a selected sky and the foreground beneath it, is one of those problems that seems like it should have a simple fix. It does. But the fix is not where most people look for it.
In this Matt Kloskowski tutorial, Kloskowski walks through a two-part approach to eliminating sky mask halos inside Lightroom and Adobe Camera Raw. What I appreciate about his method is that the first part is not a technical trick at all. It is a reality check about what the edit is actually doing to the image, and why the mask looks wrong in the first place. The second part is a brush technique that is precise, repeatable, and genuinely useful. Together they cover the two root causes of the problem, and once you understand both, you start seeing the halo for what it is rather than just fighting its symptoms.
Step 1: Make Your Initial Sky Selection
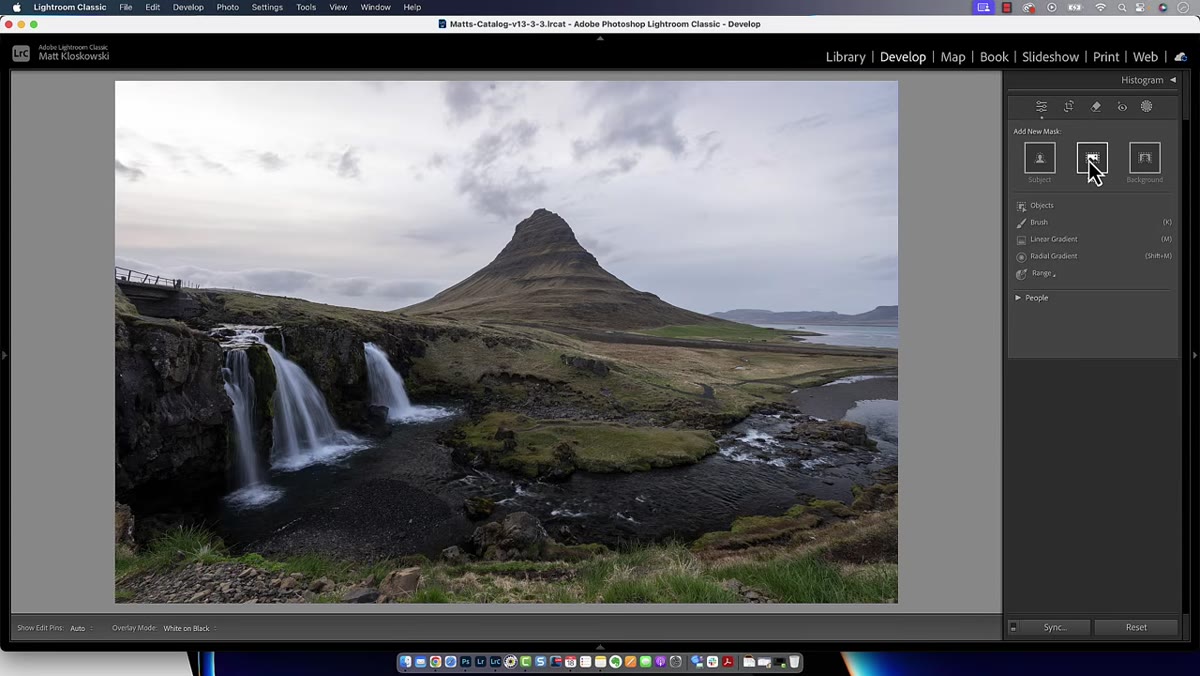 Masking panel open with Select Sky option visible
Open the Masking panel in Lightroom or Camera Raw and use the Select Sky option to generate your initial sky mask. This is the starting point most of us default to, and it works well for clean-edged skies. The AI selection will do a reasonable job separating sky from foreground in most landscape shots. Once the mask is active, you will see the color overlay indicating what is selected.
Masking panel open with Select Sky option visible
Open the Masking panel in Lightroom or Camera Raw and use the Select Sky option to generate your initial sky mask. This is the starting point most of us default to, and it works well for clean-edged skies. The AI selection will do a reasonable job separating sky from foreground in most landscape shots. Once the mask is active, you will see the color overlay indicating what is selected.
Kloskowski suggests switching the overlay display from the default color view to a white-on-black or black-on-white view, which makes it significantly easier to read the actual edge quality of the mask. You are looking for how cleanly the selection follows the horizon line, the treeline, or whatever the sky-to-ground transition is in your image.
Step 2: Make a Conservative Exposure Adjustment to the Sky
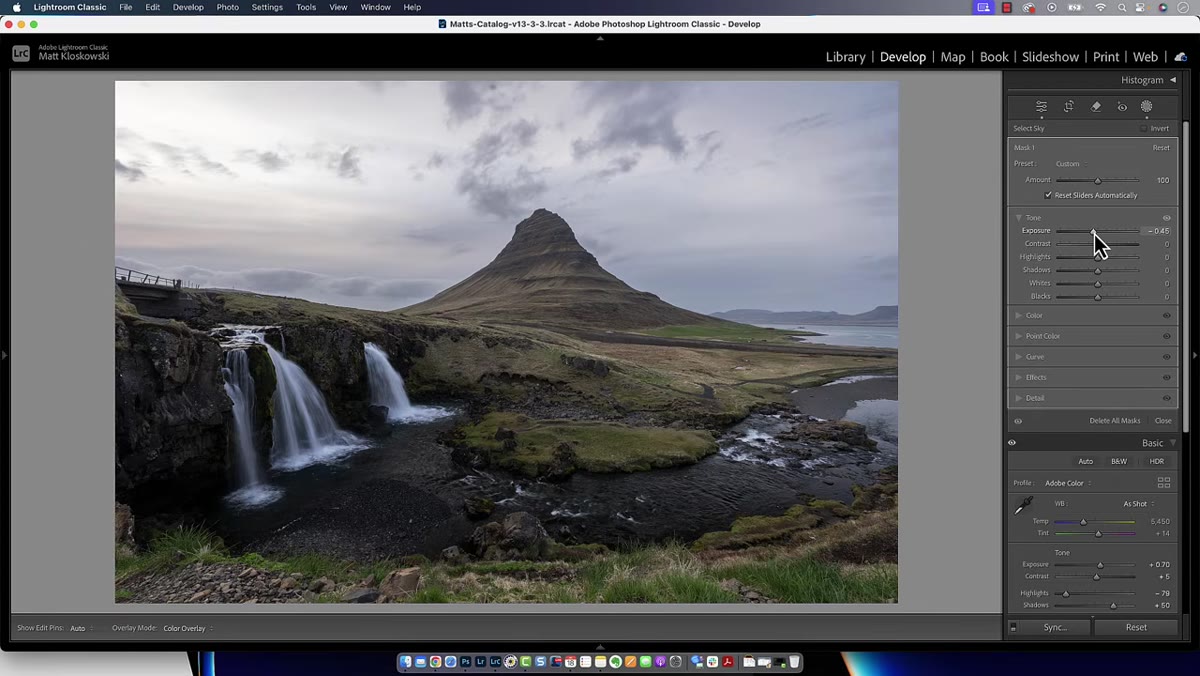 Exposure slider being pulled down on sky mask adjustment
With the sky mask active, bring down the exposure. This is where the halo reveals itself. As you push the adjustment further, the edge between the selected sky and the unselected foreground starts to show a visible rim. It looks like the software failed to make a clean selection, but that is not actually what is happening.
Exposure slider being pulled down on sky mask adjustment
With the sky mask active, bring down the exposure. This is where the halo reveals itself. As you push the adjustment further, the edge between the selected sky and the unselected foreground starts to show a visible rim. It looks like the software failed to make a clean selection, but that is not actually what is happening.
What you are really seeing is the consequence of creating a large tonal gap between two areas of the image that share edge pixels. The mask can only be so precise. When the sky is darkened dramatically and the foreground stays bright, those transitional pixels along the border land in an in-between zone that reads as a halo. The mask did not get worse. The edit made the mask’s imprecision visible.
Step 3: Recognize the Real Problem Before Reaching for a Fix
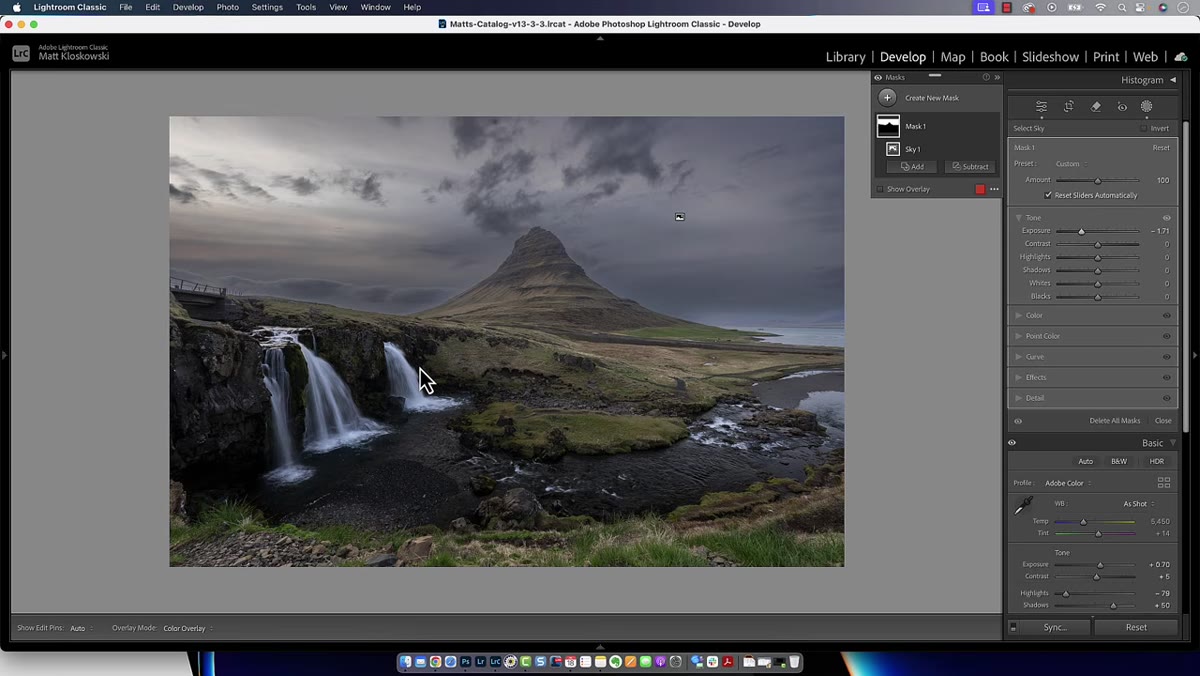 Visible halo artifact along horizon line after strong exposure pull
Kloskowski makes a point here that I think is the most valuable thing in the entire tutorial: if you can see an obvious halo, the edit itself may be the problem. When a sky darkening is so severe that it creates a believability gap between the sky and the foreground light, no amount of mask refinement is going to save it. The light hitting the hills or the ground near the horizon still reflects the original sky brightness, and a drastically darkened sky simply does not match that.
Visible halo artifact along horizon line after strong exposure pull
Kloskowski makes a point here that I think is the most valuable thing in the entire tutorial: if you can see an obvious halo, the edit itself may be the problem. When a sky darkening is so severe that it creates a believability gap between the sky and the foreground light, no amount of mask refinement is going to save it. The light hitting the hills or the ground near the horizon still reflects the original sky brightness, and a drastically darkened sky simply does not match that.
This is something I think about constantly in compositing work. A technically perfect mask can still produce a result that reads as fake because the tonal logic of the image is broken. Before you try to fix the mask, ask whether the adjustment itself is too aggressive for what the image can support. Pull the exposure back toward a level that looks physically plausible, even if it is not as dramatic as you initially wanted.
Step 4: Add a Brush to the Existing Mask
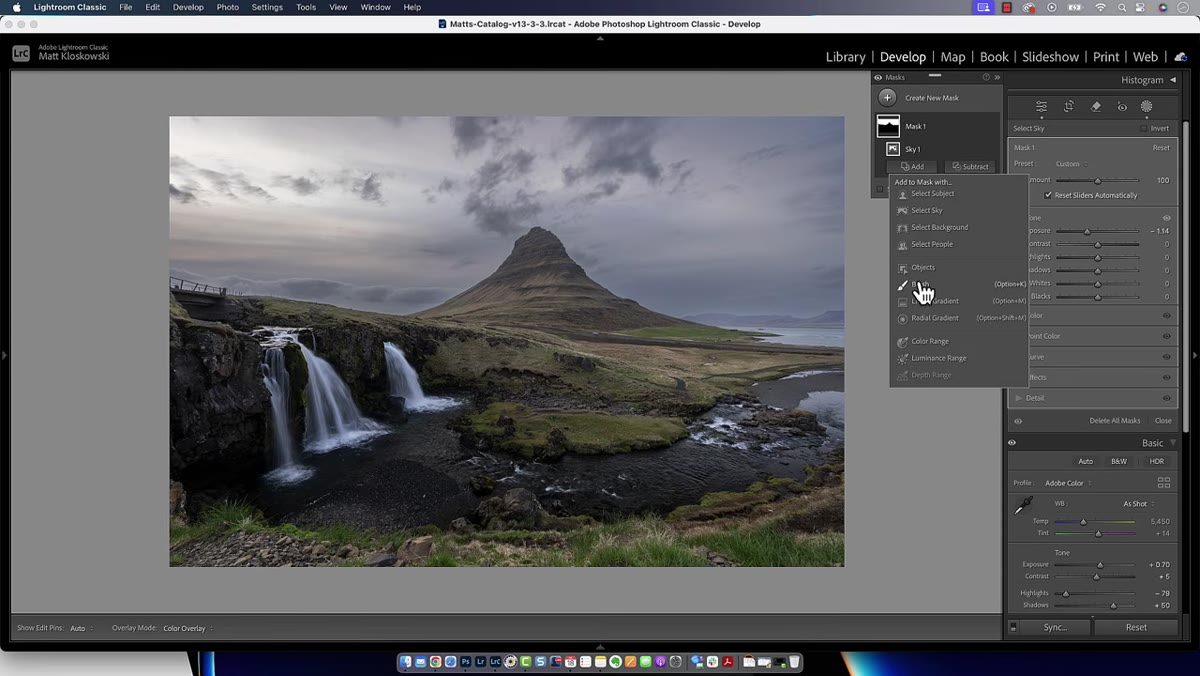 Add menu open with Brush option selected inside mask panel
Once you have brought the sky adjustment to a more believable level, go back to the mask you created and click the Add button within the mask options. From the dropdown, choose Brush. You are not creating a new mask here. You are adding to the existing sky mask with a brush stroke, which allows you to feather the edge of the selection in a controlled way.
Add menu open with Brush option selected inside mask panel
Once you have brought the sky adjustment to a more believable level, go back to the mask you created and click the Add button within the mask options. From the dropdown, choose Brush. You are not creating a new mask here. You are adding to the existing sky mask with a brush stroke, which allows you to feather the edge of the selection in a controlled way.
This is an important distinction. Adding to a mask in this context lets you extend and soften the transition zone along the horizon line without losing the core sky selection you already have.
Step 5: Configure the Brush for a Feathered Edge Pass
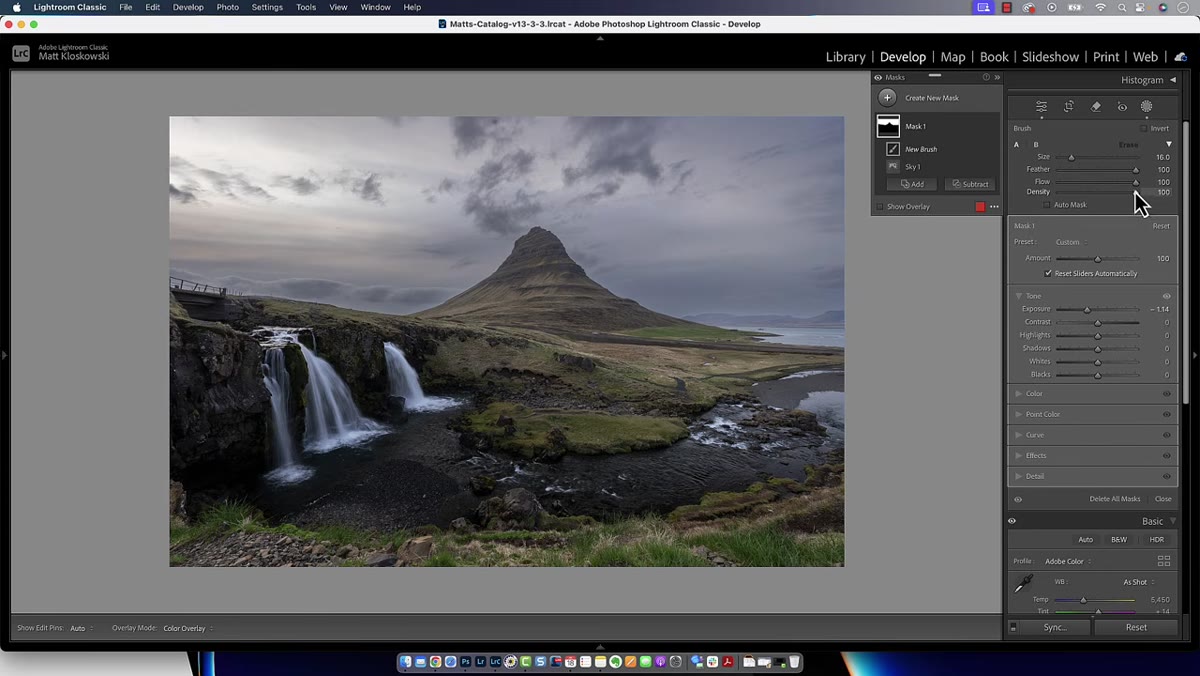 Brush settings panel showing Feather at 100, Flow and Density at 100
Set the brush Feather to 100 percent. Set Flow and Density both to 100 percent as well. Then make the brush very large, using the right bracket key to size it up. The goal here is to use the outer feathered ring of the brush, not its hard center, to do the work.
Brush settings panel showing Feather at 100, Flow and Density at 100
Set the brush Feather to 100 percent. Set Flow and Density both to 100 percent as well. Then make the brush very large, using the right bracket key to size it up. The goal here is to use the outer feathered ring of the brush, not its hard center, to do the work.
The visual cue Kloskowski describes is key: you want to position the brush so that only the very edge of the outer ring, the soft transitional zone, just barely touches into the foreground side of the horizon. Not the sky. The foreground. This is the opposite of what feels intuitive, which is probably why most people miss it.
Step 6: Paint Along the Horizon to Soften the Halo
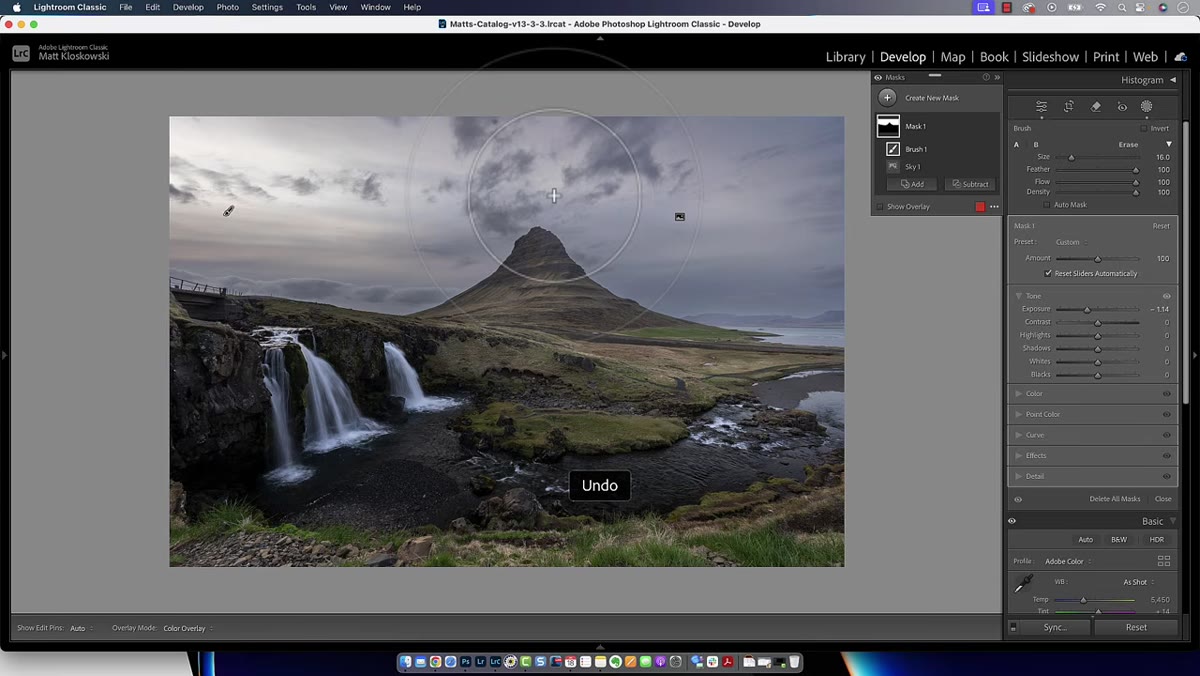 Large feathered brush being painted along the horizon line
With the brush sized and configured, paint a single pass along the horizon or the sky-to-ground boundary. Because you are using a large feathered brush and positioning it so only the soft outer edge grazes the foreground, you are effectively blending the mask’s edge outward in a very gentle gradient. This softens the hard rim that creates the halo without blowing out the mask above it.
Large feathered brush being painted along the horizon line
With the brush sized and configured, paint a single pass along the horizon or the sky-to-ground boundary. Because you are using a large feathered brush and positioning it so only the soft outer edge grazes the foreground, you are effectively blending the mask’s edge outward in a very gentle gradient. This softens the hard rim that creates the halo without blowing out the mask above it.
Switch to the white-on-black overlay while you work so you can actually see what the brush is doing to the mask in real time. The edge should become slightly less defined, which is exactly what you want. The goal is a transition, not a hard line.
A Note From Compositing Work
The brush technique Kloskowski demonstrates here maps almost directly onto how I think about edge blending when building composite images in Photoshop. The principle is identical: the edge of a selection or a mask is never truly a line. It is a zone. The wider and softer that zone, the more two elements of an image feel like they belong together.
Where I would extend this in a compositing context is to also consider painting some of the foreground’s color or luminosity back into the sky edge using a separate layer. In Lightroom you cannot do that, but the underlying logic is the same. Halos exist because two image regions stop abruptly where they meet. Anything that creates a gradual handoff between them, whether through mask feathering or tonal blending, reduces the artifact.
The single most important thing to take away from Kloskowski’s tutorial is this: a halo is often a symptom of an edit that has outpaced what the image can support, not a masking failure. Fix the edit first, then refine the edge. That order matters.
Watch the full tutorial on YouTube to see both techniques demonstrated on an actual viewer-submitted landscape photo, including the mask overlay views that make the before-and-after difference clear.
Comments (4)
The tip about the halo problem how i finally was the missing piece for me. Thank you.
I tried this on a client project yesterday and the results were way better than expected.
Quality content like this is rare. Keep it up.
Bookmarked. Coming back to this one for sure.
Leave a Comment