
There is a particular kind of frustration that comes from knowing exactly what a photo needs and watching your tools refuse to cooperate. I run into it most often when a client hands me a source image where the thing I need to isolate shares color or luminance values with something I desperately need to leave alone. Global adjustments are useless. A brush is too slow and too imprecise. And you end up either compromising the edit or spending an hour in Photoshop doing something that, frankly, should have taken five minutes. That is the problem that pulled me into this tutorial by Mark Denney, and it is the problem his workflow solves with an elegance I genuinely did not expect from Lightroom.
Watch the full tutorial on YouTube
In this Mark Denney tutorial, the example image is a blue-hour photograph of a sailboat shot in Greenland, and the goal is simple: make the red sails pop without touching the clouds, which happen to share some of the same tonal and color territory. What Denney demonstrates is not just a clever trick. It is a complete philosophy about how to approach masking: start broad, then subtract your way to precision using the tool’s ability to layer different selection types on top of each other. I have been doing compositing work long enough to have a folder labeled “failures” that I review every month, and after watching this, I went back and looked at a few old jobs where I fought with exactly this problem. I overcomplicated all of them.
Step 1: Identify Why a Global Adjustment Fails First
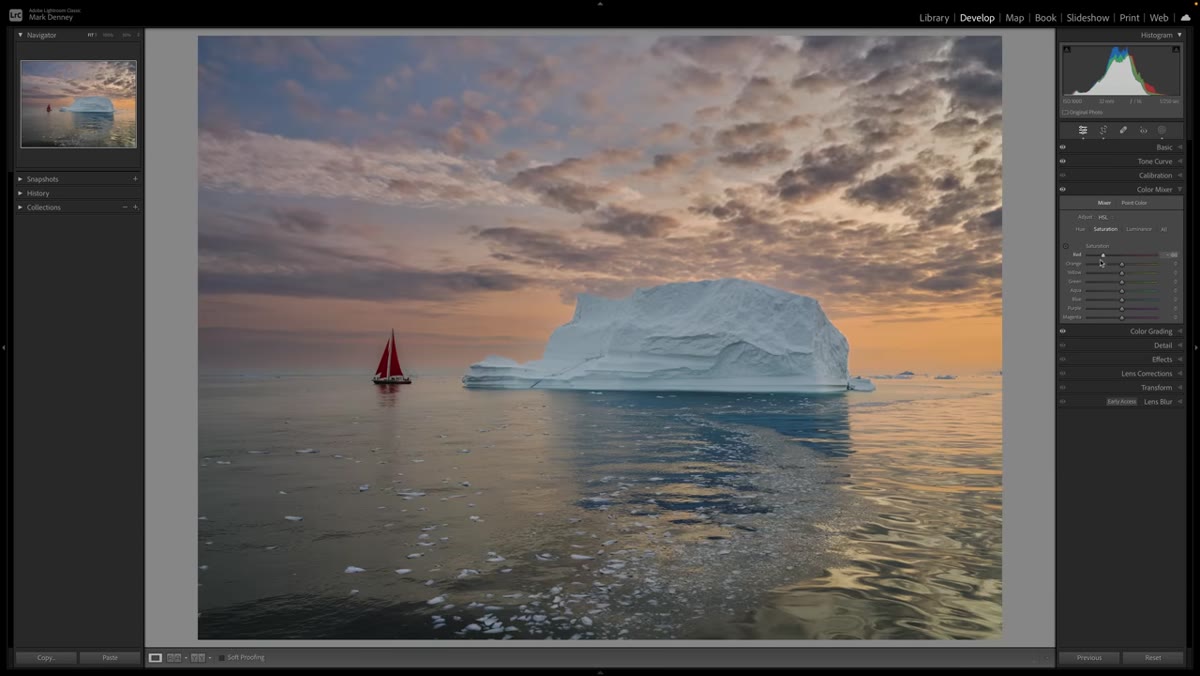 Color mixer red saturation slider affecting clouds as well as sails
Before reaching for a mask, test the global adjustment to understand the scope of the problem. In this case, that means going to the Develop module, opening the Color Mixer, and pushing the red saturation slider. Watch what happens not to your target subject, but to everything else. In Denney’s example, the clouds immediately shift, which tells you exactly why a targeted mask is necessary. This diagnostic step is not wasted time. It shows you precisely which tonal regions you need to protect, which will inform every refinement decision you make later. If you skip this step and jump straight into masking, you are working blind.
Color mixer red saturation slider affecting clouds as well as sails
Before reaching for a mask, test the global adjustment to understand the scope of the problem. In this case, that means going to the Develop module, opening the Color Mixer, and pushing the red saturation slider. Watch what happens not to your target subject, but to everything else. In Denney’s example, the clouds immediately shift, which tells you exactly why a targeted mask is necessary. This diagnostic step is not wasted time. It shows you precisely which tonal regions you need to protect, which will inform every refinement decision you make later. If you skip this step and jump straight into masking, you are working blind.
Step 2: Open the Masking Panel and Choose Object Selection
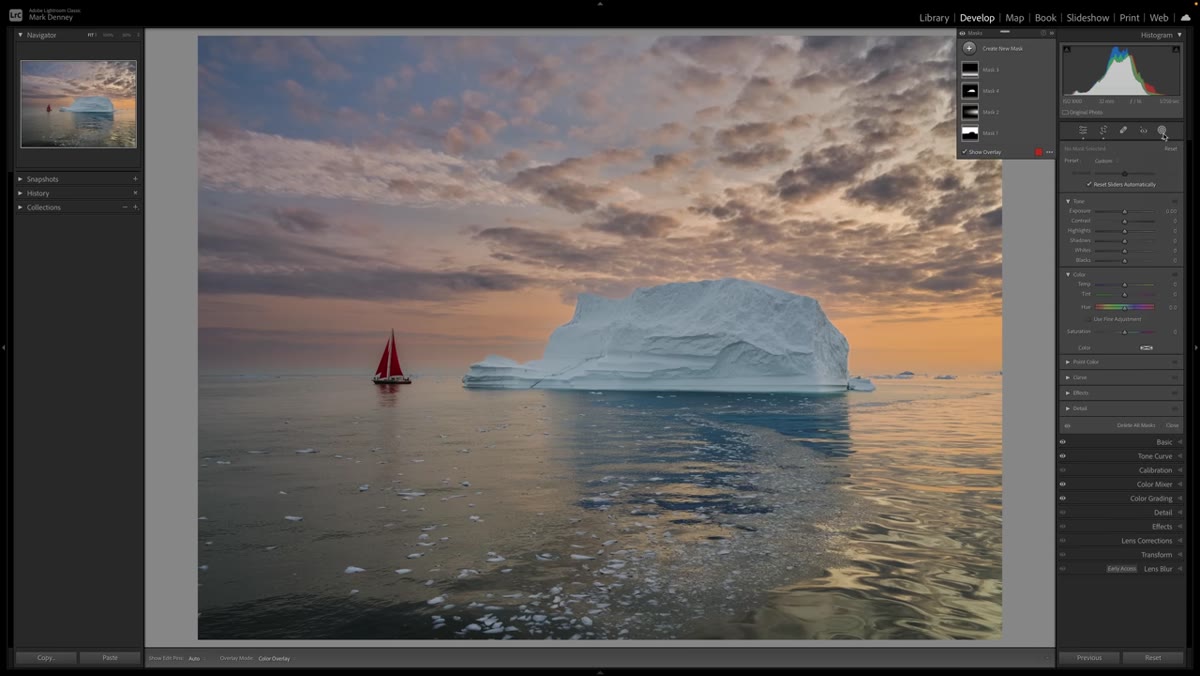 Masking panel open with ‘Create New Mask’ and Objects option visible
Navigate to the masking panel in the Develop module and select “Create New Mask,” then choose “Objects.” Lightroom gives you two input methods here: a freehand brush, or a marquee-style rectangular selection. Denney prefers the rectangle, and after experimenting with both, I agree. The rectangle forces you to be deliberate about what you are including in the initial analysis area, which tends to produce a cleaner first-pass selection than painting loosely over a subject. Draw your rectangle snugly around the object you want to isolate, give Lightroom a moment to process, and let it do its initial detection before you judge the result.
Masking panel open with ‘Create New Mask’ and Objects option visible
Navigate to the masking panel in the Develop module and select “Create New Mask,” then choose “Objects.” Lightroom gives you two input methods here: a freehand brush, or a marquee-style rectangular selection. Denney prefers the rectangle, and after experimenting with both, I agree. The rectangle forces you to be deliberate about what you are including in the initial analysis area, which tends to produce a cleaner first-pass selection than painting loosely over a subject. Draw your rectangle snugly around the object you want to isolate, give Lightroom a moment to process, and let it do its initial detection before you judge the result.
Step 3: Evaluate the Initial Selection Without Judging It Too Harshly
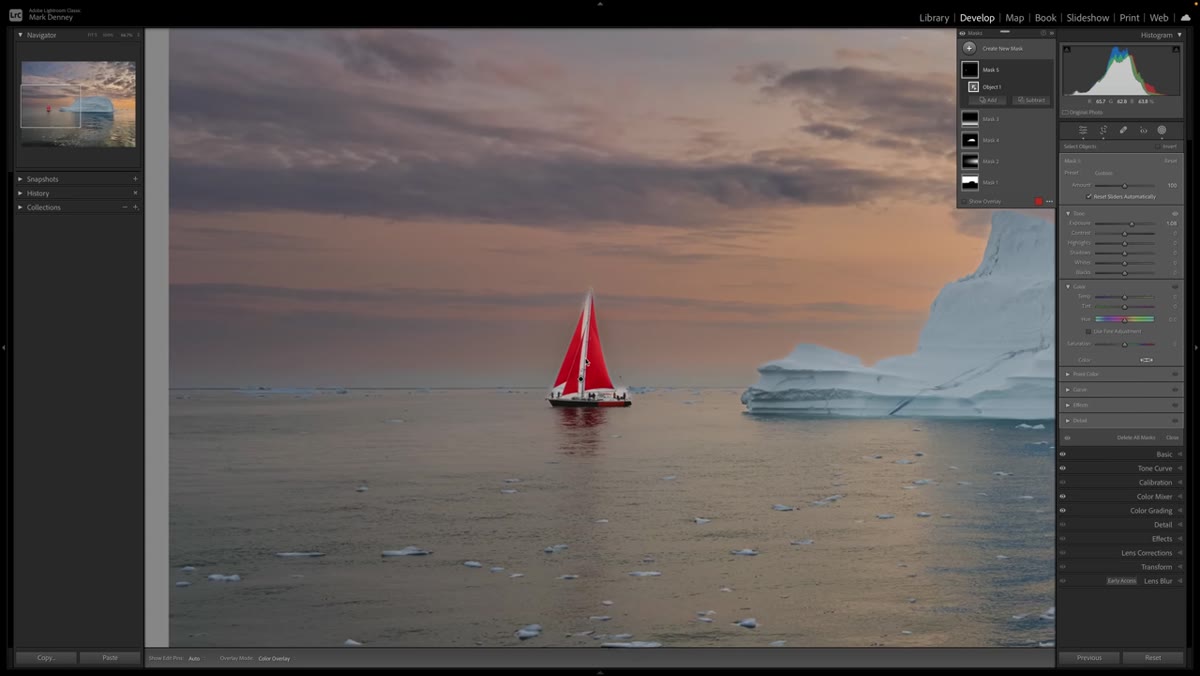
 Object mask applied showing sails selected but also hull and sky gaps
Here is where most people abandon the tool. The initial object selection will almost certainly be imperfect. In the sailboat example, Lightroom correctly identifies the sails but also pulls in portions of the hull, slivers of sky between the rigging, and other areas you do not want. Temporarily increase the exposure or push a slider to a visible extreme so you can clearly see exactly what the mask is and is not catching. Do not delete this mask and start over. The imperfect selection you have right now is the foundation, and what comes next is where the real power lives. Accepting that all masks require refinement is the single biggest mindset shift that separates fast, confident editors from people who stay frustrated.
Object mask applied showing sails selected but also hull and sky gaps
Here is where most people abandon the tool. The initial object selection will almost certainly be imperfect. In the sailboat example, Lightroom correctly identifies the sails but also pulls in portions of the hull, slivers of sky between the rigging, and other areas you do not want. Temporarily increase the exposure or push a slider to a visible extreme so you can clearly see exactly what the mask is and is not catching. Do not delete this mask and start over. The imperfect selection you have right now is the foundation, and what comes next is where the real power lives. Accepting that all masks require refinement is the single biggest mindset shift that separates fast, confident editors from people who stay frustrated.
Step 4: Use Subtract with Color Range to Carve Out Unwanted Areas
 Subtract menu open with Color Range option highlighted
With your object mask still active, go to the “Subtract” option within that mask and choose “Color Range.” Your cursor becomes an eyedropper. Click directly on a color in your image that you want removed from the selection. In this workflow, that means clicking on areas like the sky gaps or the boat hull. Each click places a sample point. Hold Shift and click additional areas to add more color samples to the subtraction simultaneously. Lightroom builds a refined exclusion zone based on those color samples, and you will see the overlay update in real time. Work methodically around the edges of your intended subject, sampling each distinct color you want removed. The goal is not perfection in one click. It is progressive narrowing.
Subtract menu open with Color Range option highlighted
With your object mask still active, go to the “Subtract” option within that mask and choose “Color Range.” Your cursor becomes an eyedropper. Click directly on a color in your image that you want removed from the selection. In this workflow, that means clicking on areas like the sky gaps or the boat hull. Each click places a sample point. Hold Shift and click additional areas to add more color samples to the subtraction simultaneously. Lightroom builds a refined exclusion zone based on those color samples, and you will see the overlay update in real time. Work methodically around the edges of your intended subject, sampling each distinct color you want removed. The goal is not perfection in one click. It is progressive narrowing.
Step 5: Dial In the Color Range Smoothness Slider
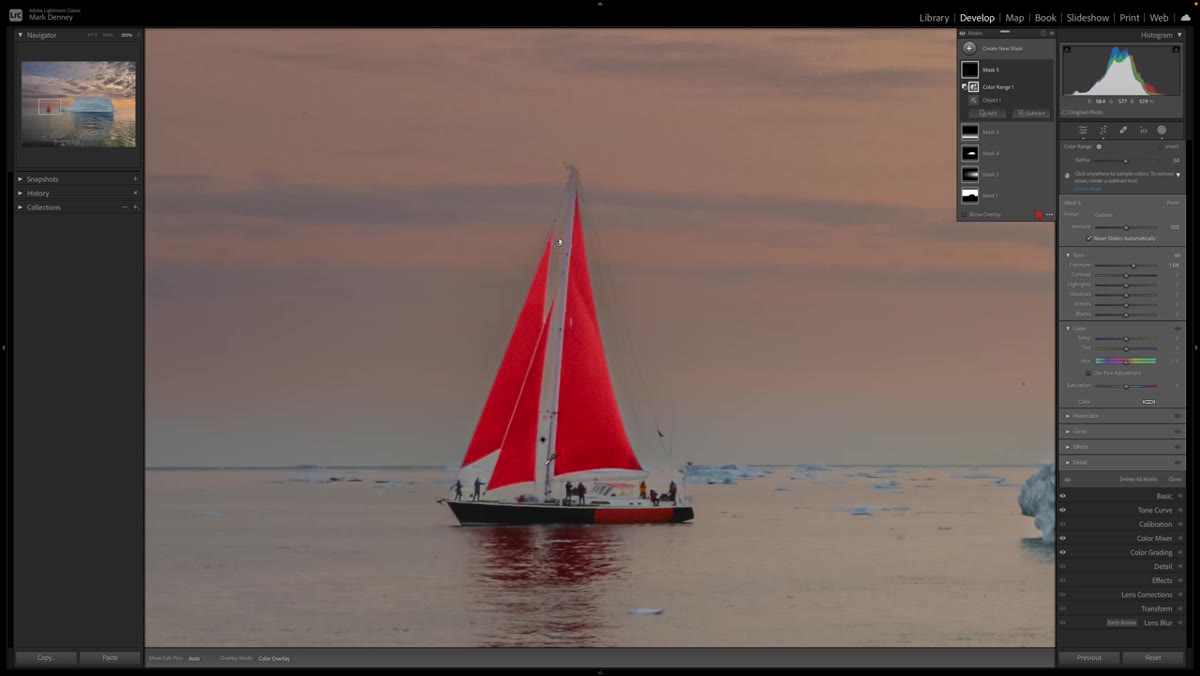 Color range panel showing smoothness slider being adjusted
After placing your color samples, look for the smoothness or refinement slider within the Color Range panel. This controls how hard or soft the transition is between what is included and what is subtracted. A lower value produces a tighter, harder edge. A higher value feathers the boundary and prevents the kind of halo effect that makes masked adjustments look artificial. For subjects with fine edges or textured boundaries, like rigging on a sailboat or hair or foliage in a composite, err toward a slightly higher smoothness value. You can always layer another subtract pass if the selection is still pulling in unwanted areas. Take your time with this slider. It does more work than it looks like it does.
Color range panel showing smoothness slider being adjusted
After placing your color samples, look for the smoothness or refinement slider within the Color Range panel. This controls how hard or soft the transition is between what is included and what is subtracted. A lower value produces a tighter, harder edge. A higher value feathers the boundary and prevents the kind of halo effect that makes masked adjustments look artificial. For subjects with fine edges or textured boundaries, like rigging on a sailboat or hair or foliage in a composite, err toward a slightly higher smoothness value. You can always layer another subtract pass if the selection is still pulling in unwanted areas. Take your time with this slider. It does more work than it looks like it does.
Step 6: Apply Your Adjustment and Verify Against the Original Problem
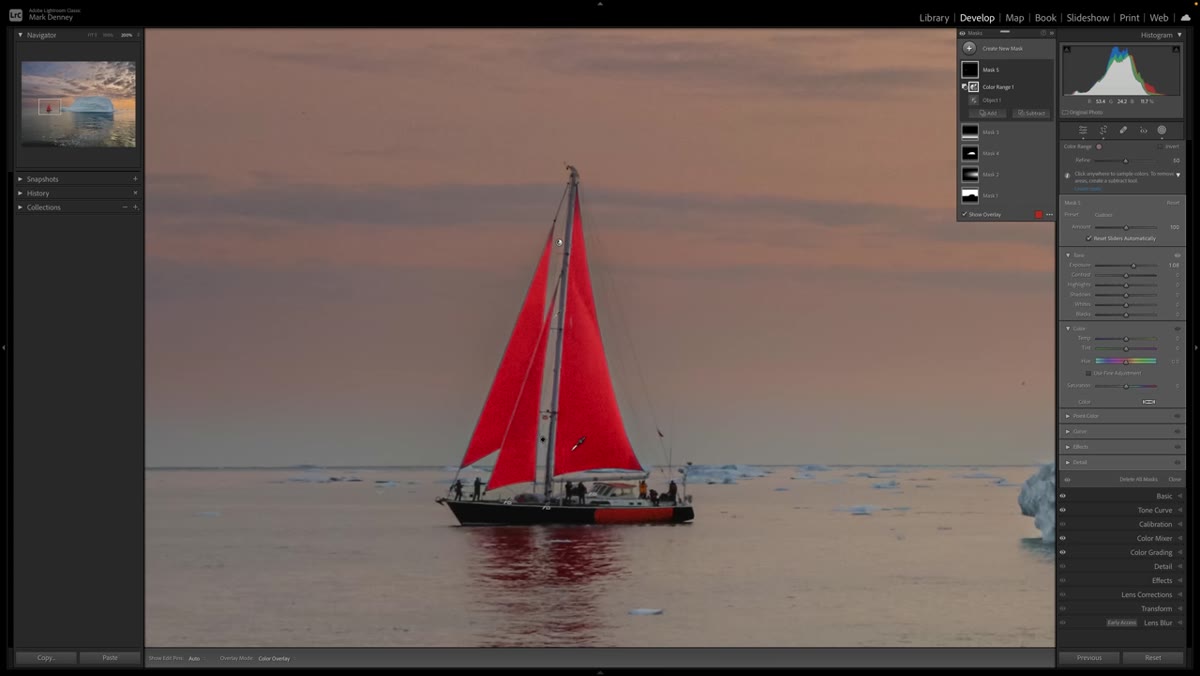 Final mask applied with exposure increase showing isolated sails only
Once the mask is refined, apply your actual adjustment. In Denney’s case, that is a targeted boost to saturation and luminance for the red sails only. Toggle the mask visibility on and off to confirm that your edit is isolated. Go back and check the area that failed during your Step 1 diagnostic test. In this example, check those clouds. If they are not moving while the sails respond to your slider, the mask is working. This verification pass is not optional. It is the difference between a file you can confidently hand to a client and one that has a problem you will only notice after the job is closed.
Final mask applied with exposure increase showing isolated sails only
Once the mask is refined, apply your actual adjustment. In Denney’s case, that is a targeted boost to saturation and luminance for the red sails only. Toggle the mask visibility on and off to confirm that your edit is isolated. Go back and check the area that failed during your Step 1 diagnostic test. In this example, check those clouds. If they are not moving while the sails respond to your slider, the mask is working. This verification pass is not optional. It is the difference between a file you can confidently hand to a client and one that has a problem you will only notice after the job is closed.
How I Would Take This Further in Compositing Work
The power of this layered masking approach does not stop at single-image editing. When I am building a composite and I need to integrate an element that shares color values with the background, I use this exact logic inside Lightroom during the raw processing stage before I ever move to Photoshop. Getting the tonal relationships right in the raw file means less correction work later and more believable blending. I have also started using this subtract-by-color-range technique to build luminosity-style masks in Lightroom for landscape compositing work. The combination of an initial subject selection refined by color subtraction can approximate the kind of precise tonal masking that people usually associate with dedicated plugins, and it lives right inside your raw processor.
The core lesson here is architectural: start with the broadest possible selection that gets you in the right neighborhood, then subtract your way to precision rather than trying to build a perfect mask from scratch. Denney frames this as a “mask anything” philosophy, and that framing is correct. The object selection tool is not limited to clean, high-contrast subjects. It is a starting point for a layered process that can isolate virtually anything if you are willing to refine it.
Watch the full tutorial on YouTube
Comments (3)
Great breakdown. The step-by-step approach really helps.
This is the kind of content that keeps me coming back.
Excellent tutorial. I'd add that from a photoshop standpoint, this technique is incredibly versatile.
Leave a Comment