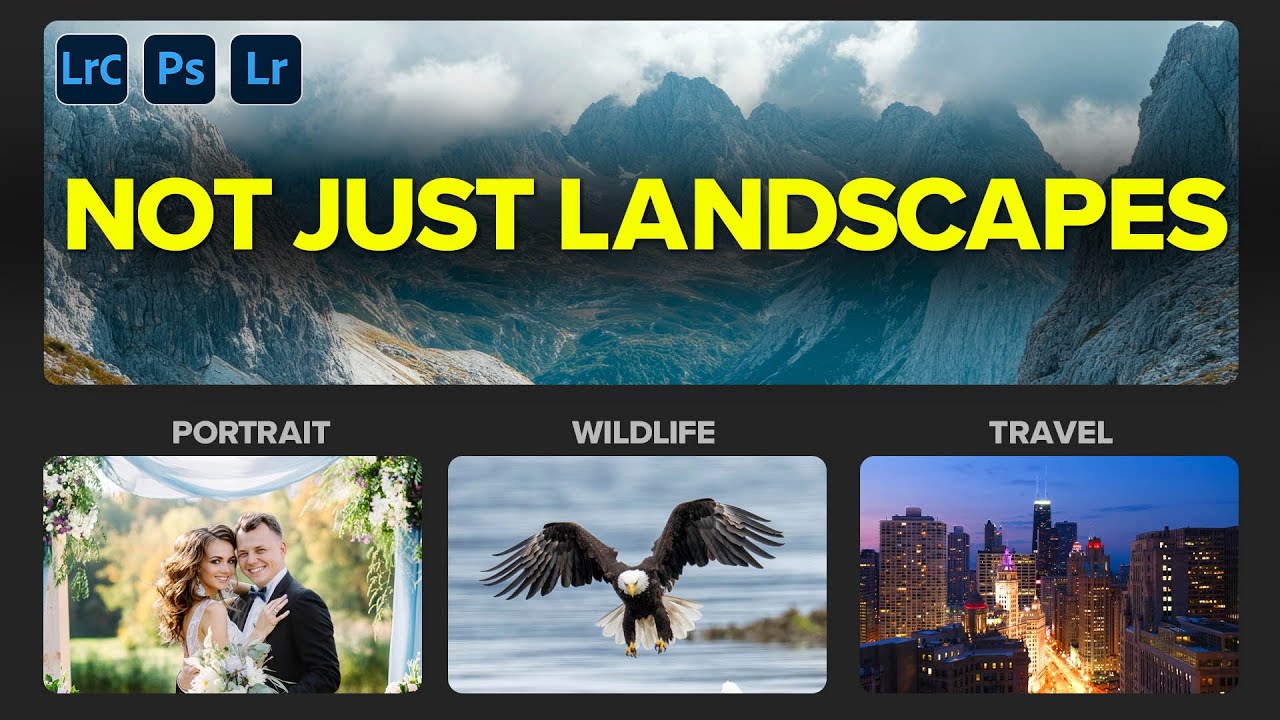
There’s a specific kind of editing frustration I know well. You have a wedding portrait with gorgeous, dappled light falling through a canopy of trees behind the couple. The people look great. The background is flat. You want to push the greens, warm the flowers, give the whole backdrop some life without touching the subjects — and suddenly you’re 45 minutes into a hand-painted mask that still has problems around the bride’s hair. That used to be the tax you paid for environmental control. It doesn’t have to be anymore.
In this Matt Kloskowski tutorial on landscape masking, Kloskowski makes an argument that reframed how I think about Lightroom’s AI masking suite entirely. The landscape masking tools — sky, vegetation, water, ground — weren’t built exclusively for rolling hills and golden-hour coastlines. They’re environment selectors. And if you shoot anything outdoors, that includes you.
What got my attention wasn’t just the efficiency angle. It was the underlying philosophy. Kloskowski talks about his entire editing approach being built around directing a viewer’s attention. Masks are the mechanism for that. Once I started thinking about landscape masks as attention-direction tools rather than landscape-specific utilities, I started finding uses for them in almost every outdoor shoot I process. Here’s how the workflow actually runs.
Step 1: Generate Your Landscape Masks First
 Masking panel open with landscape mask options visible
Before you do anything else with a photo, navigate to the Masking panel in Lightroom or Adobe Camera Raw and run the landscape mask generation. Kloskowski points out that you can generate up to seven separate masks — sky, vegetation, water, artificial ground, and others depending on the scene. The catch is that there’s currently no single “generate all” button, which makes doing this manually feel repetitive. Kloskowski built a free preset that triggers all of them at once, available in the video description, and it’s worth grabbing before you go any further. Treating that preset as part of your startup routine will save you real time across a week of editing.
Masking panel open with landscape mask options visible
Before you do anything else with a photo, navigate to the Masking panel in Lightroom or Adobe Camera Raw and run the landscape mask generation. Kloskowski points out that you can generate up to seven separate masks — sky, vegetation, water, artificial ground, and others depending on the scene. The catch is that there’s currently no single “generate all” button, which makes doing this manually feel repetitive. Kloskowski built a free preset that triggers all of them at once, available in the video description, and it’s worth grabbing before you go any further. Treating that preset as part of your startup routine will save you real time across a week of editing.
Step 2: Assess What the AI Actually Found
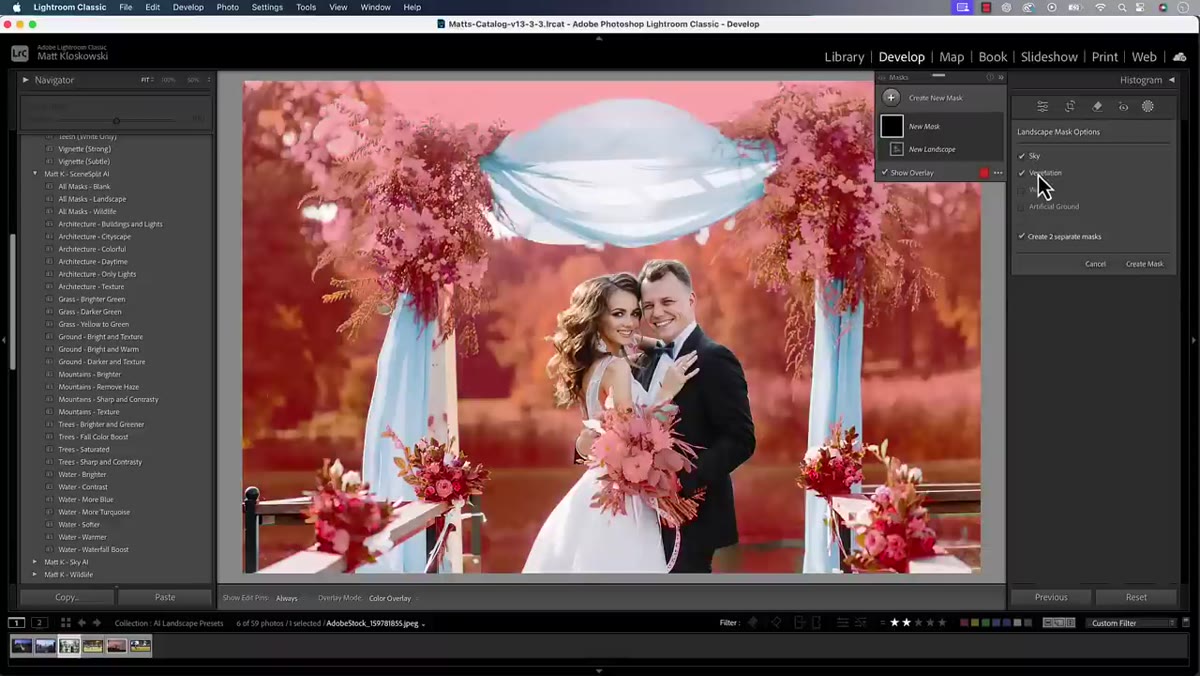 Generated masks shown in panel, vegetation and sky highlighted
After generation, click through each mask individually and check what Lightroom identified. Kloskowski demonstrates this on a wedding portrait taken in front of trees and a small body of water. Some masks will be immediately useful. Others, like a tiny sliver of water in the background, may overlap with surrounding elements enough that they’re not worth the effort. Set your expectations here: not every generated mask will be a clean, ready-to-use selection. Your job at this stage is triage. Identify which masks represent meaningful, editable zones and which ones you’ll skip or merge.
Generated masks shown in panel, vegetation and sky highlighted
After generation, click through each mask individually and check what Lightroom identified. Kloskowski demonstrates this on a wedding portrait taken in front of trees and a small body of water. Some masks will be immediately useful. Others, like a tiny sliver of water in the background, may overlap with surrounding elements enough that they’re not worth the effort. Set your expectations here: not every generated mask will be a clean, ready-to-use selection. Your job at this stage is triage. Identify which masks represent meaningful, editable zones and which ones you’ll skip or merge.
Step 3: Refine Vegetation Masks by Subtracting the Sky
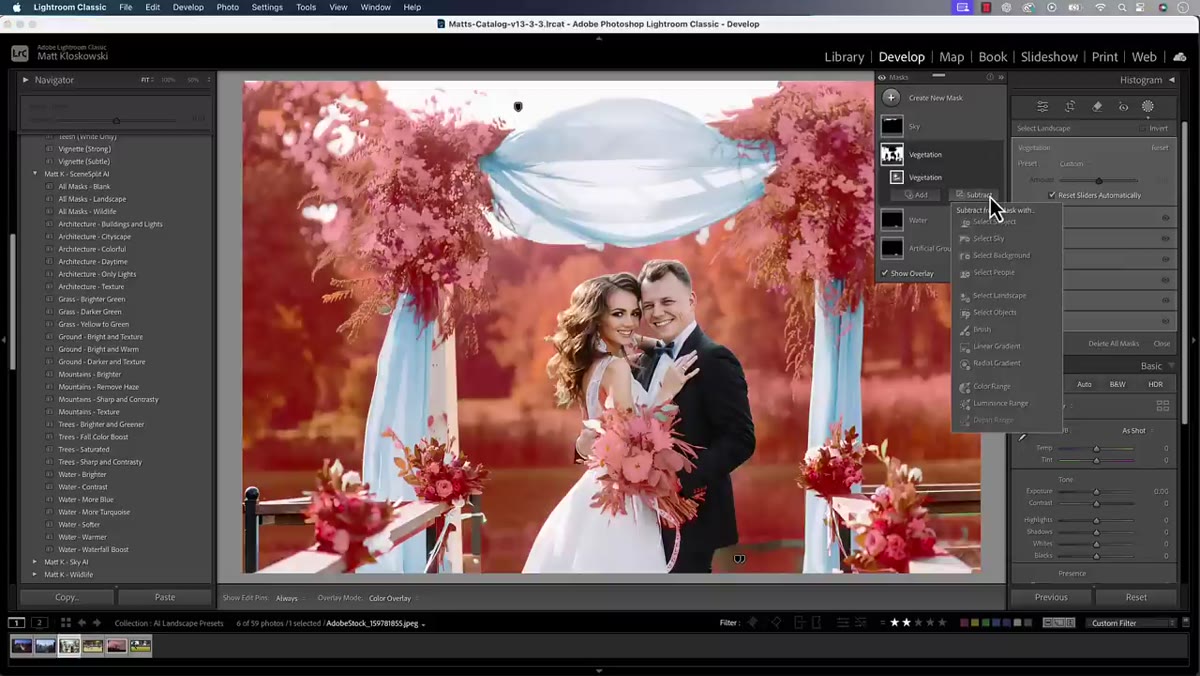 Subtract sky option selected to clean up vegetation mask edge
The vegetation mask is usually the workhorse in environmental portraits and it’s usually the messiest at the edges where foliage meets open sky. Kloskowski’s fix is straightforward: with the vegetation mask selected, use the subtract function and choose “Select Sky.” Lightroom recalculates the boundary, and the bleeding between tree canopy and sky tightens up considerably. This is a small step that produces a disproportionately clean result, and it costs you maybe ten seconds. Do this before you make any tonal adjustments to the mask, otherwise you’ll be chasing edge artifacts after the fact.
Subtract sky option selected to clean up vegetation mask edge
The vegetation mask is usually the workhorse in environmental portraits and it’s usually the messiest at the edges where foliage meets open sky. Kloskowski’s fix is straightforward: with the vegetation mask selected, use the subtract function and choose “Select Sky.” Lightroom recalculates the boundary, and the bleeding between tree canopy and sky tightens up considerably. This is a small step that produces a disproportionately clean result, and it costs you maybe ten seconds. Do this before you make any tonal adjustments to the mask, otherwise you’ll be chasing edge artifacts after the fact.
Step 4: Subtract the Subject to Protect Your People
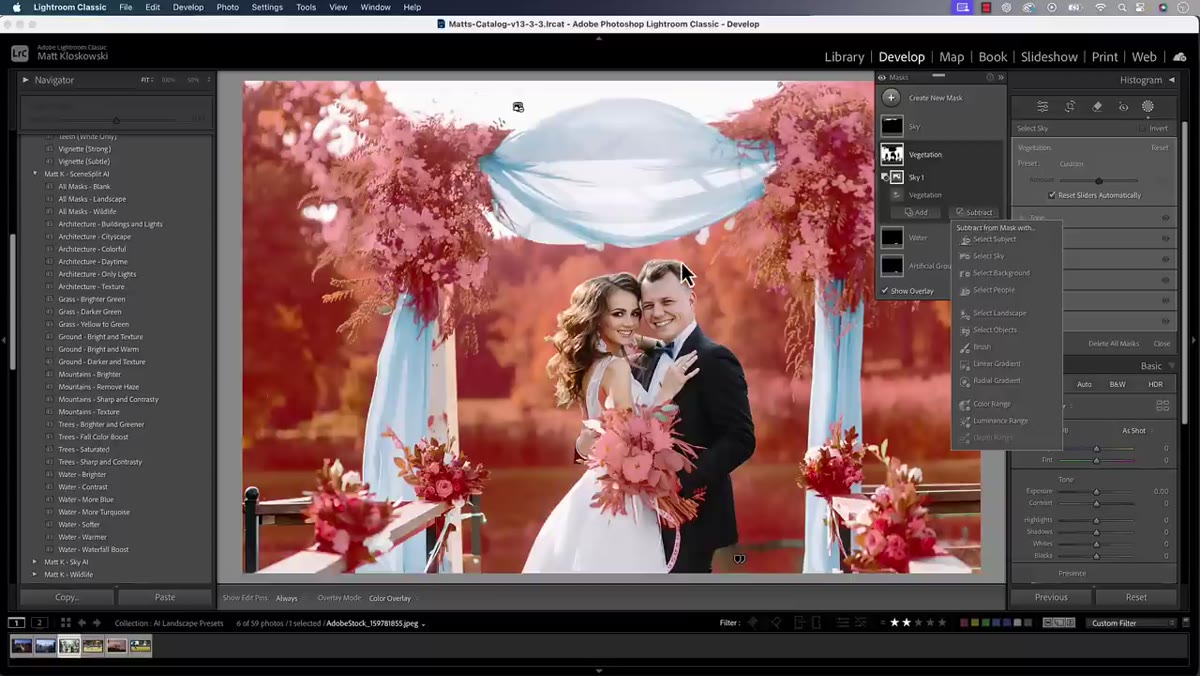 Subtract select subject applied, people cleanly excluded from vegetation mask
Even after fixing the sky boundary, the vegetation mask will often bleed into your subject, especially around hair, shoulders, or any area where the person and the background share similar luminosity values. Still inside the vegetation mask, subtract again, this time using “Select Subject.” Lightroom isolates the human figures and removes them from the vegetation selection. Kloskowski zooms in to show the hair boundary in particular, and the improvement is visible. You now have a mask that covers your environmental elements cleanly, with your subjects fully protected. This is the version of the mask you want before touching any sliders.
Subtract select subject applied, people cleanly excluded from vegetation mask
Even after fixing the sky boundary, the vegetation mask will often bleed into your subject, especially around hair, shoulders, or any area where the person and the background share similar luminosity values. Still inside the vegetation mask, subtract again, this time using “Select Subject.” Lightroom isolates the human figures and removes them from the vegetation selection. Kloskowski zooms in to show the hair boundary in particular, and the improvement is visible. You now have a mask that covers your environmental elements cleanly, with your subjects fully protected. This is the version of the mask you want before touching any sliders.
Step 5: Edit the Environment Independently
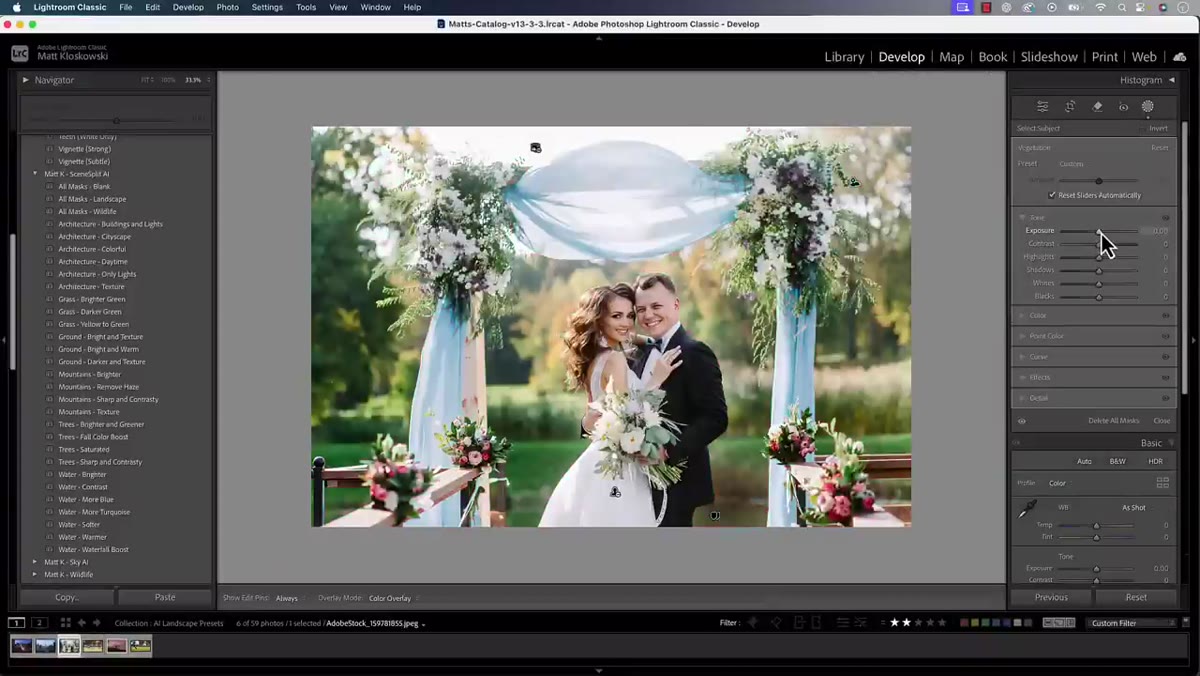 Brightness and saturation sliders adjusted on vegetation mask only
With a clean vegetation mask in place, you have genuine editorial control over the background as its own object. Kloskowski runs through the range of adjustments this unlocks: brightness, contrast, warmth, saturation. He also highlights the Point Color tool inside the mask, which lets you target a specific hue within the already-masked region. If there are purple wildflowers in the background, you can boost their saturation without that adjustment touching the sky, the ground, or your subjects. This level of specificity inside a mask is where the workflow earns its keep. You’re not just editing a region, you’re editing a color within a region.
Brightness and saturation sliders adjusted on vegetation mask only
With a clean vegetation mask in place, you have genuine editorial control over the background as its own object. Kloskowski runs through the range of adjustments this unlocks: brightness, contrast, warmth, saturation. He also highlights the Point Color tool inside the mask, which lets you target a specific hue within the already-masked region. If there are purple wildflowers in the background, you can boost their saturation without that adjustment touching the sky, the ground, or your subjects. This level of specificity inside a mask is where the workflow earns its keep. You’re not just editing a region, you’re editing a color within a region.
Step 6: Add Subject and People Masks as Separate Layers
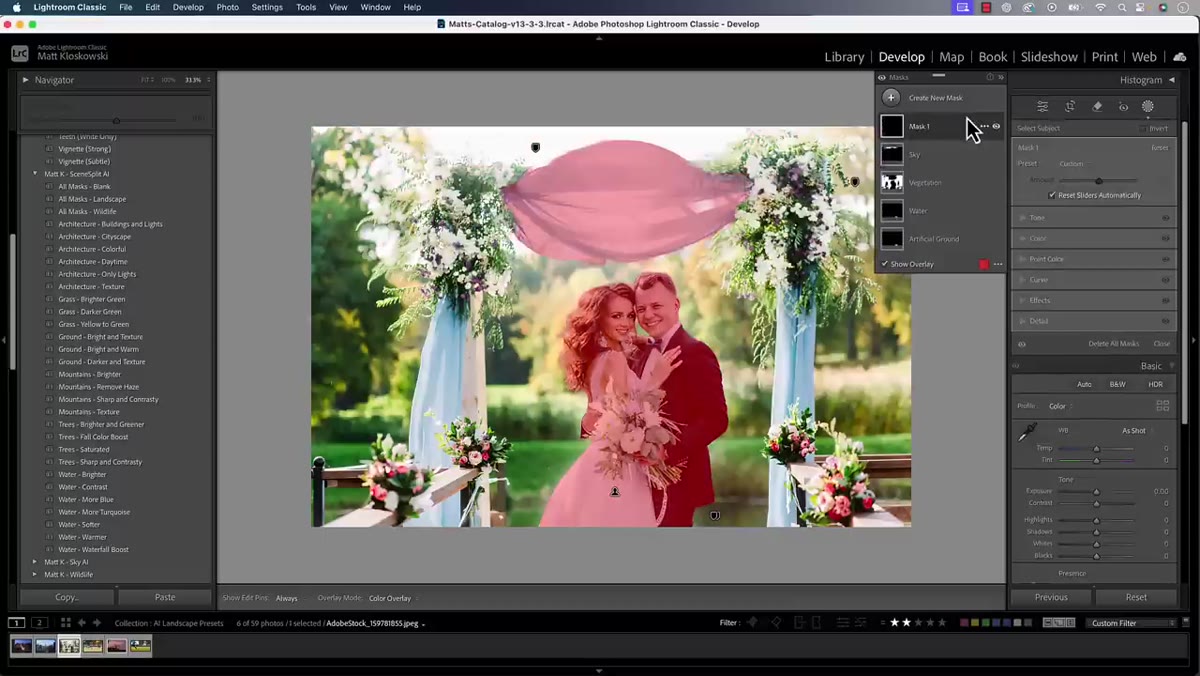 New mask created using Select Subject alongside existing landscape masks
Once the environment is dialed in, don’t close the masking panel and start over. Stay in it. Create a new mask using “Select Subject” to bring your main figures into the same workflow. Kloskowski also shows the “Select People” option, which can identify and individually mask multiple subjects in a single frame. Now you have your environmental masks and your subject masks operating in parallel, each with their own adjustment sets. The landscape masks didn’t replace your subject work. They just handled the environmental layer first so you can give the subjects the same focused attention.
New mask created using Select Subject alongside existing landscape masks
Once the environment is dialed in, don’t close the masking panel and start over. Stay in it. Create a new mask using “Select Subject” to bring your main figures into the same workflow. Kloskowski also shows the “Select People” option, which can identify and individually mask multiple subjects in a single frame. Now you have your environmental masks and your subject masks operating in parallel, each with their own adjustment sets. The landscape masks didn’t replace your subject work. They just handled the environmental layer first so you can give the subjects the same focused attention.
How I’d Extend This in a Compositing Context
I work primarily in Photoshop, doing composites for commercial projects, so Lightroom is my pre-comp stage rather than my final destination. But this masking workflow has changed how I prep source images before I ever open a PSD. When I’m integrating a subject into an outdoor environment, both elements need to feel like they belong to the same light. Running landscape masks on my background plate in Camera Raw lets me identify and adjust the vegetation, ground, and sky zones before I start building the composite. I get a much clearer read on the background’s true luminosity and color temperature, which makes my light matching in Photoshop more precise from the start. If you use Lightroom as a gateway to further editing, treat these masks as diagnostic tools as much as adjustment tools.
The single most important idea in this tutorial is one Kloskowski keeps returning to: these masks exist to remove the grunt work so you can spend your time on actual editing decisions. The AI isn’t making your creative calls. It’s just building the scaffolding faster than you could by hand. Once you stop thinking of landscape masking as a feature for landscape photographers and start thinking of it as an environment-parsing system for anyone who shoots outside, its usefulness expands immediately.
Watch the full tutorial on YouTube to see Kloskowski walk through the full portrait example, and check the video description for the free preset that generates all landscape masks in a single click.
Comments
Leave a Comment